
Introduction
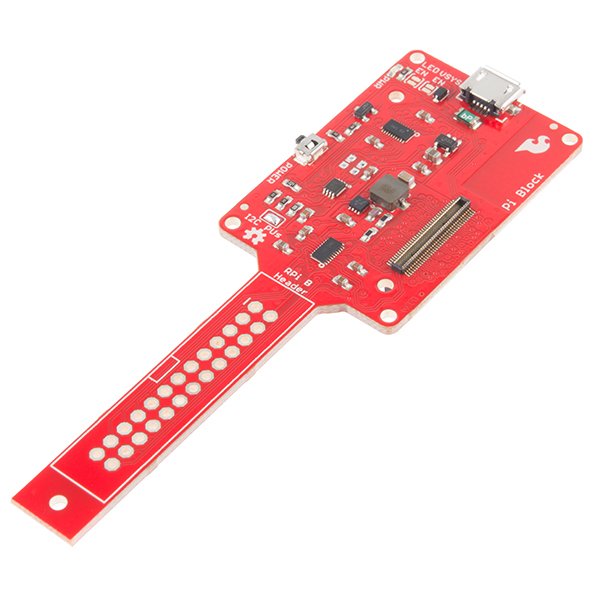
The Pi Block breaks out and level shifts several GPIO pins from the Intel Edison. It presents them in the same configuration as a Raspberry Pi Model B.
Suggested Reading
If you are unfamiliar with Blocks, take a look at the General Guide to Sparkfun Blocks for Intel Edison.
Other tutorials that may help you on your Edison adventure include:
- USB Power – used to provide 5V to Pi Block and power the Edison. Note that the data lines are not connected to the Edison.
- Power Button – The power switch is connected to the “PWRBTN” line on the Edison. This give the user the ability to place an Edison in sleep or power down the module completely. This does not affect power to other Blocks in the stack.
- Power LED – The power LED illuminates when power is present on VSYS. This can come from the onboard USB Power or any other powered Block in the stack.
- Expansion Header – The 70-pin Expansion header breaks out the functionality of the Intel Edison. This header also passes signals and power throughout the stack. These function much like an Arduino Shield.
- LED Jumper – If power consumption is an issue, cut this jumper to disable the power LED.
- VSYS Jumper – By default, a USB cable must be attached to the USB Power port to provide power to the 5V pins on the RPi B Header. You can power the Edison and Pi Block from another Block (e.g. Base Block), but there will not be 5V on the pins labeled “5V”. By closing this jumper, you can power the Edison and Pi Block from another Block, and ~4.2V (VSYS) will appear on the pins labeled “5V”.
- RPi B Header – Same configuration as the old Raspberry Pi Model B pinout.
Using the Pi Block
To use the Pi Block, attach an Intel® Edison to the back of the board, or add it to your current stack. Blocks can be stacked without hardware, but it leaves the expansion connectors unprotected from mechanical stress.
We have a nice Hardware Pack available that gives enough hardware to secure three blocks and an Edison.
You can put headers on the Edison side, which gives you easy access to the pin labels. Note that this pinout is mirrored from the Raspberry Pi Model B pinout.
Alternatively, you can populate the back side of the Pi Block with headers. This method gives the same pinout as a Raspberry Pi Model B. You could, in theory, swap the Edison in for your Raspberry Pi on an existing project, or use Raspberry Pi accessories (e.g. Pi Wedge).
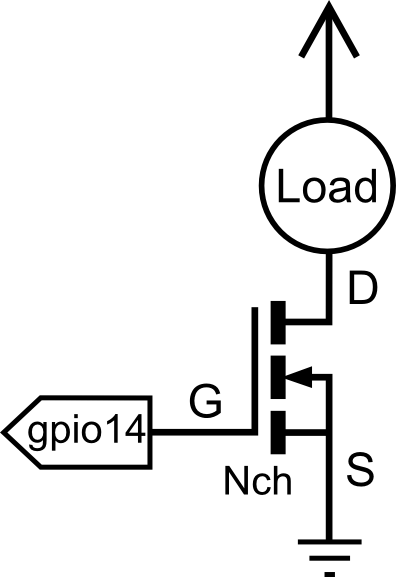
Using the Pi Block as an output device
If you want to use the Pi Block to control high power LEDs or relays, an external transistor or MOSFET will be required. It is possible to illuminate a small LED directly from the level shifter. It may not be as bright since the current output of the TXB0108 level converter is very low (~5ma).
For more detail: SparkFun Blocks for Intel® Edison – Pi Block