
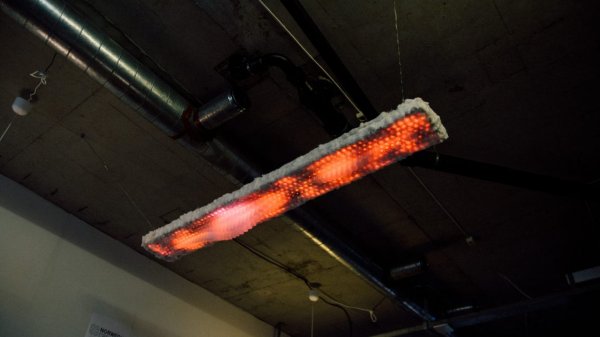
Sometimes, when we need to learn how to do something, we create a project out of it. This was one of those times, and what we wanted to learn was to control a bunch of individually controllable LEDs with Fadecandy and make it react to Facebook events.
The Design
We are huge fans of parametric design, and we wanted to explore this in the project. We ended up with a large grid of 8×64 LEDs in a pattern where every LED is in the center of virtual hexagons. Above ~200 of these LEDs we would 3D-print thin, hollow and transparent hexagonal columns in different heights. The height and position of these columns would be designed parametically. Above the remaining ~312 LEDs we would glue on cotton the diffuse the light and give it a “cloud look”.
Going Parametric
Using Octave (a free alternative to MATLAB, which we grew up with on the univeristy), we created a few trigonometric functions which decided the shape of the hexagonal “mountain” across the lamp. Here’s the code:
x = linspace(1,64,64);

a1 = 0.005;

a2 = 0.007;

a3 = 0.015;

a4 = 0.07;

a5 = 0.05;

a6 = 0.05;

a7 = 0.008;

a8 = 0.001;

f1 = sin(0.1*x)+1;

f2 = cos(0.25*x)+1;

f3 = sin(0.03*x.^2)+2100;

fq = 0.001*(-(x-32).^2 + 965);

y1 = a1*(f1+f2).*f3.*fq;

y2 = a2*(2*f1+f2).*f3.*fq;

y3 = a3*(f1+2*f2).*f3.*fq;

y4 = a4*(0.5*f1+2*f2).*0.5.*f3.*fq;

y5 = a5*(1.2*f1+f2).*f3.*fq;

y6 = a6*(f1+0.1*f2).*f3.*fq;

y7 = a7*(f1+f2).*f3.*fq;

y8 = a8*(f1+f2).*f3.*fq;

A = 0.4*[y1;y2;y3;y4;y5;y6;y7;y8];

B = A - 10;

threshold = 5;

k = 0;

for i = 1:8 for j = 1:64 if (B(i,j) < threshold) B(i,j) = 0; else k = k +1; endif end

end

k

figure(1)

surf(B)
What we basically do here is creating 8 different trigonometric functions, one for each row of LEDs, creating an 8×64 matrix with values equal to the height of the hexagonal columns in milimeters. Here’s a visual representation of the matrix in Octave:
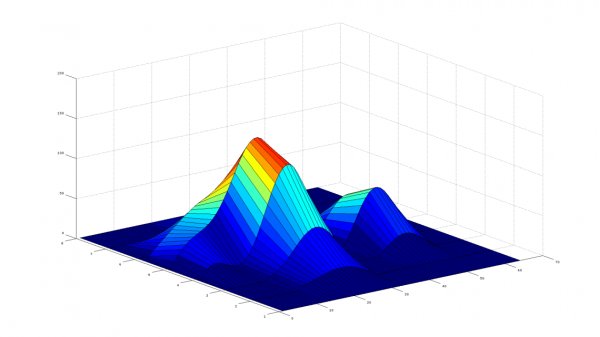
The function coefficents were found just by trial and error, using the surf() function.
CAD
As usual we wanted to make a 3D-model of the whole thing to verify the final design before starting building it.
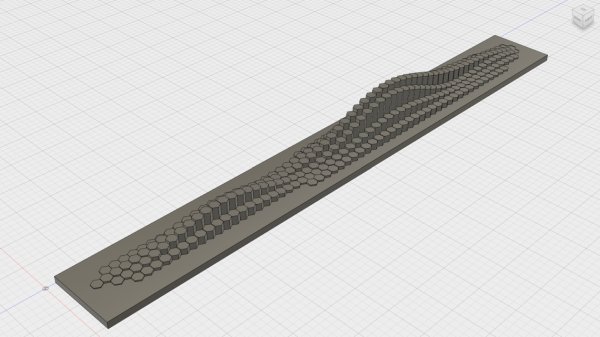
This lamp was built before we got access to a large CNC machine, which is one of the main reasons the rest of the design is rather simplistic. The screenshot is actually seen from below since the lamp would hang upside down from the ceiling with the LEDs and columns hanging below the main structure.
In addition, we modelled each column with 0.9 mm thick walls and a 0.6 mm thick “cap” for 3D-printing purposes.
Building the Lamp
3D-Printing
We printed all the hexagonal columns individually with our good ol’ Solidoodle 3 with transparent ABS, which was quite time consuming.
Read More: Designing and Building an Interactive LED Lamp – Technical Insights