
Internet of Things Toilet uploads flush events and toilet paper roll change out events to Google Drive spreadsheet.
How does it work? – An aquarium liquid level sensor float switch detects toilet tank level; flushing lowers the level closing the switch. A photo cell located in socket (blind hole) of the toilet paper holder spindle mounting arm detects when the spindle is removed to change out the toilet paper (letting light hits the photo cell, thus “closing the switch”).
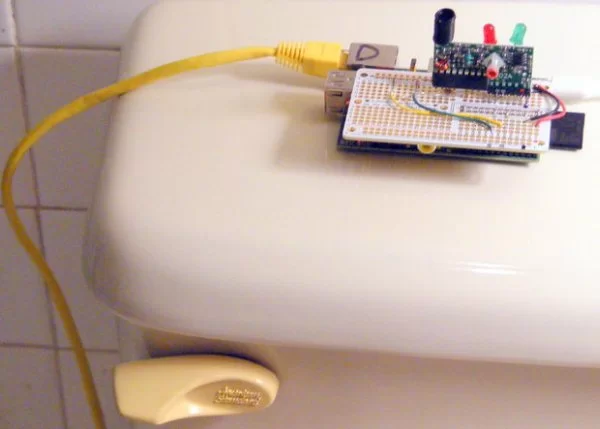
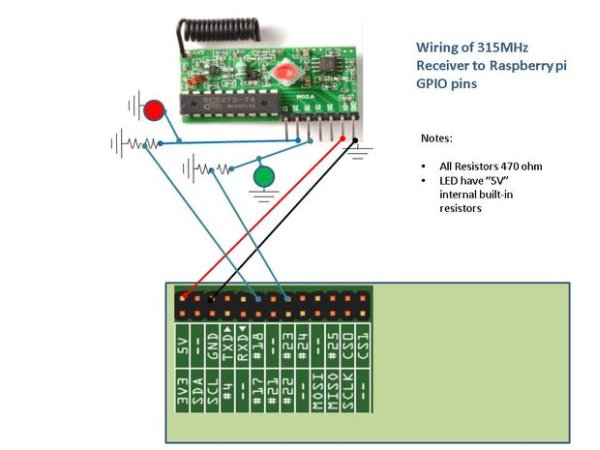
Signals from these two sensors are sent (wirelessly – despite what the intro photo implies) via a hacked two button key fob; that is, sensor switch closure effectively pushes a button. A 315 MHz receiver module connected to a Raspberry Pi receives switch closure signals.
The Raspberry Pi, using Python API gspread, transmits the event data to Google Drive spreadsheet.
See system layout image.
How hard and how much $ ? – Assuming you already have a Raspberry Pi, and you know how to load and run Python programs, and can build basic electronic circuits – this is pretty easy & quite inexpensive (< $40) IoT (Internet of Things) project.
Why do this? – (1) To explore IoT on the cheap, and (2) because I can.
Step 1: Stuff you need
Assuming you already have a Raspberry Pi, additional stuff you'll need …
1 each:
Keyfob 2-Button RF Remote Control – 315MHz (products/1391) PID: 1391 $6.95
Simple RF M4 Receiver – 315MHz Momentary Type (products/1096) PID: 1096 $4.95
Photo cell (CdS photoresistor) (products/161) PID: 161 $0.95
Stacking Header for Raspberry Pi – 2×13 Extra Tall (products/1112) PID: 1112 $1.95
Adafruit Half-size Perma-Proto Raspberry Pi Breadboard PCB Kit (products/1148) PID: 1148
Radio Shack 271-009 1/8-Watt 470 Ohm Carbon-Film Resistors (4 req'd, but 5 in the pack)
Amazon.com, 1 each:
Aquarium Wired Liquid Water Level Sensor Float Switch
http://www.amazon.com/gp/product/B006Z965BI/ref=oh…
(1 req'd) – 5mm Through-hole LEDs with Built-in 5V Resistor, Red # 604-WP7113ID5V
(1 req'd) -5mm Through-hole LEDs with Built-in 5V Resistor, Green # 604-WP7113SGD5V
(2 req'd) – 2 pin Female Headers # 517-929870-01-02-RB
(2 req'd) – 2 pin Male Headers # 571-4-103321-4
plus misc stuff like hookup wire, solder …
Step 2: Mount Liquid Level Sensor Float Switch in Toilet Tank
Build – Bend a coat hanger into a float switch bracket as shown. The bracket should position the switch clear of the toilet tank sidewall, and hang far enough down so the switch float ring is fully up when the toilet is “un-flushed”. Position bracket along tank back wall so it doesn't interfere with anything. Secure bracket and switch leads to the top tank wall with duck tape.
Check – Connect a multimeter leads to switch to check continuity.
With the toilet un-flushed the switch should be open, flushing the toilet should close the switch, and finally as the tank refills the switch should return to open.
Note – You now have a sensor to detect when the toilet is flushed
Step 3: Mount Toilet Roll Sensor (photo cell)
Build – Drill 1/4 inch hole centered inside the spindle roll holding “blind hole” of one arm of the toilet paper holder as shown. Note – the photo cell will be installed into this 1/4 inch hole – so with roll spindle installed, the photo cell will be dark, and when the spindle is removed, light will reach the photo cell.
To prevent light from reaching the the photocell from the back side, place photo cell leads through a small piece of black plastic (I cut mine from microwave dinner plate). Solder photo cell leads to short lengths of wire (insulate with heat shrink tubing) and a 2 pin male header. The wire needs to be long enough to reach the two button key fob placed next to the toilet paper roll holder, see photo.
With black electrical tape, secure photo cell “light tight” to arm backside.
Check – Connect a multimeter to photo cell leads to check resistance. With the toilet paper roll installed the photo cell should be dark and the resistance high (I measured 4 Mohm). Remove the toilet paper roll, room light should now reach the photo cell and the resistance should be much lower (I measured 14 Kohm).
Note – You now have a sensor to detect when the toilet paper roll is replaced
For more detail: Internet of Things Toilet Uploads Events to the Cloud (Raspberry PI)