
Overview
This guide walks through the construction and configuration of a home media center from parts to running system. After following these steps, you will have a running Kodi media server on a Raspberry Pi 2 in an Altoids tin case, ready for you to attach a thumb drive or hard drive with your media. These steps detail the method I used in my build with the hardware and software choices I made, but there are other options that you can choose. I included some notes about alternative choices in the steps where alternatives are available. Although the steps in this guide are specific, you should be able to adapt the general method for some of the alternative choices.
I chose to use the following components and software.
- Raspberry Pi 2 Altoids tin case
- Xbian 1.0 Release Candidate 2 operating system
- Remote control input via IR receiver wired to GPIO
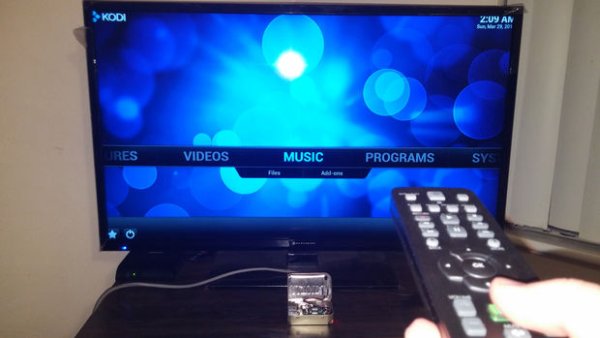
When I built my media center, I did most of my work with the Raspberry Pi 2 plugged into a desktop computer monitor and set of speakers. These steps could have been done while plugged into an HDMI capable television.
About This Project
Difficulty: Moderate
Total time: 5 hours (rough guess). 2 to 3 hours if you do not set up a remote control (Step 6).
This project requires prior experience with
- Dremel to cut metal
- Linux command line and configuration files (for Step 6 only)
List of steps
Step 1: Gather Parts
Step 2: (Optional) Work around “Xenon death flash” bug
Step 3: Make a case from an Altoids tin
Step 4: Download XBian onto a MicroSD card
Step 5: Install XBian on the Raspberry Pi 2
Step 6: (Optional) Install and configure infrared remote control capability
Step 7: Updates and next steps
The instructions in Step 6 enable the media center to accept commands from any remote control you have or purchase. I bought a remote control at a thrift store. If you have a television that supports HDMI CEC (Consumer Electronics Control), you do not need to perform Step 6. Instead, you can control the media center with your television's remote control without any additional configuration required.
Software
Kodi – A free and open source media server and entertainment center. Formerly XBMC. http://kodi.tv/about/
LIRC – Linux Infrared Remote Control. A software package that decodes digital infrared signals of most commercial remote controls. Included by default as part of XBian. http://www.lirc.org/
XBian – A GNU/Linux based operating system for the Raspberry Pi, Raspberry Pi 2, and other small computing devices that runs the Kodi software. http://www.xbian.org/what-is-xbian/
Step 1: Step 1: Gather Parts
Parts
- Raspberry Pi 2 model B
- Empty Altoids tin
- MicroSD card (at least 2 GB)
- AC to microUSB power adapter for the Raspberry Pi 2(output 5 volts, 1 to 2 amps)
- Ethernet cable
- HDMI cable
- Television with HDMI input or computer monitor with HDMI input and speakers
- Remote control
- Three female to female jumper wires, about 20cm long
- Vishay Semiconductor TSOP 38238 IR receiver
Tools
- Duct tape or electrical tape
- Mounting putty (optional)
- Scissors or pocket knife
- Permanent marker
- Dremel with metal cutting bit
- Metal file
- Computer which supports MicroSD cards and has SSH client software (Step 6 only)
- USB keyboard USB mouse (optional)
- Hot glue (optional)
Alternatives
Instead of using the Raspberry Pi 2, you can build a media center using an earlier version of Raspberry Pi. Prior to this project, I completed a similar one using a Raspberry Pi model B rev. 2. The advantage of the Raspberry Pi 2 is that it has a faster processor and more memory, which should make the media center load and respond faster.
In addition to XBian, there are several other operating systems to run Kodi on the Raspberry Pi. See Step 4 for a list of other current software distributions.
Step 2: Step 2: (Optional) Work around “Xenon death flash” bug
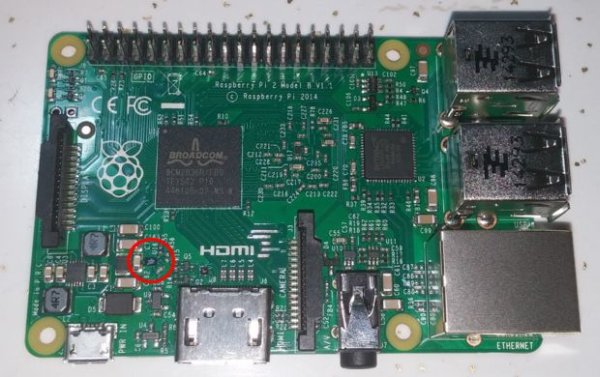
The Raspberry Pi 2 has a peculiar bug which causes it to power down when exposed to intense flashes of light of certain wavelengths, such as those of laser pointers and xenon flash bulbs. Although this will not damage the Pi, a running system could experience data corruption. This only occurs under particular conditions, so if you do not expect to take flash photos of the board with a traditional xenon flash bulb, you do not have to do anything about the bug. The easiest workaround is to cover the affected part, device U16, with opaque tape or glue. For more information, see http://www.raspberrypi.org/xenon-death-flash-a-fr…
Parts and tools
- Raspberry Pi 2
- Electrical tape, duct tape, or mounting putty
- Scissors or pocket knife
Instructions
- Identify device U16 on the Raspberry Pi 2 board. It has a shiny surface, and it is located between the HDMI port and the Raspberry Pi logo.
- Cut a small piece of tape and place it over device U16, or cover it completely with a small blob of putty. The tape or putty should completely cover both the top and sides of device U16.
Note that I have not tested my Raspberry Pi with this tape as pictured because I do not expect anyone to take photos with traditional cameras while the media center is running. It may actually take a larger piece of tape to cover the device properly.
Step 3: Step 3: Make a case from an Altoids tin
Alternatives
Instead of using an Altoids tin case, you can purchase or 3D print a plastic case, or not use any case at all. Using a case will protect the Raspberry Pi. The Pi must always rest on a surface that is non-conductive to prevent damage from a short-circuit.
Parts and tools
- Empty Altoids tin
- Permanent marker
- Dremel with metal cutting tip
- Duct tape
Instructions
- Clean the Altoids tin.
- Carefully hold the Raspberry Pi 2 board up to the case to see where openings need to be made. Hold the board and the case so the audio, HDMI, and MicroUSB ports will be on the side of the tin with the hinges.
- With the permanent marker, mark the areas of the tin to be cut away. The following areas must be removed (identified as if the side with the hinges is away from you).
- The whole left side and a thin edge from both the base and the lid, starting just ahead of the middle of the curved corners. This will provide an opening for the left two corners of the board, the Ethernet port, and the USB ports.
- A small strip of metal across the lower part of the right side, and a corresponding portion of the base. The opening should begin just before the beginnings of the curved corners of the tin. This will accommodate the right two corners of the board and the microSD card once it is inserted.
- A rectangular section from the back side of the tin around the audio port.
- A rectangular section from the back side of the tin around the HDMI port.
- A small rectangular section from the back side that extends the strip taken from the right side (corners and microSD strip) far enough to provide an opening for the microUSB connector.
- Double check that all the marked areas will fit the board in one position by carefully holding it up to the Altoids tin again and inspecting the marked areas.
- Using a Dremel, carefully cut out the marked sections of the tin, then remove any metal shavings and file the edges (they will be sharp).
- Carefully fit the Raspberry Pi into the case to verify that it fits correctly. Insert the side with the HDMI port into the case first, then gently press the rest of the board into place. Repeat the cutting and filing until the board fits easily but stays secure.
- Remove the Raspberry Pi, then wrap the base of the case with duct tape for insulation.
For more detail: Raspberry Pi 2 Media Center: Kodi on XBian