
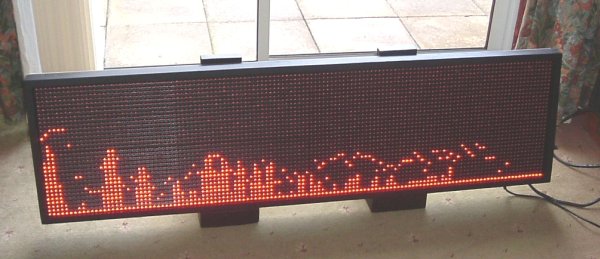
| This is a 128×32 pixel LED display built from 8 “P10” LED Panels and a Raspberry Pi board. The code its running is takes UDP data from another computer and displays the pixels in either one or two bits per pixel. The sign is pictured here being driven from an empeg mp3 player. It can be driven by anything with ethernet (a network port). |
The sign is constructed from wood, its about 1.3m wide. It has a matching stand which it just sits on, the sign can be removed and even wall mounted if brave.
I sourced the led panels from ebay Look for Red led display module P10 32×16 LED
If you do want to make one you need 8 panels, but it's best to have a spare in case one gets damaged.
Case Construction
The box is made from two different sizes of wood with a hardboard back. The frame is glued and screwed together, the slats are placed in to line up with the mounting holes in the P10 boards. The P10 boards sit far enough from the front face for a 3mm red perspex panel to mount in front. Corner sections made from painted PCB material screwed with black screws hold the corners of the perspex panel.
P10 Boards
The term serial in the description refers to serially loading of shift registers, not RS232 or SPI.
The P10 boards daisy chain together. This sign uses a strange arrangement, the top 4 boards are daisy chained right to left, the bottom 4 boards are mounted upside done and daisy chain left to right. This arrangement allows the cables to be short, this helps with clocking the data fast. The 2 bits per pixel code updates the display at more than 400 complete frames a second.
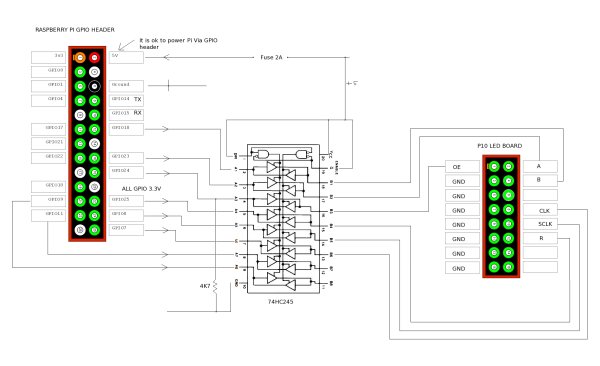
The P10 boards use a set of shift registers, these are serially loaded with pixel data. The pinout of the P10 is pretty simple, lines “A” and “B” are a two address bits, these selects which row is active. SCLK changes state to update the active row (strobe). R is the pixel data (red), CLK is the pixel clock. OE is used to enable/disable the shift registers. This turns all the leds On or Off. At any one point 1024 leds can be one, the display is 4096 leds in total so its required that you keep clocking them to update the display. The raspberry Pi is amply fast enough to do the job. Pictured left is a minimal level converter for 3v to 5v logic to drive the panels. You probably don't need it as I suspect that the panels will work with the 3 volt signals.
 A PC Power supply is wired to the sign. The unit has 3 red and black 20Amp cable pairs, one pair connects to the top 4 panels, the second pair connect to the bottom 4, the final pair is used just to power the raspberry Pi. This separate power for the Pi board is important. Each panel takes a worst case 4 Amps. With 8 Panels connected that is a worst case total of 32 Amps, under this type of current draw the 5v voltage will tend to sag, it may even drop below 3 volts. My experience is that this causes the RPi to crash. To prevent problems I power the Pi board from the ATX power supply standby power line, this line is regulated separately from the main 5v supply. To connect the PSU to the sign I purchased a PC motherboard power extension cable and cut one connector off, this leaves an ATX socket with wires. I soldered the wires to the 3 5v red and black wires having threaded heat shrink along the cables first. If done carefully this ends up moderately neat, though not exactly pretty. It does mean the sign has an external power unit. I could have built it into the sign case, but that would make the box much deeper than required so I thought it a reasonable compromise.
For more detail: Raspberry Pi driven 128×32 LED sign