
Step 1: Materials
- Raspberry Pi, AC-to-DC 5V power adapter, plastic enclosure
I am using Raspberry Pi 2, with Raspbian installed.
Cost $45.0 - USB WiFi adaptor,
I’m using Edimax Wifi adaptor.
Cost $10.0 - DC motors x2, wheels x2, car frame, acrylic sheet x2, motor bracket x2, brass stud x8, shaft coupling x2, screw xn,
I purchased them from Here
The gear ratio of the motors I got is 1:34. I think the one of 1:21 should be better. You can use any other DC motors as long as the speed and the torgue is large enough for your robot.
Cost $50.0 - AC-to-DC 12V power adapter
Cost $4.0 - L293D IC,
I purchased it from Here.
Cost $3.0 - MPU6050 module,
I purchased it from Here.
Cost $3.0 - Breadboard: 830 tie-points
Cost $4.0 - Jumper wires,
Male-to-Male wires xN,
Male-to-Female wires xN
Cost $3.0 - Cable Tie x8
Cost $1.0 - Total cost about $123.0
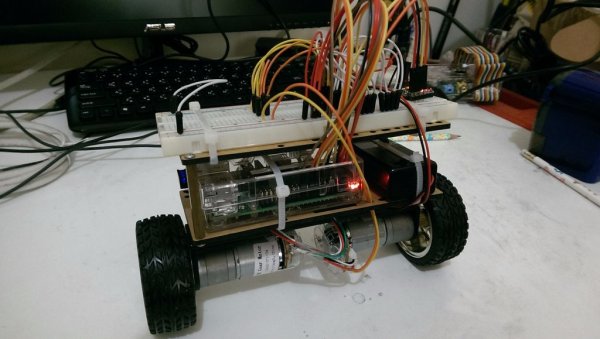
Step 2: Frame Installation
Please follow the installation Instructions to build the car frame.
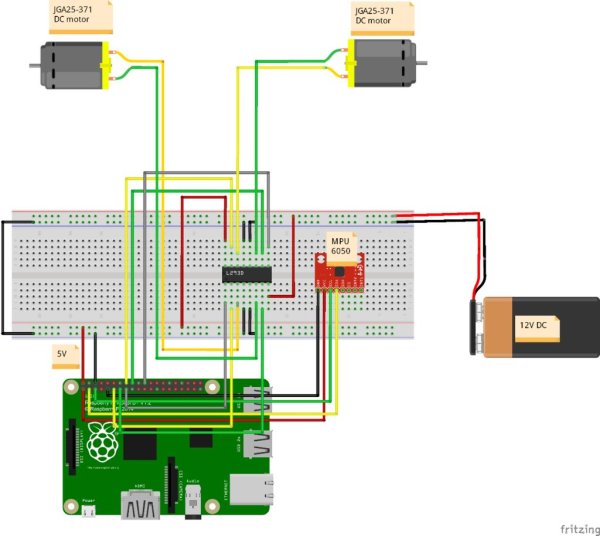
Step 3: Circuit Installation
Please follow the circuit diagram to install components to the breadboard and insert connection to you RPi.
Let me have a short explaination of the circuit.
The interface of the MPU6050 module is i2C. There are four pins have to be connected to Raspberry Pi GPIO as below.
- MPU6050 VCC –> RPi GPIO header pin#1 (3.3V),
- MPU6050 SDA –> RPi GPIO header pin#3 (SDA)
- MPU6050 SCL –> RPI GPIO header pin#5 (SCL)
- MPU6050 GND –> RPi GPIO header pin#6 (GND)
To drive DC motors, I am using the popular L293D IC.
- RPi GPIO header pins (pin#11, pin#13, and pin#15) are for the left wheel.
They have to be connected to L293D (pin#2, pin#7 and pin#1) - RPi GPIO header pins (pin#16, pin#18, and pin#22) are for the right wheel.
They have to be connected to L293D (pin#15, pin#10 and pin#9) - L293D pin#3 & pin#6 –> left motor M+ and M-.
- L293D pin#14 & pin#11 –> right motor M- and M+.
To drive L293D, we should have extra power with enough voltage. What I'm using is a 110V AC-to-DC 12V adaptor and then connect to L293D.
- L293D Vs –> 12V DC
- L293D Vss –> 5V DC
- L293D pin#4, #5, #13, #12 –> GND
Step 4: Tight them up
Please use the cable ties to tight all the parts up.
Step 5: Software Installation
I’m assuming that you already installed the Raspbian with WiFi adapter and you know how to use ssh to login to your RPi. We will start from installing i2C kernel module and wiringPi library.
The i2C kernel module is to help us to access MPU6050 and the WiringPi library is to help us to access GPIO.
Here are the instructions:
To install i2c kernel module,
$ sudo apt-get install libi2c-dev
To setup i2c kernel module,
$ sudo vi /etc/modules
Add following lines into the file.
i2c-bcm2708
i2c-dev
We also have to check a blacklist file.
$ sudo vi /etc/modprobe.d/raspi-blacklist.conf
Make sure the following two lines are commented, then save.
#blacklist spi-bcm2708
#blacklist i2c-bcm2708
Check raspi-config
$ sudo raspi-config
In Advanced Options -> I2C, please enabled it.
Then, reboot your RPi
$ sudo bash; sync;sync;reboot
When it goes back, check if the i2c driver kernel module is loaded automatically.
$ lsmod |grep i2c
i2c_dev                 6027  0
i2c_bcm2708             4990  0
Then, let's install the wiringPi library.
Install git first.
$ sudo apt-get install git-core
Download and install wiringPi
$ cd
$ git clone git://git.drogon.net/wiringPi
$ cd wiringPi
$ sudo ./build