
This page presents my implementation of a smart thermostat using the Raspberry Pi board as the controller, with an added Pi Plate expansion board. This thermostat is controlled using a web page interface, so it can be controlled via any personal computer, smart phone or tablet with a regular browser. There is even a possibility to control it using another application via TCP/IP socket messages.
DISCLAIMER: I have created this web page to share my experience on using the Raspberry Pi in a thermostat application. You should not consider the solution detailed below as a final product to copy. You should rather see this as providing ideas on how to design your own smart thermostat. If you do not feel capable of understanding this project in its entirety, do not use it. Besides, I am not claiming to be a good software writer… So use it at your own risk! Consider the potential hazards that playing with heating and air conditioning systems represent. I shall not be held responsible for any mishaps that may occur as a result of implementing this thermostat solution.

|
BACKGROUND
|
The advent of the Raspberry Pi board opened a new world and allowed for elaborate thermostat feature development via simplified programming. Using any microcomputer platform like PIC or Arduino is possible, but the Ethernet stack, a web server and plotting functions are not something you can easily develop on such hardware. The Raspberry Pi, being a full computer running Linux, makes the above task development relatively easy, as support for these features is built-in.
|
IMPLEMENTATION
|
The idea behind this smart thermostat project is to provide the same basic features as a regular programmable thermostat to begin with, namely:
- Current temperature and humidity measurement and display,
- Seven-day programming for both heating and cooling modes,
- 4-wire interface (Common, Heat, Cool, Blower),
- Manual program override (and self-return to program),
- Built-in clock.
This implementation adds the following nice features, which really differentiate this from a regular thermostat:
- Web interface, touch-friendly, for control and programming instead of LCD display and buttons,
- Seven-day programming of blower cycles to recirculate air at predetermined periods of the day,
- Outdoor temperature display via weather service RSS feed query,
- Ability to control the thermostat using text commands sent through TCP/IP socket messages. I use this to control from my home phone Asterisk PBX.
- Solid state relays (PhotoMOS) instead of dry mechanical relays,
- Web authentication by means of user ID and password,
- Temperature and On-Off cycle plotting on a per-day basis, in .PDF or .PNG output format, with a seven-day back log.
- An optional Watchdog function using a separate autonomous PIC micro-controller. Safety First!
The Software Platform
The Linux distribution I used on the Pi is Raspbian, a free operating system based on Debian optimized for the Raspberry Pi hardware. I elected to use Python 2.7 scripts to program this thermostat. Much of the required python libraries are already installed as part of the Raspbian Linux disto. The following are the Python libraries I use to augment the Python experience on Raspbian:
- Flask as the web server. It is lighter than Apache and it integrates seamlessly into Python. Follow these instructions to install Flask on the Pi.
- RPIO to control the Raspberry Pi General Purpose Input Output (GPIO) pins. It is an improved version of RPi.GPIO. It also allows to manage interrupts from I/O pins and TCP/IP Socket within Python with just a few commands. Follow these instructions to install RPIO on the Pi.
- Pychart to generate the temperature and activity plots. To me, this seems like the simplest yet a quite flexible package for generating charts out of raw data. Type “sudo apt-get install python-pychart” to install Pychart.
- Feedparser as the RSS client engine. This is optional, but it allows to retrieve and display weather data, such as outdoor temperature, sourced from a reliable weather services. Follow these instructions to install Feedparser on the Pi.
The rest of the programming is in plain HTML, with a bit of embedded Javascript wherever necessary.
Here is the Python and HTML source code of my RasTherm project. I hope it will give you some good ideas!
The Hardware Platform
 Of course, you need to obtain a Raspberry Pi board. I suggest the B version (either 256MB or 512 MB RAM) and an SD card (8GB, class-10 recommended). An enclosure, even the cheapest ($5), is highly desirable. A suitable 5V DC supply with a micro-USB cable is also required.
There are many ways to support and interface the required electronics to the Pi. I use the Pi Plate. It is an add-on board of the same dimensions, which sits right above the Pi. Since the amount of external electronics is small, there is more than enough room on the Pi Plate. Look on eBay; you may find cheaper pre-assembled copies of the Pi Plate…
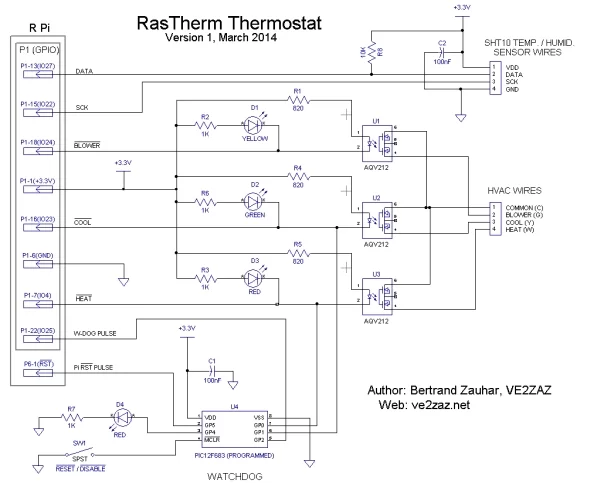
For the temperature sensor, I have chosen the Sensirion SHT10 Temperature/Humidity sensor. It is relatively inexpensive, it uses a two-wire data interface and can be operated at any clock rate, something important if the cable between the Pi and the sensor is long. Mine is 9 meters long and reliable readings are achieved. Please see the note below on how to extend the length of the cable to more than the specified 30 cm. This is a small sensor with 0.050″ pin pitch!, So I mounted the sensor on a generic SOIC-to-DIP adapter PCB, which makes the connection to the cat-5 cable much easier.
I have elected to use the AQV21x PhotoMOS solid state relay family on the HVAC wiring instead of mechanical latched relays, which are more expensive, require more current to operate and make noise. These solid state relays (essentially fancy opto-couplers) on the other hand only require 2 or 3 milliamperes to operate, are reliable and sell for only a couple of dollars each.
I have used surface-mounted (SMT) 0805-size resistors and capacitors in the circuit. This size fits very well between the holes of the prototyping area. The wire type used is AWG 30 wire-wrap solid wire (the red wires). I have also used AWG 24 stranded wire (the yellow and black wires) between the PhotoMOS relays and the terminals.
Here is the overall circuit schematic diagram of RasTherm. Everything you see on this diagram is implemented on the Pi Plate.
The Watchdog
Also part of the hardware is an optional firmware watchdog. If you are like me and your trust in the Pi is not absolute, then you will like the idea of having an independent watchdog to kick the Pi in the butt if it ever crashes of freezes. Remember, this is a thermostat that may control a powerful furnace… I used the 8-pin Microchip PIC12F683 micro-controller as the watchdog. I used BoostC to program the PIC micro firmware to perform the watchdog functions. It will trigger a reset on the Pi reset line (connector P6) if any of the following abnormal conditions are detected:
- The Pi stops toggling one of the GPIO pins at every second, indicating that some of the software or the operating system has crashed. The watchdog will reset after 120 seconds of pulse inactivity. This gives enough time for the Pi to reboot and not trigger a unneeded hardware reset.
- The heat relay is engaged for more than 120 minutes, which is normally highly unlikely,
- Both the heat and cool relays are activated simultaneously, which should never happen.
The watchdog circuit is equipped with a red LED that, when lit, indicates that at least one Pi reset has been issued. I have also added a watchdog reset/disable toggle switch that will clear the latched-lit LED and/or keep the watchdog function from being triggered. This is useful to disable the watchdog during development.
The following zip file contains the ANSI-C watchdog source code file and the Intel Hex file for programming the PIC micro-controller.
Long Sensor Cable Length
Having the ability to position the temperature/humidity sensor farther from the Raspberry Pi than a few centimeters is a must. Unfortunately, the CMOS line drivers on both the SHT10 sensor and the Pi are not designed to drive long cables at a low controlled impedance. Nevertheless, I have successfully been able to use the sensor at the end of a 19 meter cable.
Here is how I have done this in the Python software. I have programmed the clock rate to 1 millisecond, so data rate is rather slow. It could be even slower and it would still be OK. How often do we need a temperature reading? Right now there is a new reading of temperature and humidity every 4 seconds. I am also using the checksum feature and am rejecting any false data. Temperature and humidity readings are dashed out on the web page when invalid data is received, and the previous data is kept.
The cabling must also be done with care, otherwise it will not work. Remember that even though the data rate is slow, the sharp clock pulse edges must also be taken care of. Here is what you need to do.
- Use CAT5 (Category 5) or better Ethernet cable. We need the twisted pair feature in this cable.
- For the clock signal, use one twisted pair, with the other wire of the pair connected to ground.
- The data and Vcc signal can use another pair. These are not as critical.
- Add a 100nF decoupling capacitor at the sensor end, between Vcc and ground.
- Add a 1 Kilo-ohm resistor at the Raspberry Pi end in series with both the clock and data wires. These resistors limit the current of the CMOS drivers, which slows down the signal edges and reduces reflections. Without these series resistors, the sensor will simply not work with a long cable!
RasTherm website Access
By reading through the Python code, the reader will figure out what is happening. Directing your browser to the configured Flask web server IP address and port (for my implementation: 192.168.0.20:8888) will pop up a user id and password popup window. Entering the same userID and password as defined in the Python script will pop up the RasTherm main window. If you prefer, you can go directly to 192.168.0.20:8888/popup_main.html to get the main control window.
The web interface is composed of three pages. I have coded the main page as a popup window. To me this handled better on a desktop PC, as opposed to having the interface in a tab like any other window. The two other pages are a Program change page, where you can change the program settings for heat, cool and fan circulation based on day of week and time of day. Finally, the third page is a debug page protected by a distinct password. This is where only you, the boss, may want to go. In there you can produce the temperature plots, reboot or shut down the Pi, and change a few control parameters on the fly.
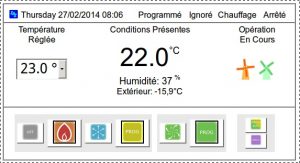
Main Window Fields
The main window is divided down into three bands. The top band is the status bar. It reports back the system status in text form. The second band, located in the center, provided control of the set temperature and indicates the current temperature and relative humidity. Animated wind mill icons also show whether the furnace or A/C is currently running. The lower band contains the system buttons. These have toggle action. When enlarged, they show that the function is active. In this zone there is also a button to access the thermostat program editing window. Finally, there is a debug button that brings up the debug window, a place to generate the temperature plots and issue a Raspberry Pi restart or shutdown. The debug window is password-protected with a different user ID and password. Only you, the developer, should have access to that window.
Field Refresh Delay
The entire main window is composed of iframe fields that get refreshed at intervals set in their respective HTML files. There may be a delay of a few seconds between a system action and corresponding display on the main window. This is inherent to HTML rendering refresh, which is browser-issued and not server issued. In other words, the web server can refresh a field when there is an action (button pressed, dropdrown menu selection, etc) performed by the user. But when no action takes place, the only way to refresh a plain HTML page is at a regular interval. That interval can be changed, but a balance between update delay and network traffic must be found.
30-Second Change Delay
When the set temperature is changed or when the mode (heat, cool) is changed, there is a 30 second delay in applying the new setting. This is done to protect the HVAC system in case of an erroneous setting by the user. This gives a chance for the user to correct the mistake before the system gets updated.
Program Override
The override state needs a bit of explanation. Whenever you are in programmed mode (system follows the temperature setting schedule), the user can override the current setting simply be entering a new temperature. The system will be in program-override state and will keep that manually-set temperature until the next entry in the schedule is met. A good example of this is when you feel cold and want a little boost of heat during the day. When the night comes, the system will catch up with the night program schedule and set the temperature to the next programmed entry, thus exiting the override mode.
IP Socket Control
I have included the ability to control and query RasTherm via an IP connection. The most common way to do this is using the Socket module, which is pre-built into Python. With the help of the RPIO package, managing socket interrupts is a breeze. Whenever data is received via a socket packet, some Python code is run. The socket_callback() function in my script does that. For example, another remote python script could send a text command such as “get_current_temp” or “21.5” and RasTherm would return the current temperature or an OK to the other end to confirm that the command was received. I use this feature to control RasTherm via my home telephone system, in my case an Asterisk IP phone PBX. I have mapped DTMF keypad entries to various RasTherm functions. I use Text-To-Speech to read back temperatures and statuses.
Adjustable Parameters
In the Debug page of the web interface, there are two adjustable parameters. They are “Temperature Cycle On/Off Threshold” and “Temperature Sensor Correction”. The Temperature Cycle On/Off Threshold is the temperature difference from the set temperature at which the thermostat will activate and deactivate the HVAC. For example, with a set heating temperature of 21.0 °C and a threshold of 0.5, the HVAC will start a heating cycle at 20.5 °C and stop the cycle at 21.5 °C. The other parameter is the Temperature Sensor Correction. It is simply a temperature offset to apply to the temperature readings. For example, if the temperature sensor reading is 22.0 °C and the Temperature Sensor Correction is -1.0, the actual ambient thermostat temperature will be 21.0 °C.
Launch RasTherm at Raspberry Pi Boot Up Time
In order to make RasTherm automatically launch when the Raspberry Pi boots up, you can add the following entries to the /etc/rc.local file, just bellow the header comments (the “&” character is important; it launches the script in the background):
# Launch RasTherm at startup
cd /home/pi/your_RasTherm_project_directory
sudo python therm_main.py &
Features that were not developed, but could be easily added:
- Automatic Heat-Cool switchover feature ( I prefer to select A/C or furnace mode myself),
- Real-Time_Clock with battery backup, available pre-assembled on the web (as long as you have internet connectivity, this is not required),
- A switch to disconnect the solid stare relays' +3.3V supply, which would inhibit RasTherm from controlling you HVAC system without powering off the Raspberry Pi. This can be done with an external switch. All you need to do is disconnect the Common (C) wire.
- Easy selection between Fahrenheit and Celsius temperature scales. Currently, Celsius is hard-coded.
- Multi-Language web site support. Currently, only French is implemented.
To increase system availability and robustness, I suggest you follow these recommendations.
- Use an uninterruptible power supply (UPS) to feed you Raspberry Pi AC adapter,
- Leave your old commercially-made thermostat connected in parallel with RasTherm, but leave it in OFF mode so that it does not interfere with RasTherm. If RasTherm ever becomes unavailable for a long period, you can revert to your old thermostat.
- Install the ‘fake-hwclock' script on the Pi. This retrieves the last known date and time at power up, which is much better than reverting to 1970! Invoke “apt-get install fake-hwclock” to install the package.
- Perform Regular Raspberry Pi Reboots. In order to ensure that the system is always stable, it is probably a good idea to schedule a Pi reboot at a fixed interval, for example once a week, at night. The Cron scheduling tool is already there in Linux to do this. Use the “sudo crontab -e” command to invoke the Cron editor. Add the following entry for a reboot every Wednesday at 3:00 am:
0 3 * * 3 /home/your_username/your_script_location/reboot.sh
The reboot.sh bash script invoked must exist at the provided location. The script will simply contain the reboot command:#!/bin/bash
sudo shutdown -r now
The source code and HTML code contains French web labels as my main language is French. Spend a few minutes of translation work in the source code and HTML pages and you will have an interface that speaks to you in your language…
For mroe detail: RasTherm – A Smart Thermostat built on the Raspberry Pi