
Unlike most commercial frames, this digital picture frame connects to Flickr, allowing you to add and remove photos without a physical storage device, such as USB stick or SD card. A Raspberry Pi hidden inside the TV connects to the internet and automatically updates the pictures when the Flickr album is modified.

Materials:
- Raspberry Pi – RadioShack 277-196
- Wifi dongle (or ethernet cord) – RadioShack 55044156 (online only) or RadioShack 55066170 (online only)
- Small TV/monitor – RadioShack 55059573 (online only)
- HDMI cable (shortest you can find) – RadioShack 1500477
- Micro USB charger (for powering the Raspberry Pi) – RadioShack 2302182
- Open back picture frame
- Balsa wood
- Picture frame mat with a 6″ x 8″ cut out
- Styrofoam/craft foam
- Wood glue
- Small wood screws – #2, 3/8″ long
- Hinge
Step 1: Set up the Raspberry Pi
Since there are already plenty of good guides for setting up a Raspberry Pi, I won't go into the details here. I followed this instructable, and made sure that I had auto-login working (wifi doesn't work well with my network, so I ended up plugging in to ethernet since I had the power cables showing anyway). I would also recommend setting up SSH so you can access the Pi without taking apart your picture frame.
Step 2: Install feh
The Raspberry Pi is essentially running a full-screen slideshow and updating the folder it pulls the photos from. To run the slideshow, I used an image viewer called “feh”. You can find documentation here. To actually install feh, type “sudo apt-get install feh” in the terminal window of the pi and hit ENTER. This should automatically download the library and install it in the proper location (if you are connected to the internet).
In the feh documentation, you can see the options available for the image viewer. I used the full screen, delay, full zoom, hidden cursor, and randomize options. This meant that my line of code looks like “feh -F -Z -z -Y -D5 /home/pi/photoframe/flickr” (the file path is the location where I store the photos I pull from Flickr). For testing, I used a delay of only five seconds so I can check that it works without waiting. The final frame will have a longer delay of five minutes or so. Feh is run directly from the terminal window, so you can test if it is working pretty easily.
Step 3: Write shell scripts
Since feh is run in the terminal, the slideshow itself can't be directly run from within the python code. However, shell scripts (.sh files) containing terminal commands can be run from python code. I wrote two scripts – one for running the slideshow and one for closing it – and saved them both in the directory /home/pi/bin. More info on how to write a script can be found here.
Running the slideshow (“sudo nano /home/pi/bin/script_slideshow”) :
#!/bin/bash
DISPLAY=:0.0 XAUTHORITY=/home/pi/.Xauthority feh -Z -F -z -Y -D 3 /home/pi/photoframe/flickr &
Killing the slideshow (“sudo nano /home/pi/bin/kill”):
#!/bin/bash
if [ ! -z “$1” ]; then
PROCESS=$1
PIDS= ps ax | grep $PROCESS | sed -e “s/.*killp.*//” -e “s/ *\ ([0-9]\{$.*/\1/” | grep -v “^$”
if [ ! -z “$PIDS” ]; then
echo Killing $PROCESS pid=$PIDS
kill -9 $PIDS
else
echo No process $PROCESS in process list
fi
else
echo Usage : $0 process_name
fi
Step 4: Setup Flickr
Obviously, you need to sign up for a Flickr account in order to have a Flickr album to pull photos from. Once you do that, you also need to get an API code in order to run their API on your devices. Go here and follow their instructions for a non-commercial code.
The python code uses all of the photos in an album, so make an album with all the photos set to PUBLIC (otherwise you can't access them without account information). Go to the album page and write down the album id number (located at the end of the URL – see the photo) so you can use it in the python code to reference the album.
Step 5: Main python code
The python code connects to the Flickr through its API and checks to see if it needs to add or remove photos from the folder on the Raspberry Pi. If there is a photo on Flickr that isn't in the folder, it downloads it and adds it to the folder. On the other hand, if the folder is bigger than the album, it figures out which photo doesn't have a match on Flickr and deletes it. If the code modifies the folder it restarts the slideshow so the changes can take effect.
To install the library for the API, type “pip install flickrapi” in the terminal window and hit enter. Documentation can be found here. Make sure you use the newest version (updated June 18th), because older versions won't work due to changes in the Flickr API.

Step 6: Edit the crontab
I wanted the Raspberry Pi to periodically check the Flickr album for updates, so I edited the crontab (internal timing script) to run the main python script every minute.
1) Open the crontab: crontab -e
2) At the bottom, type: */1 * * * * python /home/pi/photoframe/download_flickr_set.py (or wherever you saved the script)
3) Save and close the file
Step 7: Setup auto-start
To make the Raspberry Pi load directly into picture frame mode, I had to add the code to the start-up routine. I did this by adding a file to the autostart directory that contains the slideshow script.
I mostly followed the directions found on this project page, but I'll post exactly what I did here
1) Change directory: cd /etc/xdg/autostart
2) Create the new file: sudo nano slideshow_image_changer.desktop
3) Write the file:
[Desktop Entry]
Type = Application
Name=Slideshow Image Changer
Comment=Slideshow Image Changer
Exec=/home/pi/bin/script_slideshow.sh
Terminal=true
4) Save and close the file
Step 8: Disable sleep
Finally, I didn't want the screen to go black after 10 minutes (as the pi normally does after a period of inactivity) so I disabled its ability to go into sleep mode and to automatically turn off.
1) Open the kbd config file: sudo nano /etc/kbd/config
2) Inside the file, change the BLANK_TIME to 0 (so it never goes blank)
3) Still inside the file, change the POWERDOWN_TIME to 0 (so it never automatically shuts off)
4) Save and close the file
Step 9: Open up the monitor
Once the code was setup and working I assembled the physical frame. I wanted to reduce the thickness of the frame as much as possible so I decided to hide the Pi inside of the TV.
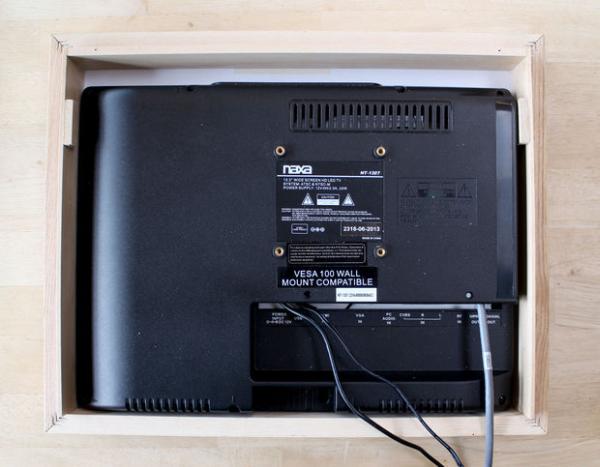
The TV is held together with a bunch of screws, so simply unscrew them. Carefully pry apart the casing – I used a screwdriver to help. Be careful not to pull on the internal wires! There are cables running between the two halves of the casing (between the circuit board and the screen) that need to stay plugged in.
The vertical part of the TV stand is connected to the interior of the TV and should be removed. This will make the monitor a little smaller and easier to fit into a frame.
For more detail: Internet Photo Frame