
What is SPI?
SPI stands for Serial Peripheral Interface (SPI). It is made up of 4 wires normally and it was a standard designed by Motorola for use with their microcontrollers. SPI is easy to use and fast. The bus is fully duplex, meaning devices can transmit and receive data at the same time, and it is used for short distance, single master communication, for example in embedded systems, sensors e.g. DS1722, and SD cards. The SPI bus can operate with a single master device and with one or more slave devices. Here is what a standard SPI bus looks like, multiple slaves is optional. SPI is accessible via the GPIO connector on the Raspberry Pi board. The MISO and MOSI wires are located on pins GPIO 9 and GPIO 10 respectively. These pins operate as standard GPIO pins until their SPI functionality is enabled. 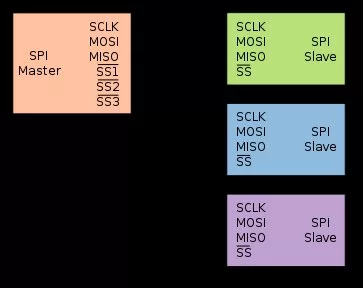
Loading SPI on the Raspberry Pi under Raspbian “wheezy”
At the moment, the Raspberry Pi only implements master mode and has 2 chip-select pins, so it can only directly control 2 SPI devices/channels. On many Raspberry Pi distributions, including Raspbian, the SPI and I2C device drivers are not loaded by default on boot. The raspi-blacklist.conf file stored in the ‘/etc/modprobe.d/' directory indicates which kernel modules must not be loaded. Since I2C and SPI, aren't needed by most users, they need to be explicitly removed from that list by placing a ‘#' mark (comment) in front of the ‘blacklist' command.
- Edit and save ‘/etc/modprobe.d/raspi-blacklist.conf' and make sure that the lines containing blacklist spi-bcm2708 and blacklist i2c-bcm2708 are commented out. You can do this by making sure there IS a # before blacklist spi-bcm2708, so it looks like this – #blacklist spi-bcm2708. Adding this ‘#' prevents SPI from being disabled.
To gain access to SPI devices, their kernel device drivers must be loaded, either manually using the ‘modprobe' (module probe) command or on boot. To load them on boot, edit and save the file named ‘/etc/modules' as shown below so it contains the following lines (it may contain more lines):
- Finally, reboot the Raspberry Pi' with the ‘reboot' command to get all the kernel module drivers loaded or use the modprobe command if you don't want to reboot your Pi. Verify that all the kernel module drivers have been loaded as expected with the ‘lsmod' (list module) command.root@raspberrypi:/# lsmod
…..
i2c_bcm2708 3681 0
spi_bcm2708 4401 0

Test the SPI Port
Test the SPI port is working by typing:
ls /dev/spidev*
You should see the following:
/dev/spidev0.0 /dev/spidev0.1
There are 2 spidev devices shown. The first number refers to the SPI peripheral which in both cases is 0 (the RPi only has 1 SPI port), the second number represents the chip select pins CS0 and CS1.
For more detail: How to Enable SPI on your Raspberry Pi