
Using some off the shelf relays and some basic electronics components coupled with a Raspberry pi with basic HTML, PHP and javascript programming, this Web Based relay control box can be used to turn on or off devices that are connected to the box's plugs.
Step 1: Relay board
The relay boards were constructed using pcb software. I used Droid PCB but any software can be used. I also had access to smd resistors and this simplified the relay board somewhat but all of the components can be through hole.
The pcb design was printed onto a transparency and then using the heat transfer method was placed onto the copper clad board. After it was etched, the finished board was then populated with the components.
 The parts used were (per relay board)
One 220/250 V AC 5A relay
One 2N 3904 NPN transistor
One 1N 4007 diode
One 1000 ohm resistor
One red 5mm LED (power indicator)
One green 5mm LED (relay on indicator)
Two 330 ohm resistors
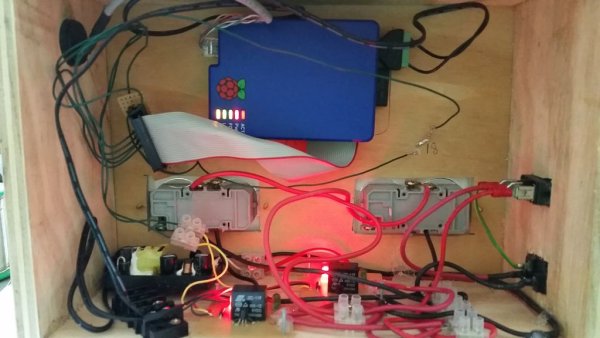
Step 2: Housing
The housing is made out of 1/2″ ply wood that was scrap wood just laying around. It's dimensions are 10″×7″x4″.
Two holes were cut out to accommodate the standard 110 V AC recessed plug.
Holes were also cut out for an AC plug, power switch, ethernet adapter and two LEDs.
Step 3: Connecting the dots…
BEWARE! this section contains information on connecting to mains power and unless you are knowledgeable in these things I suggested you get someone who is and or qualified.
To power the relay board and the Raspberry Pi, I used a power adapter that was from a old switch. It was rated at 5 V 1A which was ideal as that meant I didn't have to do do any voltage regulation for the Raspberry pi. I cut the plug end off exposed the wires for connection later to the mains supply.
The mains power comes into the box via the power adapter. I got this from an old computer power supply.
When dealing with mains power and more importantly switching it, you try to have any connected devices not connected to the “hot” or live end of the power.
Having said that, the neutral from the mains power is connected to the neutral of the plugs and the neutral of the power supply. These are all the neutral connections we have.
Since I wanted to use a power switch (optional) the “hot” connection from the mains goes to one terminal of the switch and the other terminal is connected to all of the “hot” connections. (If you are using a 3 terminal power switch (like me), I suggest you use a multimeter to see which two terminals are continuous when switched.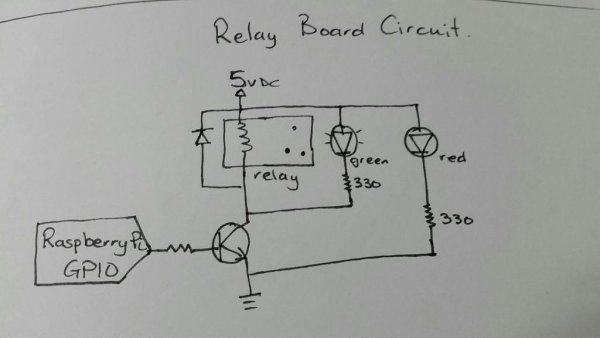 The third terminal is used to ground the internal light and cause it to be illuminated when switched on.) These are the other end of the power supply and the common terminals to the relays. Since I want to control the mains power to the plugs when the relays are on, I then connect the Normal Open (NO) connection of the relay to the “hot” side of the plugs. Note: if you wanted your plug to turn off a connected device when on then the “hot” side of the plug would be connected to the relays Normally Closed (NC).
Once you have done that double check your wiring and your connections and then check it again. Be very careful when dealing with mains power.
Once that is done everything from here on out is DC.
Step 4: Connecting to the Raspberry Pi
The Raspberry Pi is running Raspian and is using python scripts and Wiringpi to turn on the GPIO pins. I had bought ribbon cables and female connectors when I bought my Raspberry Pis so I used these to make a simple break out board.
I am using 4 of the GPIO pins to control the two relays and the corresponding LEDs to show you which plug has mains power.
For more detail: Web Based, Raspberry pi controlled, 2 channel relay mains control box.