
For project updates, visit: AgriVision – Raspberry Pi SSTV Camera.
The goal of this project is to use the Raspberry Pi with the PiCam as a wireless camera which can transmit images over long distances, usually tenths of kilometers. Images will be transmitted by amateur radio (ham-radio) using slow scan television (SSTV) on the 2 meter band (144.5 MHz).
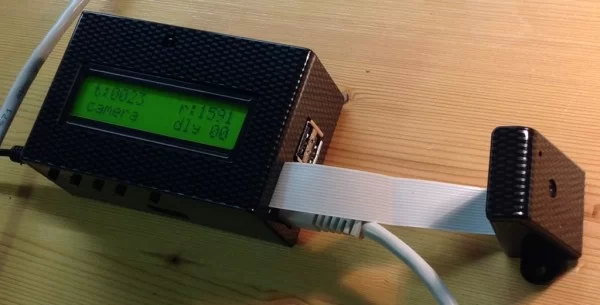
Since the Pi can generate the HF FM signal itself, no additional electronics are needed for low power transmissions. For a little bit more power a one or two transistor amplifier will be suitable. Furthermore a low pass filter is recommended to filter out higher harmonics of the signal.
This project also contains a python script which detects movement. Using this script the Raspberry Pi can be used as a wireless security cam at distances far outside the range of normal WiFi networks.
Be aware that you need a ham-radio license to use this application!
Step 1: Capturing the image
First thing to do is capturing the image we want to transmit. This can easily be done with raspistill:
raspistill -t 1 --width 320 --height 256 -e png -o /tmp/image.png
For sstv we need a small image, of 320 x 256, it is saved into the /tmp directory as png.
Step 2: Converting the image to a SSTV sound file
Next we need to convert the image to a sound file which can be transmitted over the air. There are several SSTV implementations available for the Raspberry Pi.
PySSTVFirst I had a look at PySSTV, a Python implementation which can be installed using pip:
pi@rpicamera ~/sstv $ sudo apt-get install python-setuptools
pi@rpicamera ~/sstv $ sudo apt-get install python-imaging
pi@rpicamera ~/sstv $ sudo easy_install pip
pi@rpicamera ~/sstv $ sudo pip install setuptools --no-use-wheel --upgrade
pi@rpicamera ~/sstv $ sudo pip install PySSTV
This works, but it is very slooooooooooooow, it takes many minutes to convert a single image. So I continued to search for another option.
C implementationNext I found a plain C implementation here:https://sites.google.com/site/ki4mcw/Home/sstv-via-uc Unfortunately there were some errors in the preamble tones, but those were easy to fix. I also made it a little bit more flexible so that you can set the audio sample rate from the commandline line. Source of my implementation can be found on GitHub. To compile the source code:
pi@rpicamera ~/sstv $ sudo apt-get install libgd2-xpm-dev
pi@rpicamera ~/sstv $ sudo apt-get install libmagic-dev
pi@rpicamera ~/sstv $ gcc -lgd -lmagic -o pisstv pisstv.c
To run the program:
pi@rpicamera ~/pisstv $ ./pisstv /tmp/image.png 22050
Constants check:
        rate = 22050
        BITS = 16
      VOLPCT = 20
       scale = 6553
     us/samp = 45.351474
     2p/rate = 0.000285
 Checking filetype for file [/tmp/image.png]
 File is a PNG image.
 Input  file is [/tmp/image.png].
 Output file is [/tmp/image.png.wav].
 Writing audio data to file.
 Got a total of [2589556] samples.
 Done writing to audio file.
 Created soundfile in 4 seconds.
As you can see the SSTV sound file is created in just 4 seconds. So far so good, next step, how to transmit the audio over the air.
Step 3: Transmitting the sound file with PiFm
You can add a radio transmitter, like a portable radio transceiver, but its much more fun to let the Pi itself generate the high frequency signal. Thanks to Oliver Mattos and Oskar Weigl this is possible. You can find their code here: Turning the Raspberry Pi Into an FM Transmitter – Imperial College Robotics Society Wiki.
Their code has evolved considerably. The first version was very simple, but used all cpu cycles, and the signal was hampered by glitches when other processes were active. The last version uses dma and works pretty good, without eating up all cpu cycles. Nevertheless the code is much more complex now. Oliver and Oskar did a very good job, but out of the box the software is not suitable for ham-radio and SSTV. There are mainly two problems. First the bandwidth is to high and secondly the timing which is very important for SSTV was a little bit off.
Step 4: Reducing the bandwidth
Reducing the bandwidth appeared to be very simple. As every ham knows, for frequency modulation the bandwidth can be set with the modulation index, which is equal to the volume of the audio signal which modulates the hf carrier. In the source code it is just one value it can be found in the consume function of the Outputter class.
Here is the original code:
void consume(float* data, int num) {
   for (int i=0; i<num;i++){
       float value = data[i]*8;  // modulation index (AKA volume!)
I made a command line parameter of this value, the new code looks like:
void consume(float* data, int num) {
   for (int i=0; i<num;i++){
       float value = data[i]*modulation_index;  // modulation index (AKA volume!) (original 8)
Unfortunately this does not work very well, very strong sidebands persists, so this needs some focus in future versions of the software.
The figure shows a spectral plot of the full bandwidth FM signal. The second spectrum is the reduced bandwidth, tuning on the peak in the middle shows a nice and clean signal, but we need to get rid of the sidebands. The last one is the reduced bandwidth signal of the first version of PiFm, nice bandwidth, but the signal is hampered by clicks due to cpu activity in other processes.
For more detail: Raspberry Pi (security) Slow Scan Television Camera