
This is a project I've been working on for a while, and still have ways to go, but I have enough success right now that I can I share what I've got. This covers connecting a Beaglebone and an Arduino via TTL serial and I2C, using a parallel LCD with an Arduino, using a DHT-22 with Arduino, and using DS18B20 1-wire sensors with a BeagleBone in the next week or so.
I believe that all the instructions here will apply more or less as-is to a RaspberryPI or pcDuino or any other little computer that supports TTL serial and i2c, and 1-wire for the DS18B20. As I get some ArchReactor (the local hackerspace) members to try this on their devices, I'll update here confirming what devices work and add any relevant information.
My end-goal is to use several temperature, humidity, and other sensors spread through my house, including outside, and control my heat and AC and whole house fan in order to optimize and balance comfort and energy use. The details of how that will work are yet to be nailed down, and I'm going to start with monitoring so I can see what kind of data I have to work with.
This instructable will explain how to get started with using an Arduino and Beaglebone and a couple sensors and a display.
Stuff you'll need:
– BeagleBone
– Ardunio
– TFT LCD
– Sensors
– lots of jumper wires!
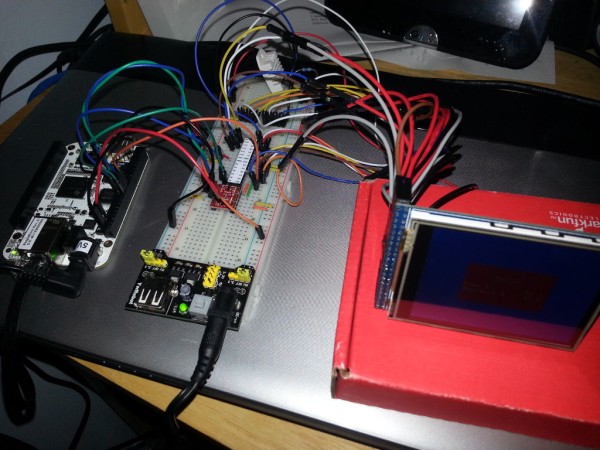
I've had a BeagleBone for a while, but a Black should work the same. For the Arduino you can prototype with an Uno or other standard arduino compatible, but I'm using a breadboard arduino, and I'll eventually make a PCB for it, so that I can integrate it into as small a case as possible. For the LCD, I've chosen an 2.8″ TFT with touch screen. There are certainly easier to use LCDs out there, but this one is only $18, and I have enough IO's to make this run in 8-bit mode. I'm starting with the DHT-22 temp and humidity sensor, and I'll be adding DS18B20 temp sensors soon.
I've made a SparkFun wishlist for the breadboard Arduino parts and the sensors.
Another goal of mine was to be able to update the Arduino's program from the BeagleBone's TTL serial. I've detailed that in this instructable, and the serial parts here will be based on that. After I got the LCD working I realized that it requires use of D0 and D1 (the serial port) and so to communicate with the Beaglebone I had to use something different. I decided to learn something new and use I2C.
Step 1: Wire the BB and Arduino together
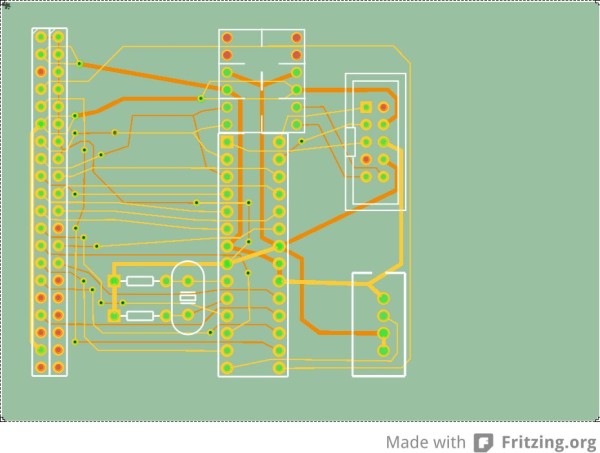
We'll start by getting the BeagleBone to talk to the Arduino. I recommend reading my instructable for getting them wired up and running the test code. I'll do a quick overview here, refer the image with the chart for pin numbers:
Wire the bare bones Arduino, minus the FTDI.
wire BeagleBone Serial2 to the level shifter.
wire Ardunio serial to the level shifter, RX and TX crossed.
wire BeagleBone and Arduino i2c together. Level shifter is not needed, the BeagleBone's pullup's are strong enough to handle the low current.
wire BeagleBone's P9 23 to Arduino Reset
Wire 5V supply on one power rail, and 3.3V on the other.
Wire the grounds together.
I've included a new Fritzing to show the I2C lines. Unfortunately I did not save a simple set of i2c test programs. If anyone has trouble getting this to work I can make one.
Step 2: Wire up the LCD and DHT-22
The ITDB02 LCD supports 16bit and 8bit display modes. 8bit mode is done by using only 8 of the data wires and jumping the others to ground. Since I'm really only displaying text and some basic graphics, I'm using 8 bit mode to free up the IO pins for other uses.
I'm using the UTFT library to drive the LCD. Their requirements pdf has a chart showing the pin mapping for the Arduino. I found the pin labels on the LCD hard to read after a few wires were connected and referring to the image and chart on the product page was a big help.
Since the LCD's pin header is not breadboard friendly, I used some female<->female jumpers on it with some normal male<->male jumpers to get it all hooked up. This is a ton of wires, so just take your time and double check it all.
The DHT22 works on 1wire protocol, but it's not Dallas 1-wire compatible. Adafruit has a great tutorial on connecting and using the DHT-22, I recommend following her guide.
Step 3: Programming
The UTFT library turned out to be quite easy to use, and I also found an easy to use library for the DHT-22. Even with these nice libraries, there were some challenges.
The Arduino as a i2c slave seems to only behave if you limit your use to single-byte operations, and this makes sending flexible complex structures difficult. I want to be able to send screen drawing commands from the BeagleBone to the Arduino. My options were to code a system where a byte is sent as a “command type” then branch to read more bytes to complete the structure, or work out a way to encapsulate a delimited string and process it. Method 1 would mean I can't have optional parameters, and if the byte sending gets out of sync it will be difficult to re-sync. So I used method 2 by using some buffer variables and sending a 0-byte as a null terminator, like C uses for strings. Even if a byte gets dropped, the 0-byte will end the structure at some point and then it's just a matter of dealing with weird data when I parse.The next challenge was that the DHT22 is slow. like, really really slow. Solved that using a “current value” variable and a delay. I don't need super fast response when the values change, but I want it to respond quick when I ask for the values. The main loop polls a function every time, that function then checks when the value was last updated, and updates it if it's been more than 3 seconds. I'll probably end up converting this to a timer of some sort.I also programmed in a “dev mode” so I can disconnect the LCD and get some information on serial. It's been handy so far, but now that the basics are worked out I probably won't use it again.On the Beaglebone, I'm using PyBBIO right now. it's arduino like commands and methods keep me from getting super confused when dealing with such different languages as C and Python are. It's pretty easy to install, and has a few nice classes build in. It is my intention to try and get some sort of i2c class into it, if Haim doesn't first!You'll find a zip file attached with my code, an ino file for the arduino, and a python file for the beaglebone. Currently there's only support for the DHT22 temp and humidity readings. It updates the display on the arduino even if the python script isn't running. The python script simply gets the values and prints them to the terminal. Like I said at the start, I still have a lot of work to do!
 The compiled sketch uses 29.5K of the 32.2K maximum, and I still need to add touch support and those drawing functions! I think there's a lot of code in the utft that I can trim out, and maybe I can pull the DTH library stuff in and make it more lean as well. Or, maybe I'll just enough, we'll see!
 myDisplay.zip2 KB