
I’ve been a nerd for a very long time; As a teenager in the 1970’s I drove up to the Western Union office in my hometown of Buffalo, New York and asked if they had any old teletypes they’d like to get rid of; The next thing I knew I was driving my VW bus away, full of Teletype Gear.
I became with familiar with them; Basically they were like remote typewriters; The keyboard on one would control the printer on another. The process could be automated with paper tape punches and readers. These machines were the mains-stay of printed communication until they were supplanted by fax machines in the eighties. Somewhere over the course of several moves during college, I parted with my big, heavy teletypes.
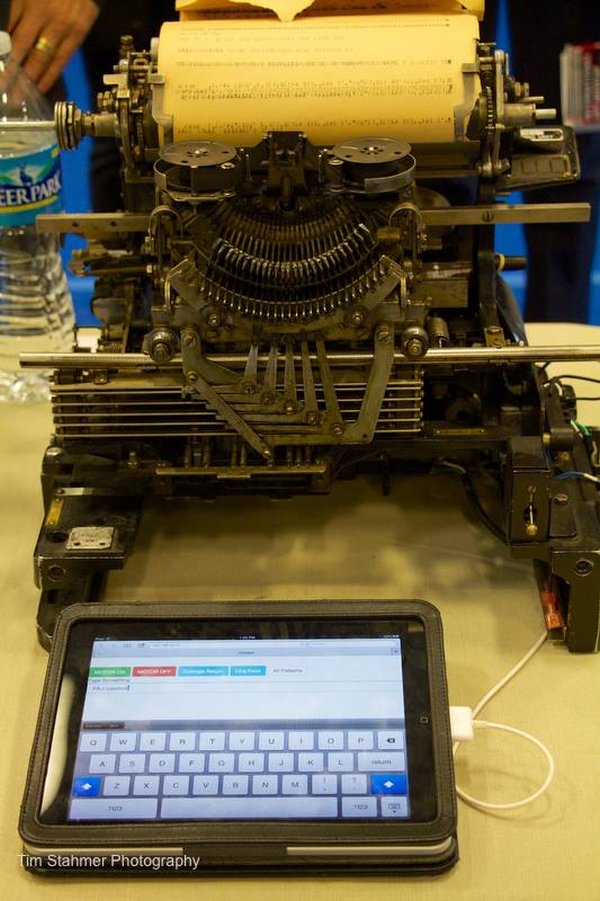
Wind the clock forward to Maker Faire NYC 2013. NYC Resistor had a Model 15 as part of their Future Crew exhibit. We struck up a conversation about teletypes. I told them how I regretted having parted with my teletypes. They were gracious enough to offer me one of their spares. That is how I once again I was reunited with a Teletype Model 15; I promised to reactivate it and show it off at hamfests and makerfaires.
How To Drive A Teletype
Brushing the dust off some seriously aged neurons, I started sketching what I recalled of the Teletypes wiring.. By modern-day gadget standards, it is astoundingly simple:
A synchronous AC motor drives all the mechanics. Then there is a data relay which must be driven on and off at precisely 45 times per second. This relay closes at around 150ma of current. A readily-available 24VDC Wall-wart with a series resistor is capable of supplying this. The orginal standard called for a higher voltage and a lower current, so this is a bit of a cheat from the original standard, but it works.
One Easy Drive Method: A Relay Board
I came upon the following readily-available board which pretty much fit the bill with only slight modification
An opto-isolated relay board allows you to control a relatively large (line voltage) circuit safely. Here is the overall schematic including the Kootek relay board, slightly modified:
d GND are connected from the control source (raspi). The IN lines can then be tied to any GPIO line from the source. I used 7 and 8. When the line is set to logic 0, the relay will close and the K* lines will be connected together. So we can turn the motor on and off with one channel and run the data relay with the other channel. Wonderful.
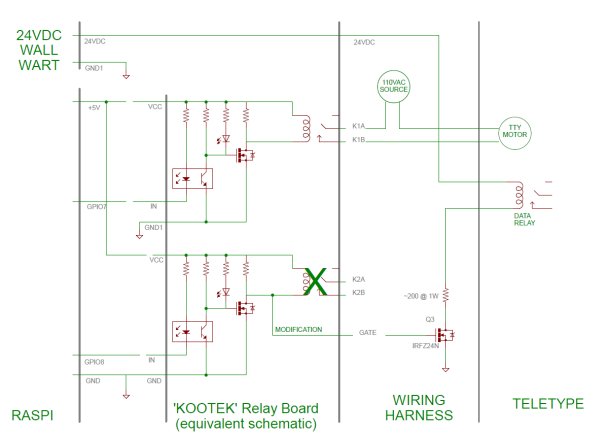 But wait. There is one minor issue with driving the data relay. We need to drive it fairly fast (45 times per second), which is faster than the Kootek’s relay will go (I know. I tried). So we are going to have to do a small mod. It just entails hijacking the output of the optoisolator. We just need to solder one wire to the correct trace. We then use this to drive the gate pin of our own N-Channel MOSFET and a series resistor, mounted in the wiring harness, which will do the job of turning the Teletype’s data relay on and off (see schematic). We connect +5V and ground of the Raspi to the relay board. We also tie a GPIO (GPIO7) to IN1 of the relay board and GPIO8 to IN2 The K1a and K1b contacts are put in series with the hot side of the 110VAC line voltage and the TTY Motor. +24VDC from the wall wart is tied to one side of the data relay The special tap off of the relay board labelled modification, is then tied to the gate input of our external n-channel mosfet. A 200 ohm, 1 watt resistor is tied from the drain of the mosfet to the other side of the teletype data relay. The source of the mosfet is tied to ground. All other ground connects including the wall wart’s minus side are are tied together to ground.
For more detail: A 50 year-old Teletype Powered by a Raspberry Pi schematic