
As part of my Big Trak refurbishment (not going as well as I wanted it to), I decided to use the Adafruit Prototyping Pi Plate to mount the additional electronics on. If you’re not familiar with it, then this is it:
So it’s a double-sided PCB with a GPIO connector tracked to various pads round the outside of the board with space to solder in headers or screw-terminals (or both!), as well as having space in the middle to solder components to, supporting a standard DIL type layout, SOIC chip mounting pads and an open area.
An interesting feature is that it extends the GPIO pins through the board, giving the possibility for stacking – almost like an Arduino shield…
So for the Pi Trak, what I needed to do:
- Power supply. Powering the Pi off batteries, I needed a regulator to feed a stable 5V supply into the Pi.
- A motor controller. Essentially a dual H-bridge controller of some sort.
- Interface from a wheel position sensor of some sort.
- Interface to the keypad.
As I was running out of time to produce a prototype, I used a handy 7805 type regulator. This is great, but not too efficient – ie. it gets a bit hot when fed from 9v.
The keypad was originally going to be the Big Traks own keypad, but I substituted one I’d made earlier (some 25 years ago!) – it’s a simple 4×4 matrix and you can see 4 resistors on the protoboard. There is a 5th next to them which acts as a limiter for the LED that’s on one of the switches.
For the motor controller, I used the Pololu TB6612FNG unit which I bought locally via SKPang. (The Adafruit parts were supplied directly from the US, but note than SKPang now stock Adafruit components on the UK!)
The wheel position sensor was an interesting one – initially I thought I could use a Lego sensor (since the rest of the thing was going to be made out of Lego by that point), however it turns out the Lego rotation sensor is analog – and outputs 4 different voltages depending on the angle… So a Plan B was hatched and I re-cycled the sensor from the original Big Track – seen here under test using the Adafruit Cobler board: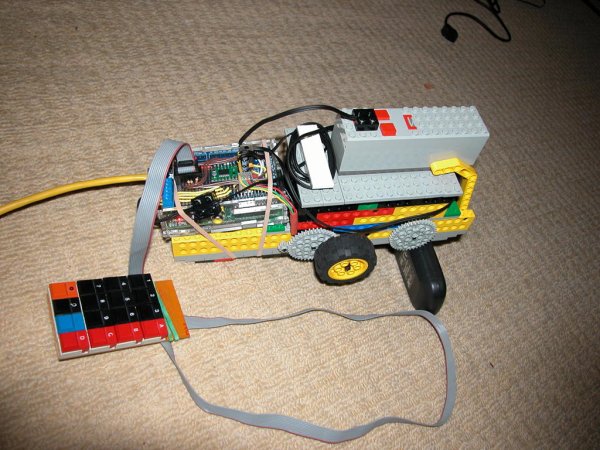
The wheel rotation sensor is the board to the left – it’s nothing more than an infra-red LED pointing to an IR photo diode. With a suitable current limiting resistor on the LED, the photo diode can be connected directly to one of the Pi’s GPIO inputs.
I also used to to test the motor driver too. I was a very easy way to do some “rapid prototyping” before committing to solder!
The end results was this:
This was the first time I’d used a board like this – more often I’d build projects on a re-usable breadboard, or on stripboard, so it did pose a few issues which I’d never encountered – The DIL area where I mounted the voltage regulator and the motor controller seemed fairly straightforwards, but with hindsight, I’d have made some of the links to the +3.3v and 0v supplies under the motor controller! In the open area, I cheated and just bent the wires of the components over to touch the pins of the 8-way socket I’d soldered on. Is that cheating, or is it the way everyone else does it? (Sensible answers please!)
However, overall, the board was very easy to work with – and does look a lot more professional than just hacking together some stripboard, and combine the board with the Adafruit case as I’ve done here, and it does open up many more possibilities for Pi interfacing projects.
Finally:
This is the Mk1 Lego PiTrak. Much room for improvement and I need to mount the keypad on it – also want to put on an LCD display, so watch this space as they say…
Bristol RaspberryJam
Just a quick post and a few photos from last nights RaspberryJam in Bristol – held in the most excellent Bristol and Bath Science Park.
Alan (@teknoteacher) the driving force behind the RaspberryJams, was on-form as usual, keeping everything flowing nicely with his usual jokes, and while I didn’t count the people, there seemed to be well over 100 attending! There was a nice time to do some networking before the main event (spread the jam as Alan says!), then the talks then a big break-out session afterwards with people showing off what they’re doing with their Pi’s and so on.
I did a one of the talks, and while it wasn’t quite fully what I’d planned, due to some technical hitches before-hand with Keith Dunlops presentation – all about RiscOS on the Pi…
(The Pi is a bit of a fussy little beast which won’t normally output to HDMI when it doesn’t detect a “live” HDMI display connected to it, so when you connect a Pi into a fancy multi-switching input thingy, unless the switch is set to take the HDMI input, then the Pi won’t boot up in HDMI mode!)
However after that delay, as Keith often ends his talk with BBC BASIC running under RiscOS on the Pi, I cut my talk a little short and spoke more about my BASIC than what I’d fully planned to speak about – however the essence of what I was going to saw was that programming (or Software engineering!) isn’t just about glitzy/glamorous web “apps” with shiny graphics and fancy buttons… Programming also encompasses a lot more – which some people think is boring, but others (like me) find much more exciting – and that’s the world of computer control.
I also think of myself as a Programmer or Software Engineer. I’m not a developer – I’ll leave that term for the airy fairy web people
So, someone, somewhere has to write the code that drives the braking system on your car, the engine management and so on. Someone has to write the low-level software for your hand held GPS, your microwave, your washing machine, etc. Someone (or probably some team!) wrote the software for the Mars Curiosity robot – now there’s a project you can’t afford to get wrong!
And if you’re wondering who wrote the software for some of these things, and thinking it’s some underpaid chap in India or China, then think again – Heber who hosted the RaspberryJam last night is based in the UK, manufacture their own control boards (in the UK!) and write software for things as diverse as vending machines to the Dyson Washing machine!
Here’s a few photos from the evening:
Links to other peoples photos, etc.:
- This is Bristol (newspaper/site)
- RaspberryPi Spy (g+)
Learning GIT
I’ve decided to start to use the GIT Source Code Management system… So hoe better to learn about it than to jump in at the deep end and actually use it for a project… So to that end, I’ve moved wiringPi to it and setup some simple hosting for it – mostly for my own convenience, but also to allow others who’re using GIT to quickly obtain updated versions and so on.
I’ll eventually be putting links from the main downloads site I’m using to the GIT repository, but until then, a quick look and it can be found here.
Accurate Delays on the Raspberry Pi
One of the issues on the Raspberry Pi is that I’m now seeing a lot of people coming to it from a traditional microcontroller background and trying to use the same ides on the Pi as they use on the microcontrollers – and promptly falling into a trap, or getting wildly unexpected results.
One of these areas is timed-delays. On a microcontroller, you can often simply loop for a number of times and get the result you desire… On the Pi, your program can be pre-emtively interrupted by Linux doing something else, it can be stalled by the GPU accessing memory and probably several other things. So timing loops in software is generally not that useful (Not to mention the CPU usage they consume – again, not an issue on a microcontroller without an operating system, but under Linux, it’s wasteful if you have something else to do!)
So… Linux provides a standard set of system calls – the issue is that you have the overhead of calling them – and that overhead can be quite variable, it depends on the system call and what it needs to do. The standard delay call, nanosleep(2) will sleep for at least how long you tell it, plus any operating system overhead and that comes to at least 20 to sometimes over 100 microseconds.
So.. when we need accurate short delays in the order of microseconds, it’s not always the best way, so to combat this, after studying the BCM2835 ARM Peripherals manual and chatting to others, I’ve come up with a hybrid solution for wiringPi. What I do now is for delays of under 100μS I use the hardware timer (which appears to be otherwise unused), and poll it in a busy-loop, but for delays of 100μS or more, then I resort to the standard nanosleep(2) call.
A quick look at the wiringPi code to see what I’m doing:
void delayMicrosecondsHard (unsigned int howLong)
{
  *(timer + TIMER_LOAD)    = howLong ;
  *(timer + TIMER_IRQ_CLR) = 0 ;

  while (*timerIrqRaw == 0)
    ;
}

void delayMicrosecondsWPi (unsigned int howLong)
{
  struct timespec sleeper, dummy ;

  /**/ if (howLong ==   0)
    return ;
  else if (howLong  < 100)
    delayMicrosecondsHard (howLong) ;
  else
  {
    sleeper.tv_sec  = 0 ;
    sleeper.tv_nsec = (long)(howLong * 1000) ;
    nanosleep (&sleeper, &dummy) ;
  }
}
I’m using the count-down timer and polling for the IRQ event (it doesn’t generate an IRQ, we’re just polling for the completion event here) This avoids any issues with having to take into account counters that wrap over.
This isn’t perfect though, and it can still take longer than we want it to, but for small delays it should be a lot closer to what we want than just calling the standard nanosleep(2) routine.
This will be in the next version of wiringPi which I’ll publish in a day or 2.
Pi, Linux and C Training
I recenty ran a 2-day course for someone who was keen to learn more about Linux, C and the Raspberry Pi.
Teaching isn’t new to me, I’ve run courses on my telephone systems, various aspects of Internet operations for people like web design companies and even used to teach something called Engineering Computing during my years at Napier, so to run a 2-day course in my office wasn’t hard and turned out to be a very rewarding experience for both myself and my student!
So what did we do? Started with getting more to grips with the Linux command-line, the use of pipes and redirection. Demonstrating that programmers are lazy (ie. command and filename completion!) We then went on to look at C programming. My student had been doing some C already, but wanted to learn a bit more. Variable scope – the difference between local and global variables. Static variables and so on. We moved on to separate compilation and linking files together – how we can use header (.h) files to give the compiler “hints” about how to call a function in another file.
We also moved on to some of the wiringPi functions too. Talked about concurrent programming and had a brief introduction to threads (with the simplified thread library inside wiringPi).
So a very worthwhile 2 days – it’s always good to share knowledge and meet more like-minded people too, and I’ve just sent my student some homework
For more detail: Adafruit Protoplate for the Rasbperry Pi