
The new Windows.Devices namespace from the Universal Windows Platform (UWP) APIs in Windows 10, enable developers to leverage the power of Windows while interacting with the real world via sensors and actuators.
This project uses the I2C bus and general purpose input/output (GPIO) ports available on the Raspberry Pi 2, to create an internet connected weather station using the SparkFun weather shield.
The instructions provided will give a developer first-hand experience setting up the required hardware along with writing and debugging the newly available Windows 10, UWP Windows.Devices API's. This lab will also demonstrate how to aggregate your data in cloud using the Azure Event Hub, via the easy-to-use ConnectTheDots API.
Hardware
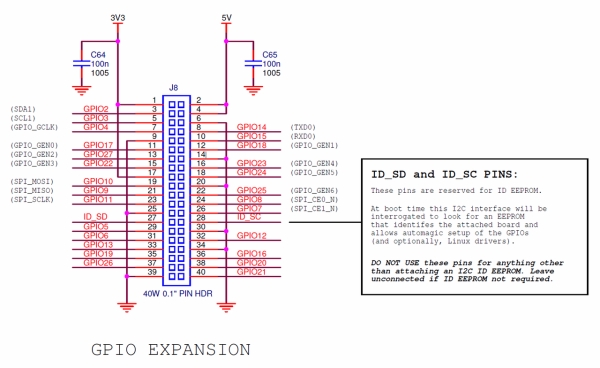
Raspberry Pi 2 to Sparkfun Weather Shield wiring
Pinout Diagram (Raspberry Pi 2 –> Sparkfun weather shield):
- GND——-(black)——GND
- 5V———-(red)———VIN
- 3V3——-(brown)——5V (shield hack; not a typo)
- GPIO2—–(yellow)—-SDA
- GPIO3—-(orange)—-SCL
- GPIO5—–(green)—–D8
- GPIO6—–(blue)——-D7
Software
Find the “//TODO:” list, when completing the lab yourself
Install the weather station application:
Clone the linked repository
- select the “lab” branch (default), if you want to learn the new UWP Windows.Devices API's and complete the code yourself
- select the “master” branch if you want the completed code
Open “WeatherStation\WeatherStation.sln” in Visual Studio 2015
Navigate to “WeatherShield.cs” in the “Solution Explorer” pane
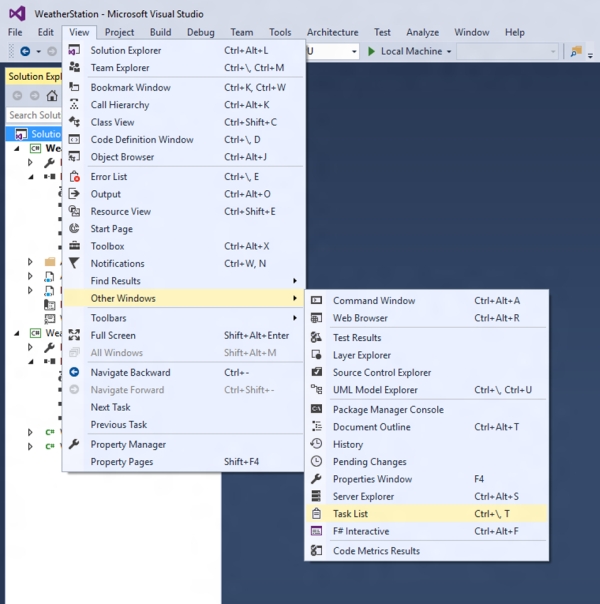
If you chose the lab branch, Navigate to “View >> Other Windows >> Task List”, to view the remaining work (depicted above).
You will notice there is quite a bit of detail in the comment to help you complete the task. However, if you still need that extra nudge, there will be a “HINT” provided to remind you to look to nearby code for help (illustrated above).
Once the //TODO:'s have been completed, click the “Debug” menu item, and select “WeatherStation Properties…”
Under the “Debug” tab, in the “Start options” section
- Select “Remote Device” as “Target device:”
- Enter the IP address of your Windows IoT Core device in the “Remote machine:” field
Deploy to the Windows IoT Core device
Interface with and/or debug the application:
- Set a breakpoint in “WeatherStationTask.cs”, in the “PopulateWeatherData” function
- Step through the individual I2C transactions as they occur
OR
- Ping the IP address of your Windows IoT Core device on port 50001 in an internet browser window (i.e. http://xxx.xxx.xxx.xxx:50001)
Integrating with ConnectTheDots:
Example of the UI on the website
Read more: //build: Hands-on-lab WeatherStation