
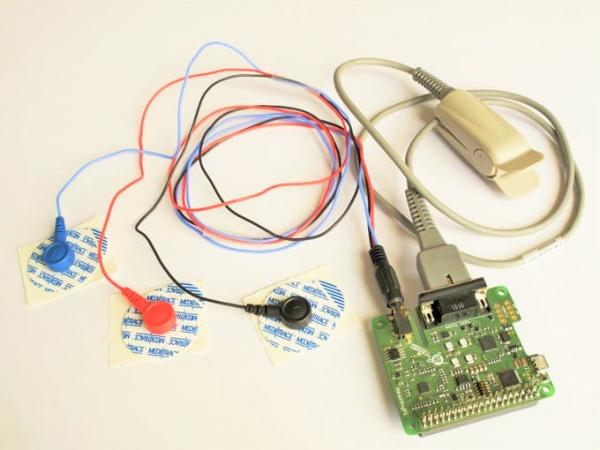
| Hardware components: | ||||||
|
× | 1 | ||||
 |
|
× | 1 | |||
 |
|
× | 1 | |||
| Software apps and online services: | ||||||
|
||||||
|
||||||
STORY
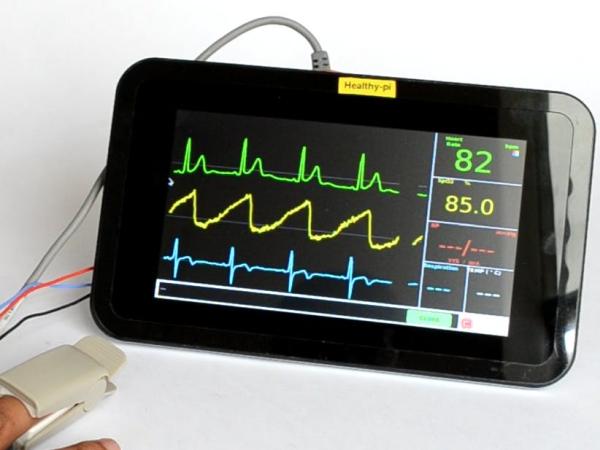
Raspberry Pi boards are used in many applications like Media streamer, Arcade machine, Tablet computer, Home automation, many more. And now Raspberry Pi can be used as patient monitor with the help of ProtoCentral's Healthy Pi Hat. This patient monitor is portable and efficient in monitoring ECG, Heart Rate, SPO2, Respiration, Temperature and Blood Pressure of a patient. This project shows how to use Raspberry Pi Board along with the ProtoCentral's Healthy PI Hat to change into Patient Monitor.
Hardware Specifications
The HAT uses the Atmel’s SAMD21 processor which collects the ECG and SPO2 data from ADS1292R and AFE4490 respectively and update the data to Raspberry Pi via UART interface. The SAMD21G18A is a 32-bit ARM cortex-M0+ microcontroller with max CPU speed of 48Mhz. It got a SRAM 0f 32KB and Flash 256KB. It runs with a 1.6-3.6V supply.
How To Get Started:
The board is pre-loaded with the firmware which works stand alone with the Rpi with fewer setup. However you will need some software. Here's what we're using:
- Atmel Studio 7
Please note that Atmel Studio 7 does not support Mac and Linux . This is the IDE software that can do step & memory debugging and its only for Windows. Also you have to make an account on Atmel's site. The IDE can be downloaded from Atmel Studio's Official Website.
Let's Go
Load the Healthy Pi Source Code
Step 1 : Start by launching Atmel Studio 7.
Step 2 : Open the Project [navigate the path where the project is saved].
Step 3 : You'll see the following, where the sketch is in a window, you can edit the code here if you like.
Debugger
You need a debugger to load the code into the SAMD21G18A. Atmel-ICE will help get from here http://www.atmel.com/tools/atatmel-ice.aspx
Step 1 : Set Up and Check Interface
Step 2 : Identify Interface
- OK now you have your debugger plugged in, its good to check that it works, select Device Programming.
- Programming window will be open.
- Select the programmer from the drop down box. Select interface as “SWD”. Click on “Apply”.
- Now read the Power and Device ID. If you are able to read the Device ID then the interface is fine.
Step 3 : Build & Start Debugging
Ok close out the modal programming window and build the program. If there are no error, then your build will be successful.
Step 4 : Run & Upload
- You will see a window appearing to select a debugging tool. Select the tool and interface.
- Once done, go back and Re-run Program without debugging.
- Now you are ready with the Healthy Pi Hat.
Read More: Build your own patient monitor with a Raspberry Pi