
In this Instructable, we're going to build a very modern take on an iconic piece of studio equipment: a smart on-air warning light that responds to the Robin room reservation system.
This project started life as a practical solution to our occasional need for quiet in a busy office of creatives while recording Uncorked Studio's podcast, With Intent. To read the whole back-story, and find out more about Uncorked Studios, take a look at our blog post.
Bits and Pieces
- Sandies 343-110 3-sided studio warning light
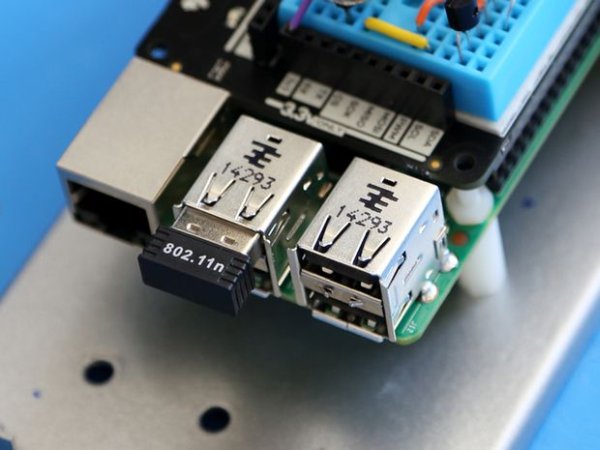
- Raspberry Pi 2B
- USB A to micro B cable and USB power supply
- 8GB+ SD card
- USB keyboard
- HDMI cable and monitor
- USB Mini WiFi Adapter based on Realtek 8188CU
- 12V power supply that can deliver at least 1.25A. We recycled an old laptop power brick that can deliver 12V/5A.
- Pimoroni ExplorerHat Pro expander board
- 12V G4 26 LED lamp assembly
- Murata 78SRH-5/2-C DC-DC converter
- 2x 2N2222A/PN2222A NPN Transistors, TO-92 package
- 2x 10K resistors (leaded)
- Assorted breadboard wire
- 4x Delrin screws, nuts and standoffs

Initial assembly
- Plug the ExplorerHat expander board into the RaspberryPi
- Plug a USB keyboard into any of the USB ports
- Plug the HDMI cable into the RPi and connect a monitor
- Insert the USB WiFi dongle into any available USB port
At this point, don’t power the board up. For the first couple steps in this Instructable, we’ll power the RaspberryPi from the USB power supply and cable, connected to J1 (marked “PWR IN”). After the board is booting and configured, we’ll mod it to run off the 12V power brick.
Step 1: Raspbian Installation and Configuration
Raspbian is a Debian Wheezy variant built for the RaspberryPi. For this project, we installed the stock Raspbian build, configured it for command-line only access, and added a few packages to support the additional hardware we installed.
To get the RPi booting a fresh copy of Raspbian, follow the instructions for NOOBS Setup, stopping at “FIRST BOOT” step 5 (raspi-config). Since this application requires the RPi to understand our current time and time zone, we’ll make a few modifications to the standard config before exiting the utility.
Get some more room
From the main menu, select “1 Expand Filesystem” and follow the prompts to make some more space on the SD card.
Locali(s/z)e Raspbian
By default, Raspbian is configured for the UK, including time zone and keyboard layout. If you happen to live elsewhere, a little reconfiguration is required. Clayton Smith wrote a very concise guide to Making the Raspberry Pi a little less British. (His instructions assume you’re starting from the command prompt; to get there, exit out of raspi-config and log in to a shell.)
- From the raspi-config main menu, select “4 Internationalisation Options”
- Select “I1 Change Locale”
- Deselect en_GB.UTF-8 and select the locale appropriate to your location. We chose en_US.UTF-8.
- Select OK to return to the main menu
- Once again select “4 Internationalisation Options” and then “I2 Change Timezone”. Walk through the screens to select your time zone, and save to return to the main menu.
- Once again, select “4 Internationalisation Options” and then “I3 Change Keyboard Layout”. Select the correct keyboard layout for your system. Save, and return to the main menu.
- It’s probably a good idea to change the default password on your RPi at this point. Select “2 Change User Password” and follow the prompts.
- Save, and then exit raspi-config by selecting “Finish”.
Log in to the RaspberryPi using the password you set in step 7 above. (Default user is ‘pi’, password is ‘raspberry’.)
Update Raspbian and install a few essentials
It’s a good idea to update Raspbian to the latest build, and then install a few essential tools we’ll need later. Given all that may have been installed, a reboot is a good idea.
sudo apt-get update -y && sudo apt-get upgrade -y
sudo apt-get install -y git build-essential vim tmux curl
sudo reboot
Step 2: Set up WiFi
Install the USB WiFi adapter
By default, Raspbian comes with the drivers required to support the USB mini WiFi adapter. The driver should have loaded automatically on boot. To confirm, run the lsusb utility.
pi@localhost ~$ lsusb | grep WLAN
Bus 001 Device 004: ID 0bda:8176 Realtek Semiconductor Corp. RTL8188CUS 802.11n WLAN Adapter
Configure the WiFi interface for your network
Now, we just need to configure the WiFi interface to access your WiFi network. (Oliver Marriott provides a very complete set of instructions for setting up WiFi on the RPi. The abbreviated version appears below.)
Edit /etc/network/interfaces with your favorite editor, and add the following block at the end, changing the parameters for wpa-ssid and wpa-psk to match your network configuration.
iface wlan0 inet dhcp
	wpa-ssid “YourSSIDHere”
	wpa-psk “YourPasswordHere”
iface default inet dhcp
Now, bring up the wlan0 adapter to get the changes and request a new DHCP address
pi@localhost ~$ sudo ifup wlan0
pi@raspberrypi ~ $ ip addr
...
3: wlan0:  mtu 1500 qdisc pfifo_fast state UP qlen 1000
link/ether xx:xx:xx:xx:xx:xx brd ff:ff:ff:ff:ff:ff
inet 192.168.1.100/24 brd 192.168.255.255 scope global wlan0
Set up the host name (optional)
Depending on your network configuration, this may be an optional step. This will enable your RPi to broadcast its hostname so that you may ssh into it by name rather than IP address. To do this, we’ll install avahi-daemon, and configure it to broadcast as onairlight.local.
sudo apt-get install avahi && sudo apt-get install avahi-daemon
Open /etc/avahi/avahi-daemon.conf, and modify the [server] section to broadcast the correct host name and domain. Modify as required to match your network configuration and requirements.
[server]
	host-name=onairlight
	domain-name=local
Then restart the avahi-daemon service
sudo service avahi-daemon restart
Step 3: Install NTPD
Since we’re going to be consuming a calendar service to control when the light is on, we’ll need to make sure the RPi always has the correct time. Simply install ntpd and you’re good to go.
sudo apt-get install ntpd
Step 4: Install the ExplorerHAT python libraries
 Step 4: Install the ExplorerHAT python libraries
Pimoroni’s instructions on Github are complete and very good.
TL;DR:
curl get.pimoroni.com/i2c | bash
sudo apt-get install python-smbus
sudo apt-get install python-pip
sudo pip install explorerhat
You can then confirm the card is working.
pi@onairlight ~ $ sudo python
Python 2.7.3 (default, Mar 18 2014, 05:13:23)
[GCC 4.6.3] on linux2
Type "help", "copyright", "credits" or "license" for more information.
>>> import explorerhat
Explorer HAT Pro detected...
>>> explorerhat.light
blue, green, red, yellow
For more detail: Connected Studio Warning Light