
A first project – Internet controlled LED
In this simple, inexpensive project you can connect a light emitting diode to your Raspberry Pi, and turn it on and off using any web browser. There’s even an app for Apple, Android and Windows smartphones.
Prerequisites
To run this you will need:
- A Raspberry Pi (with network connection)
- An LED (any colour)
- A resistor somewhere between 270 Ohm and 330 Ohm (the precise value doesn’t matter too much as long as it’s above 270 Ohm, though the higher the value the dimmer the LED will appear)
- Some wires with alligator clips on the ends, or some other way of connecting
- Some jumper wires or a breakout board to connect to the Raspberry Pi GPIO outputs
- A free dataplicity account
You can get all of the components in this list very cheaply online or from your local electronics shop.
Caution!
To prevent accidental damage to your Pi, remove all power from your Pi while you are wiring it up!
Also, be super careful not to let connections to one pin on the GPIO touch another pin.
Wire up your circuit
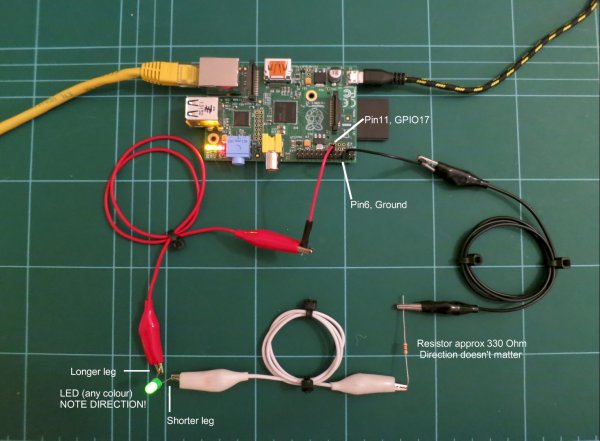
Use the alligator clip wires, jumper wires and resistor to connect the LED to your Pi’s GPIO connections so that it looks like the large picture above.
You’ll see that the circuit runs from GPIO 17 / pin 11 to the longer leg of the LED, then from the shorter leg of the LED to the resistor, and back to ground on pin 6.
Before you start:
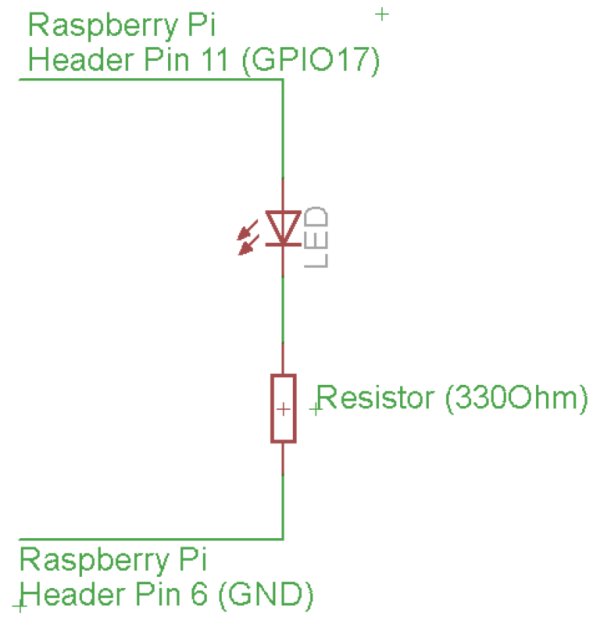
- Take note of the schematic wiring diagram below
- Be aware that while the resistor can be connected either way round, the LED must be connected in the correct direction
- Check also the close up photo of the GPIO connections below to chose the right pins. Remember: don’t let the circuit touch the other pins.
Does your Pi have NOOBS?
dataplicity requires NOOBS to be installed on your Pi, so it boots into Raspbian OS.
 In most cases the Pi is already supplied pre-configured with NOOBS, however if you don’t have it already, or if you purchased a Pi with a blank SD card, you’ll need to install it; the instructions are here: http://www.raspberrypi.org/help/quick-start-guide/ .
Get your dataplicity account
To control your new LED from a web browser you’ll need to make sure that the internet is working on your Pi (via a WiPi or Ethernet connection)
Source: Control an LED from your web browser or smartphone using Raspberry Pi