
If you are looking for some super cool DIY projects using Raspberry Pi, you are in the right place. Am pretty sure that this cool Raspberry Pi Photo booth will make a great addition to your party. Before I proceed I want to convey my thanks to Chris Evans for permitting me to write on his behalf and share his work in our website. Here you can read the original project article from his site Drumminhands.
PROJECT DESCRIPTION:
DIFFICULTY LEVEL: Intermediate
This Photo booth is not just meant for taking photos, its equipped with better features that makes them unique. This project uses a Camera module operated by Raspberry Pi to capture photos and then turn them into beautiful GIF images. And the coolest feature is it will automatically upload the converted GIF images into your Tumblr account with ease, sounds cool isn’t it.
PARTS:
This list includes all the basic parts apart from the enclosure.
- Raspberry Pi – $36
- Raspberry Pi Camera module – $20
- 5V power adapter including USB A to Micro B cable – $9
- SD card with 8GB or more memory – $13
- 7 inch monitor (HD or SD is your preference) – $64
- HDMI or RCA video cable (depends on monitor you use) to connect from Pi to your screen
- Power adapter for your monitor
- USB / Wireless keyboard and mouse
- Arcade button with in build 5V LED
- GPIO cables
- Tripod Mount
Please note if you are using Raspberry Pi 3, the composite video is hidden in the TRRS audio adapter.
OPTIONAL PARTS:
The listed parts can be used to give your Photo booth a professional finish. However using it totally up to you.
- WiFi adapter in case you need to establish wireless internet connection – $9
- TTL cable to troubleshoot or make changes without disturbing the setup.
- Pi Cobbler
- USB power panel mount
- Ethernet panel mount
- USB port panel mount
ALGORITHM OF PHOTO BOOTH:
- Start the device
- Turn on all the LED’s on the front to indicate the device is getting started and turn if off after few moments
- Await Arcade button press from the guests.
- Once the button is pressed blink the “Get ready” light asking the guests to get ready
- Display the real time video preview on the monitor
- Blink the “Pose” LED for few seconds to ask the guest to pose for the photo.
- Capture a photo and save it in .jpg format with filename marked with time stamp.
- Repeat four times
- Process all the captured images
- Turn off the video preview in the monitor
- Now blink the uploading light to indicate that the photo is getting uploaded to Tumblr
- Combine all the four images into a animated GIF
- Upload the converted GIF image to Tumblr
- Stop blinking the “Uploading” light and lit up the “Done” light for few seconds.
- Play the GIF images in the screen few times to guests to see the outcome of their photo session.
- Now await another Arcade button press.
- Shut down the Raspberry Pi once done.
DESIGN:
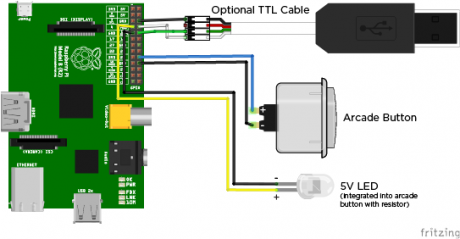
Here is the design of Photo booth which shows the connection of optional TTL: cable and Arcade button integrated with LED. Connect other LED’s similarly to the GPIO’s of the Pi (Omitted in the design).
For more detail: DIY Photo booth using Raspberry Pi for your parties