
Welcome to my new Weather Widget Project.
A weather widget is a application that can be downloaded on your PC, laptop or a mobile device and perform the job of providing easy access to weather information.But I was always trying to make something different.So I go through the internet to get some ideas.After few days of my work, finally I made it.I am sharing this so that any one can make it easily.
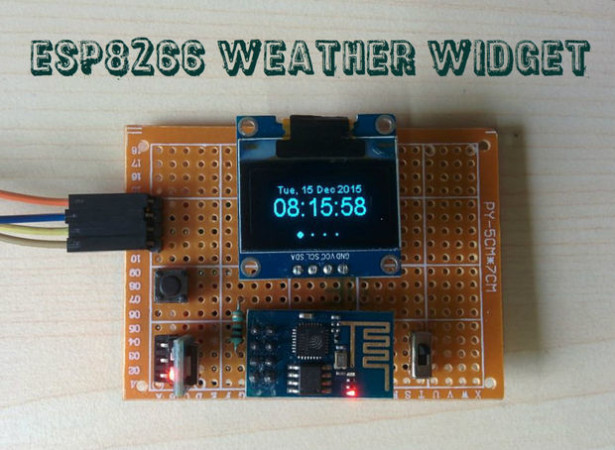
This is an ESP8266 based Weather Display unit which retrieve localized weather information from http://www.wunderground.com/ by WLAN and display it on a 128×64 OLED Display.
The Widget display following things
1. Current Time with Date
2. Current Day Weather Information like Temperature,Pressure,Humidity and Rain fall.
3. Future forecasting for 3 days
I would like to give credit to my friend Dani Eichhorn who did all of the programming parts.He is updating the software on his Github page regularly with new features.You can visit SquixTechBlog to see more projects on ESP8266.
Step 1: Parts and Tools Required
Picture of Parts and Tools Required
Parts Required :
1. ESP8266 -01 (eBay )
2. Optional NodeMCU ESP8266-12 ( eBay )
3. OLED Display (eBay )
4. Voltage Regulator AMS1117 ( eBay )
5.Tactile Switch (eBay )
6.Slide Switch ( eBay )
7.Resistors ( 10K and 330R )
8.Female Double Row Straight Pin Header ( eBay )
9. Male Double Row Right Angle Pin Header ( eBay )
9.Jumper Wires ( eBay )
10.Prototype Board ( eBay )
Tools Required :
1. Soldering Iron
2.Wire Cutter
3.Wire Stripper
4.Nipper
Step 2: Making the Circuit
Make the circuit on a prototype board as per the schematic shown above.
Important thing is that this Board can be used for programming the ESP8266 -01 module from Arduino IDE. You can use it for any of your project.
The whole Circuit is consists of ESP8266-01 module, OLED Display and few other components
1. AMS1117 : This is a voltage regulator which convert 5V to 3.3V required for ESP8266 module.
2. Tactile Switch ( S1) : Used for Resetting the ESP8266
3.Slide Switch (S2) : Used for changing the mode of ESP8266. There are two modes Normal and Program Mode.
4. Resistors : R1 is a pull up resistor and R2 is current limiting resistor.
5. Header CP2102 : Used for programming
6.Header Power : Provide power from a LiPo Battery.This is optional, because you can use the programming port's two pin for power.
7. Header OLED : Connection for OLED Display
Update as on 13/03/2016 : New PCB files
Thanks to my friend spilz who put his effort to make this nice PCB.Now you can make it by downloading the gerber files attached below.
PCB Components :
1. AMS : AMS1117-3.3
2. C1 : 100nF
3. C2 : 10uF
4. C3 : 100nF
5. C4 : 10uF
6. C5 : 100nF
Note : An additional resistor R2 is added in PCB to protect ESP8266 .
For any improvement please suggest .
ESP8266 Weather Widget.pdfESP8266 Weather Widget.pdf
ESP8266_meteo_oled_V2r – CADCAM.ZIPESP8266_meteo_oled_V2r – CADCAM.ZIP
ESP8266_meteo_oled_V2r.3DSESP8266_meteo_oled_V2r.3DS
Step 3: Download and Installed the Softwares
1. Arduino Code
ESP8266 Weather Station
2. Libraries :
Json Streaming Parser
ESP8266 Oled Driver for SSD1306 display
After downloading the library unzip it and installed it with your Arduino Library Manager in
Sketch > Include Library > Manage Libraries…
3. ESP8266 board on Arduino IDE :
To installed the ESP8266 board on your arduino IDE follow the following link.
https://github.com/esp8266/Arduino
Update on 2/1/2016 :
As per the feedback, lot of people facing problem in compiling the code.So I think it is better to share the code what I have used.You can download the .zip file attached below.
ESP8266 Weather Widget.zipESP8266 Weather Widget.zip
Step 4: Get Weather API Key
The Weather Station real-time data obtained from the Weather Underground (http://www.wunderground.com) website. So you have to get the Wunderground API Key. There is no cost to apply for a basic key, which is more than sufficient for our requirements.
Follow the steps below:
1. Go to http://www.wunderground.com/weather/api/d/login.h… a free Weather Underground account.
2.Enter your email address, a password , and a handle (a username), then click the “Sign Up” button.
3.Weather Underground will immediately send you an email with an activation link. You must click this link within the email to activate your account (you’ll be brought back to the login screen).
4. Login to Weather Underground using the account you just created and activated.
5.Click on the “Explore My Options” button.Click the “Purchase Key” button at the top or bottom of the page (you will not be asked for a method of payment).
6.Weather Underground will ask you to fill out a simple form in order to complete your request.
When asked where the API will be used, answer “Other”.
When asked if the API is for commercial use, answer “No”.
When asked if the API is for chip processing, answer “No”.
Step 5: Set up the Software
After downloading the Arduino Code, you have to change the following things
1.Open the sketch in the Arduino IDE
2.Enter the Wunderground API Key
3.Enter your Wifi credentials
4.Adjust the location according to Wunderground API, e.g. India,Kolkata
5. Adjust UTC offset
Step 6: Upload the Code
Picture of Upload the Code
Connect the FTDI Programmer as follows
ESP8266 –> CP2102
Vcc –> Vcc
GND–> GND
Tx –> Rx
Rx –> Tx
Slide the switch toward the Programming Mode
In Arduino IDE ,select the board as ” Generic ESP8266 Module ”
Then upload the code.
For More Details: ESP8266 Weather Widget