
| Hardware components: | ||||||
 |
|
× | 1 | |||
|
× | 1 | ||||
| Software apps and online services: | ||||||
|
||||||
|
||||||
|
||||||
STORY
OVERVIEW
This project is a proof-of-concept using Asterisk PBX, running on a Raspberry Pi, interfaced to Google Assistant™ Voice Service SDK & API.
Using a SIP Phone or SoftPhone, the user dials into their Raspberry Asterisk PBX extension and follows the prompts to speak questions which are sent to Google Assistant Voice Service. Responses are spoken back over the phone. No Google Home™ required.
The Google Assistant SDK lets you add voice control, natural language understanding and Google’s smarts to your devices. Your device captures an utterance (a spoken audio request, such as What's on my calendar?), sends it to the Google Assistant, and receives a spoken audio response in addition to the raw text of the utterance.
For PDF document of these instructions & all code, see:

https://github.com/rgrokett/RaspiAsteriskGoogle
I used a Perl AGI script and SOX to convert the audio formats and send & receive the audio files via Google’s python Google Assistant SDK via the Internet.
Google offers a free developer preview of this service but does require signing up for a Google Developer Account (at no charge).
As this is only a proof-of-concept, it does meet their developer requirements for private, non-commercial use. The primary limitation is that you cannot connect an external telephone number to this for use as an inbound service currently, unless you can meet their terms of service (i.e. paid service).
Importantly, this proof-of-concept has not been optimized to reduce overhead and improve response time. But for a single user demo, the Raspi Pi and Google Assistant does work, if not quite as good as Amazon’s Alexa™ voice service for Raspberry. See my RaspiAsteriskAlexa app on Github. https://github.com/rgrokett/RaspiAsteriskAlexa
If you already have the RaspiAsteriskAlexa project running, this Google Assistant project can run on the same Raspberry Pi at the same time.
Step 1: Requirements
- Raspberry Pi Zero, B+, 2 or 3
- Raspian Jessie installed and up to date
- Pi ethernet or Wifi connected (direct Ethernet is best) with Internet access
- SSH access to the Pi
- Software from GitHub:https://github.com/rgrokett/RaspiAsteriskGoogle
- A SIP/VOIP Phone (Such as Grandstream GXP1620) or SoftPhone such as: http://www.asteriskguru.com/tutorials/xlite_softp…http://www.zoiper.com/en/voip-softphone/download/z…
This project assumes some knowledge of Raspian command-line,
SSH and some beginning knowledge of Asterisk PBX. It also assumes you have a Raspberry Pi configured with Raspian Jessie (Lite version is fine!) and connected to your network. This does not require a GUI on the Pi, so assumes headless operation and a login prompt, terminal or SSH access.
Step 2: Asterisk PBX Configuration on Pi
The Pi needs outbound Internet access but the Asterisk PBX does NOT need any external SIP Voice Provider. This project does not use inbound or outbound voice calls.
If you have never used Asterisk, you probably should look up some Asterisk tutorials. Though, most of the information isn’t needed here. http://www.asterisk.org/
Note that this does NOT use the “FreePBX for Raspberry Pi” package, but instead just uses the Raspian command line install version.
This project should be done on a CLEAN RASPIAN JESSIE installation. Using an existing installation may have had modifications that impact Asterisk or the Google SDK.
1) Install an Asterisk PBX on your Raspberry Pi:
$ sudo apt-get update$ sudo apt-get upgrade$ sudo apt-get install asterisk git
This installs quite a few dependencies, so can take a while!
2) Retrieve the project files from Github: (https://github.com/rgrokett/RaspiAsteriskGoogle)
$ cd /home/pi$ git clone https://github.com/rgrokett/RaspiAsteriskGoogle.g...
3) Update the Asterisk PBX to add the SIP and Extension entries used by this project.
$ cd /home/pi/RaspiAsteriskGoogle$ bash ./install.sh
NOTE:
You will see “No client_secret.json…” and “No Google API OAUTH…” error messages, as these are set up later. Just ignore them for the moment.
- It is OK to execute the install.sh script more than once. It will verify installation.
Step 3: Add a VOIP (SIP) Phone to Asterisk PBX
4) Add a SIP Phone to your Asterisk. Since there are many ways to do this, I am showing a generic configuration. Each phone has different options, but this should be all that is needed.
See the “Requirements” section, previously, for SIP (VOIP) softphones. (PC based software. Requires headset with microphone) or use a physical VOIP telephone, such as the Grandstreams avail from Amazon. The cheap ones under $50 are fine for this.
This is adding a SIP phone with extension number 5310 to Asterisk. Remember, this does NOT include inbound or outbound calling. Only internal calls.
Configure your SIP Phone with the options below. Most other phone options are not used, so can usually be ignored.
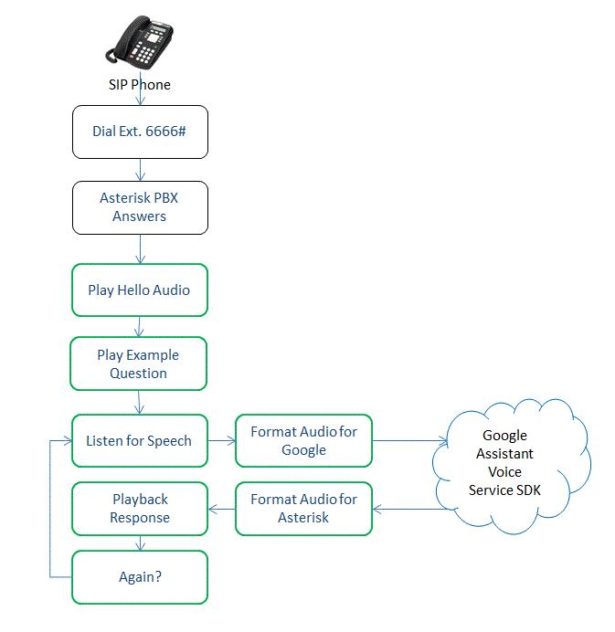
Schematics of Google Voice Assistant Using Asterisk PBX on Raspberry Pi
SIP Phone options:
SIP Proxy Server: 192.168.1.XX  <-
Domain/Realm/Registration: {same IP as above}
Username: 5310 Password:  {blank}
Note that you enter the SIP Proxy IP (i.e. your Pi’s IP address) into the EXTENSION portion of your phone. (Some phones have multiple extensions, but this project needs only 1.)
5) Go off-hook with your SIP/VOIP Phone and see if you can get dial tone.
If so, try dialing 1000# on your VOIP Phone. You should get a built-in demo.
Debugging:
  If you don’t get dial tone, your SIP Phone isn’t registering to your Asterisk server.  Try the following:
a. Reboot the Raspberry and then the SIP phone to see if they reconnect.
b. Verify the files above are edited correctly.
c. Access Asterisk from command line:
    $ sudo asterisk -r
    CLI>  sip show peers
    This should show your sip phone’s IP and status.
    Watch out for firewalls, particularly if using a softphone!
d. Verify IP addresses of the VOIP Phone and Raspi and be sure you can ping the phone's IP from the Pi.
e. If still an issue, turn on SIP Debugging:
    CLI> sip set debug on
    This will display SIP connection attempt messages. If you see nothing after a few minutes, then your SIP Phone isn’t even trying to talk to Asterisk. You need to dig into the SIP Phone’s setup instructions.
f.  Asterisk log messages go to /var/log/asterisk/messages. But note there can be lots of nasty looking messages, most are for unused/unneeded features. So it can be difficult to decipher.
g. Google is your friend. Cut/paste any error messages you see into it to learn more!
Step 4: Google Assistant SDK Install
If you have successfully gotten dial tone and the “Congratulations” demo, then you now have a working Asterisk PBX!
Now you need to create a (free) account on Google Developers site and install their Python Google Assistant SDK for Raspberry Pi.
Excerpted from Google Assistant SDK Getting Started with the Raspberry Pi and Python:https://developers.google.com/assistant/sdk/protot…
Configure a Google Developer Project
1) Go to Google Projects Page: https://console.cloud.google.com/project
You may need to create a Google Developers account or use your existing Google (gmail) account credentials to log in.
2) Create a new project called “AsteriskSpeechAPI” (or any desired name you wish)
3) Enable the Google Assistant API for the project you selected:
https://console.developers.google.com/apis/api/emb…
Click Enable
4) Create an Oauth Client ID with following steps:
a) Create the client ID: https://console.developers.google.com/apis/creden…
b) If asked, give the same project name above for the product name on the OAuth consent screen tab and click Save.
c) Click Other and give the client ID a name (again, same as above is fine).
d) Click Create. A dialog box will appear that shows you a client ID and secret.
No need to remember or save this, just close the dialog
e) Click the down arrow on the far right of the screen to download the client ID and secret as a JSON file called (client_secret_XXXX.json)
(To re-retrieve the credentials again, go to the Google Assistant API Manager, step 3 above, and select Credentials and click the download icon for your project.)
f) Copy the client_secret_XXXX.json file to /home/pi/client_secret.json on your Raspi.
(Renaming it to just client_secret.json)
You can use cut/paste to do this, if you like:
$ cd /home/pi
$ nano /home/pi/client_secret.json
Paste into the editor and save
5) Google requires you to share certain activity data with Google to use their SDK. The Assistant needs this information to function properly. (You can turn off again once you no longer want to use the Assistant SDK.)
Read More: Google Voice Assistant Using Asterisk PBX on Raspberry Pi