
Node-RED is a visual tool for wiring the Internet of Things that can be run on a Raspberry Pi and allows for rapid prototyping of projects. In this tutorial we will first set up Node-RED on a Raspberry Pi 2, before creating a flow that will read a temperature sensor and control a LightwaveRF mains socket.
Home automation with Raspberry Pi 2 and Node-RED
Node-RED is a visual tool for wiring the Internet of Things that can be run on a Raspberry Pi and allows for rapid prototyping of projects. In this tutorial we will first set up Node-RED on a Raspberry Pi 2, before creating a flow that will read a temperature sensor and control a LightwaveRF mains socket.
We will assume your Pi is already set up on the network and you can SSH into it.
Ensure your distribution is up to date:
$ sudo rpi-update
$ sudo reboot
Wait for the Pi to reboot, log back in and execute:
$ sudo apt-get update
$ sudo apt-get upgrade
Hardware
We will be using the following hardware:
- Raspberry Pi 2
- DS18B20+ temperature sensor
- 433 MHz transmitter module
- prototyping breadboard
- jumper wires (like this and this)
- 4.7k resistor
- LightwaveRF mains socket (available via many retailers)
- 174mm length of solid-core wire (to use as an antenna for the wireless board)
- Technique
Technology
Home automation with Raspberry Pi 2 and Node-RED
5268 views
Node-RED is a visual tool for wiring the Internet of Things that can be run on a Raspberry Pi and allows for rapid prototyping of projects. In this tutorial we will first set up Node-RED on a Raspberry Pi 2, before creating a flow that will read a temperature sensor and control a LightwaveRF mains socket.
We will assume your Pi is already set up on the network and you can SSH into it.
Ensure your distribution is up to date:
$ sudo rpi-update
$ sudo reboot
Wait for the Pi to reboot, log back in and execute:
$ sudo apt-get update
$ sudo apt-get upgrade
Hardware
We will be using the following hardware:
- Raspberry Pi 2
- DS18B20+ temperature sensor
- 433 MHz transmitter module
- prototyping breadboard
- jumper wires (like this and this)
- 4.7k resistor
- LightwaveRF mains socket (available via many retailers)
- 174mm length of solid-core wire (to use as an antenna for the wireless board)
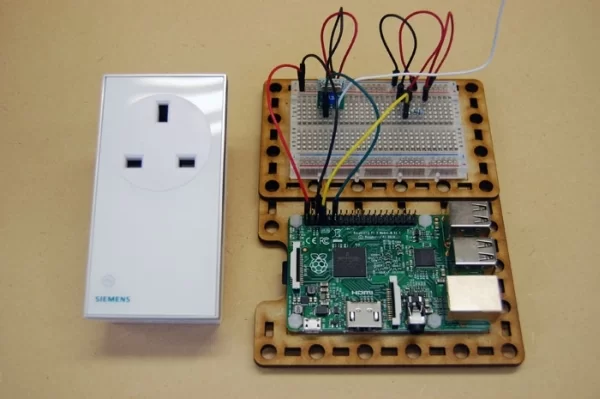
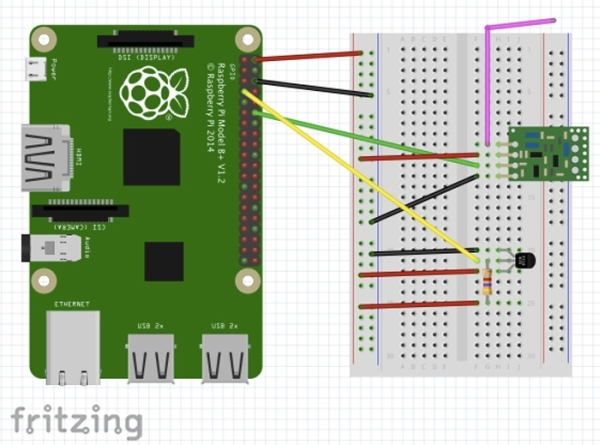
Connect the hardware as shown in the diagram below:
Here we are connecting the temperature sensor and wireless transmitter to the Raspberry Pi. Ensure each has power, ground and data connections and that they are connected to the correct pins on the Pi's GPIO header. Also ensure the aerial wire is connected to the wireless module.
Setting up LightwaveRF control
In order to control wireless mains sockets we need to install wiringPi and lightwaverf-pi. First install wiringPi:
$ git clone git://git.drogon.net/wiringPi
$ cd wiringPi
$ ./build
Now test that wiringPi installed correctly:
$ gpio -v
$ gpio readall
Next install lightwaverf-pi:
$ git clone https://github.com/leachj/lightwaverf-pi.git
$ cd lightwaverf-pi
$ make
$ sudo make install
Execute the test send command:
$ sudo ./send 0
This should execute without errors. Next we will test wireless control by attempting to pair the Pi with the mains socket:
Plug the mains socket in and put it into pairing mode by holding down the button on the side until the indicator light starts flashing orange/blue. Next transmit an on signal:
$ sudo ./send 1
The socket should pair with the Pi. The status light will flash more quickly to show this has successfully completed. You should now be able to turn the socket on and off using the following commands:
$ sudo ./send 1
$ sudo ./send 0
Installing Node-RED
First we will install Node.js (note this process is different on the Pi 2 compared to earlier Pi boards):
$ curl -sL https://deb.nodesource.com/setup | sudo bash –
$ sudo apt-get install -y build-essential python-dev python-rpi.gpio nodejs
Next install Node-RED:
$ sudo npm install -g node-red
Start up Node-RED:
$ node-red-pi –max-old-space-size=128
This will start the Node-RED server on the Pi. Open a new web browser tab and navigate to your Pi's IP address, port 1880. You should see the Node-RED environment loaded and ready to use.
- Technique
Technology
Home automation with Raspberry Pi 2 and Node-RED
5268 views
Node-RED is a visual tool for wiring the Internet of Things that can be run on a Raspberry Pi and allows for rapid prototyping of projects. In this tutorial we will first set up Node-RED on a Raspberry Pi 2, before creating a flow that will read a temperature sensor and control a LightwaveRF mains socket.
We will assume your Pi is already set up on the network and you can SSH into it.
Ensure your distribution is up to date:
$ sudo rpi-update
$ sudo reboot
Wait for the Pi to reboot, log back in and execute:
$ sudo apt-get update
$ sudo apt-get upgrade
Hardware
We will be using the following hardware:
- Raspberry Pi 2
- DS18B20+ temperature sensor
- 433 MHz transmitter module
- prototyping breadboard
- jumper wires (like this and this)
- 4.7k resistor
- LightwaveRF mains socket (available via many retailers)
- 174mm length of solid-core wire (to use as an antenna for the wireless board)
Connect the hardware as shown in the diagram below:
Here we are connecting the temperature sensor and wireless transmitter to the Raspberry Pi. Ensure each has power, ground and data connections and that they are connected to the correct pins on the Pi's GPIO header. Also ensure the aerial wire is connected to the wireless module.
Setting up LightwaveRF control
In order to control wireless mains sockets we need to install wiringPi and lightwaverf-pi. First install wiringPi:
$ git clone git://git.drogon.net/wiringPi
$ cd wiringPi
$ ./build
Now test that wiringPi installed correctly:
$ gpio -v
$ gpio readall
Next install lightwaverf-pi:
$ git clone https://github.com/leachj/lightwaverf-pi.git
$ cd lightwaverf-pi
$ make
$ sudo make install
Execute the test send command:
$ sudo ./send 0
This should execute without errors. Next we will test wireless control by attempting to pair the Pi with the mains socket:
Plug the mains socket in and put it into pairing mode by holding down the button on the side until the indicator light starts flashing orange/blue. Next transmit an on signal:
$ sudo ./send 1
The socket should pair with the Pi. The status light will flash more quickly to show this has successfully completed. You should now be able to turn the socket on and off using the following commands:
$ sudo ./send 1
$ sudo ./send 0
Installing Node-RED
First we will install Node.js (note this process is different on the Pi 2 compared to earlier Pi boards):
$ curl -sL https://deb.nodesource.com/setup | sudo bash –
$ sudo apt-get install -y build-essential python-dev python-rpi.gpio nodejs
Next install Node-RED:
$ sudo npm install -g node-red
Start up Node-RED:
$ node-red-pi –max-old-space-size=128
This will start the Node-RED server on the Pi. Open a new web browser tab and navigate to your Pi's IP address, port 1880. You should see the Node-RED environment loaded and ready to use.
Now we will add a new node to make use of the DS18B20 temperature sensor from within Node-RED. There are two kernel modules needed for correct operation and we will load these first:
 $ sudo modprobe w1-gpio
$ sudo modprobe w1-therm
Whilst it is fairly simple to load these modules manually we will configure them to automatically load at boot time. We can do this by editing the /etc/modules file:
$ sudo nano /etc/modules
add the names of the modules, each on their own line:
Now we will install a node to read data from the ds18b20 module:
$ cd /usr/lib/node_modules/node-red
$ sudo npm install node-red-contrib-ds18b20 –save
Next we need to add a line to the /boot/config.txt file:
$ sudo nano /boot/config.txt
At the end of the file add the following line:
dtoverlay=w1-gpio,gpiopin=4
Save and exit the file, then reboot and log back in to your Pi.
We will now test that the temperature sensor is properly connected to the Pi and data can be retrieved:
$ cd /sys/bus/w1/devices
$ ls
You should be able to see something like the above – the sensor here is shown as 28-000006439bd5. Change into the sensor directory:
$ cd <sensor_id>
e.g.
$ cd 28-000006439bd5
The sensor will write information to the w1_slave file, so we can look in there to see if there is any data:
$ cat w1_slave
This should show two lines. If so, the sensor is connected to the Pi and giving it data.