
By now, most Instructables users are at least familiar with the Raspberry Pi. It's a full 32-bit computer in the dimensions of a man's wallet. You may even own one and love that it can control lots of electronic objects while still streaming media or running scripts. Instead of learning C, you can write Python or Perlscripts and focus on the higher thinking.
Two newer releases change the scale of what someone can do with these nano-computers. One is the Raspberry Pi A+, the next iteration of the smaller scale and lower power machines (256 MB RAM, fits on a business card). The other is the Raspberry Pi 2, a quad-core 900 MHz ARM7 with a full gigabyte of RAM.
It runs Raspbian and Pidora, versions of Debian and Fedora Linux. As I Linux administrator for more than a decade, I am seriously comfortable with setting up these baby powerhouses.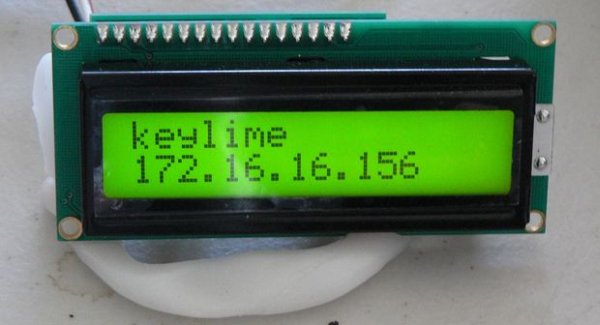
Nevertheless, one thing kept me from setting up Pis (Tau?) all over the place. If I want to run the Raspberry Pi headless — no monitor, no keyboard, no mouse, just remote login via Internet — how do I find out its IP address?
I learned of one way to solve the problem: set up a startup script where it speaks the IP address aloud. Then I figured out a second way: run a startup script that displays the IP address on a 16×2 LCD screen.
Neither takes long to configure. Each makes the device easier to set up for remote situations or for hiding in a pocket with a USB battery and becoming a walking performance piece.
Step 1: Configure the Raspi in Headless Mode
Note that you will need at least the following:
- a USB keyboard
- a wired network connection, and
- a monitor with an HDMI port or a DVI port and a DVI-HDMI adapter.
We will be setting up the RPi for runlevel 3 — no XWindows, but plenty of networking — with the SSH daemon listening for connections. Anyone familiar with Linux system configuration will already know how to do this. If you are instead coming from the electronics world, please follow the NOOBS installation steps to select Raspbian.
In either case, note these specifics for headless mode:
While installing Raspbian
- Select terminal mode;
- Set the hostname to something other than ‘pi';
- Enable sshd, SPI, I2C, and serial daemons at bootup;
- Reboot;
- Login and run “sudo bash”. You will now have the privileges to run the following:
- apt-get update
- apt-get upgrade
- apt-get install festival
At this point, you can use an SSH terminal (such as Putty for Windows) to log into the machine.
Step 2: Using Festival to say the IP address
Festival is open-source software for audio output of text. Its main use in the Linux world has been running laptops for the visually impaired. The software is robust after more than a decade of Linux development alone. This tool will speak the IP address linked to the hostname.
We covered how to install Festival in the previous section. Now we need a shell script and a way to make it run late enough after bootup that the IP address is working:
Shell Script for Festival
#!/bin/bash
hostname -I | festival --tts
Telling the system when to run the script
Debian Linux has a configuration file that gets executed as a post-command each time the runlevel changes: /etc/rc.local. This includes startup, thus it will execute after the system has its IP address.
Caveats for the audio-based process
- Using the audio requires that speakers be plugged into the 3.5mm (1/8th inch) jack.
- The default voice setting is fairly fast. It is useful to add a loop to the script so that it can repeat a certain number of times.
- Speech is transitory — the user needs to write down the answer.

Step 3: Using a small LCD screen to display the IP address
Tiny LCD screens provide a more persistent solution. Most LCD screens available for cheap allow two lines of 16 characters roughly in the ASCII set. Since an IP address is 15 characters at the most (four sets of three-digit decimal numbers separated by three periods), these screens are perfect for the job.
There are two versions of these 16×2 LCD screens:
- The Basic:, with 16 pinouts at the top for parallel address of the HD44780 chip at either 3.3 or 5 volts;
- Serial Enabled: Same as the above, but with a serial interface pre-soldered to the back.
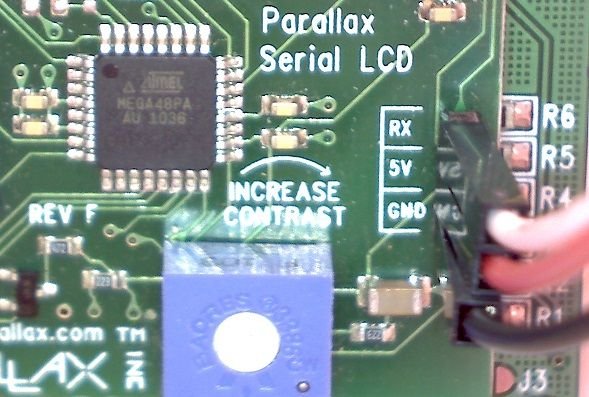
Examples of both types are available at traditional online geek stores. I had on hand Parallax's version of the latter, complete with backlight, speaker, dimmer knob, and Atmel 8U4 chip for the SPI. The code below uses its backlight feature for ease of reading, as well as its three connection pins for serial data: receive (Rx), 5V, and ground (GND).
Plugging in the wires
Since we need five volts (5v) for the screen, we can use the 5V port near the top right side of the Raspberry Pi's pinouts as well as the serial line's transmit (Tx) port and a ground (GND) port. These are ports 02 (or 04), 06, and 08 as shown in this easy-to-read schematic. Connect wires from these three ports to the related ports on the serial line input:
- 5V to 5V;
- GND to GND;
- Tx to Rx (the RPi transmits the serial signal and the screen receives it).
Connect these before giving power to the Raspberry Pi. Note in the second screen shot on this page that I used a ten-wire extension cable to keep things flexible during my tests and used ports 4, 6, and 8.
Step 4: The Script for the LCD Screen
Below is an example script that gets the necessary details from the system and prints them to the serial line. The example is in Python, but it could easily be written in Perl or other scripting languages with libraries for serial output:
#!/usr/bin/env python
import serial
import subprocess
import socket

# configure the serial connection
ser = serial.Serial(port='/dev/ttyAMA0',baudrate=9600)
host = socket.gethostname()
ipnum = subprocess.check_output(["hostname", "-I"])
# if there is more than one IP, just show the first one?

if ser.isOpen():
    # add a line to clear the unit -- 12 isn't enough at startup
    ser.write(chr(12)) # 12 clear and reset cursor
    ser.write(chr(17)) # 17 turns on the backlight; optional
    ser.write(host)
    ser.write(chr(13)) # 13 Starts a new line
    ser.write(ipnum)
Once again we can use /etc/rc.local to tell the system to run a command. This time we will tell it to run another script:
#!/bin/bash
/home/pi/scripts/ipname.py
exit 0;
The path in the second line will vary based on where you decide to save the script.
Big Honkin' Caveats
- This is an example script. Neither the author nor Instructables assume any liability for its use.
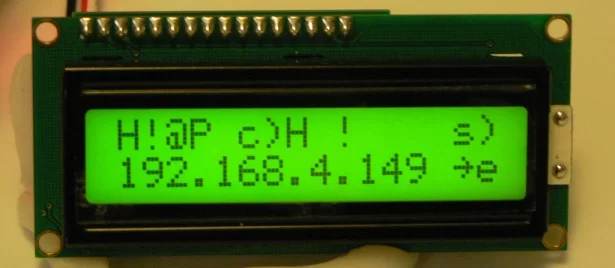
- It's also incomplete. For example, it will print anything in the serial line to the LCD screen before it gets the hostname. Thus it can spew a lot of random characters to the screen and odd notes to the speaker for half a minute leading to the final output. See the screen show for an example.
- See this source page for more details.
Source: How a headless Raspberry Pi can tell you its IP address