
Background of sending SMS from website with Raspberry Pi
Are you curious about the most easiest way to send SMS from your website? Nowadays, I have become really interested in the field of Internet of Things (IoT), therefore I thought it would be cool to integrate a Raspberry Pi to this SMS messaging solution.
Accordingly, this tutorial is intended to provide a full review on how to send SMS from a PHP website through HTTP requests and responses by using Raspberry Pi. It is gonna be exciting!
For better understanding, let me outline the basics of the SMS technology briefly. Let’s start in the beginning of the process and take a look at what happens while the SMS is being transmitted from the sender to the recipient. In order to send an SMS there is a need for an application allowing you to compose a message. (In this case this is a web application, since we are going to write and send SMS on a website.) This application should be connected to an SMS gateway, because this gateway is capable to transmit the SMS towards the mobile service provider (e.g. T-Mobile, Vodafone, Orange, etc.). The SMS gateway usually transmits the SMS through a GSM modem or over the Internet (it is determined by your configurations depending on your specific needs). After the SMS has arrived to the SMSC (SMS Center) of the mobile service provider, the provider will send the SMS to the recipient’s telephone number.
This solution provides a great way to integrate SMS solution into any website (including webshops, client gate systems, contact us sites, community-based pages, etc.), but it is also possible to use this website, powered by Raspberry Pi, to provide SMS service commercially. (For example you can protect your site with password, and your customers, who have personal username-password combination to use your site, can use this platform for sending messages.) It sounds interesting, isn't it? Let's do it!
Table of Contents
- STEP 1: Configure your website and create an SMS sender web application
- STEP 2: Let the webserver be able to manage the SMS web application
- STEP 3: Send a test SMS message from your website
- STEP 4: Conclusion and References
Hardware and software requirements
To implement the previously outlined SMS messaging solution, you will need a webserver that is able to handle the web applications. You will also need a computer that manages your website: the Raspberry Pi appears here. And finally, an SMS gateway also needs to be installed on a PC to be able to send the messages. (Please note that a GSM modem or IP SMS connection needs to be configured to be able to send out the SMS messages in deed.) Let’s take a closer look at the prerequisites in more details:
- Raspberry Pi: The Raspberry Pi is a low cost, credit-card sized computer. This tiny device enables you to do everything you would expect a desktop computer to do, from browsing the Internet and playing HD video, to making spreadsheets, word-processing, etc. What is more, the Raspberry Pi has the ability to interact with the outside world, so it allows to send SMS messages from a website as well. In this solution Raspberry Pi is used to manage the website.
- Webserver (Apache): Concerning that a web application is used to compose the SMS message in this solution, a webserver is essentially needed. To be able to reach your website in a browser, you need to download and install a webserver such as Apache. After you have installed the webserver, you need to establish connection between your Raspberry Pi and the webserver. For this purpose, you need to copy and paste the apt-get install apache2 php5 command into the /var/www folder of the Apache. (More information on how to install the Linux-Apache-PHP components to run a Dynamix HTML webpage on a Raspberry Pi – LAMP webserver.)
- PHP component: To let your webserver be able to manage the web applications, you need to install PHP on your Apache webserver. (This configuration will be described henceforth.)
- SMS gateway (Ozeki NG SMS Gateway): As it was mentioned above, an SMS gateway is essentially needed to be able to send SMS messages from your website. It should be downloaded and installed on a computer.
- GSM modem or IP SMS connection: Within your SMS gateway some configurations are required to be able to send out the SMS messages in deed. You need to setup a GSM modem connectivity by using a GSM device, or you need to configure an IP SMS connection after you have contracted with a mobile service provider. But what if you have not got any installed service provider connection right now? No problem. You can test the application by simulating the SMS sending. In this solution this case will be present: you will see how to test this solution freely using Ozeki NG.
- Windows PC: The SMS gateway I used is Windows-based, so a Windows PC is also needed to be able to install the SMS gateway.
Step 1: Configure your website and create an SMS sender web application
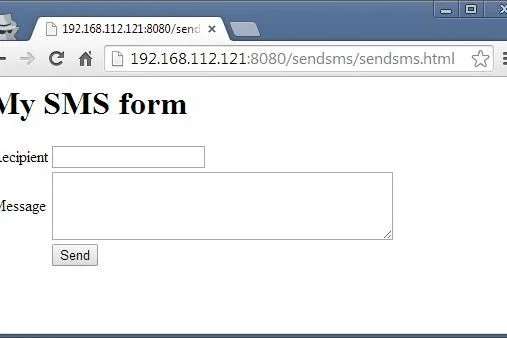
After you have installed all the required prerequisites, let’s create a simple SMS form using HTML that can be added to the code of any website. (It will be a simple HTML form that will be filled out by the website visitor who wants to send messages.)
For the simplicity’s sake, in this project a simple website was used that only contains the SMS form. Feel free to use and modify the HTML code attached to this project to reproduce the solution.
Having done the coding of your SMS form, let’s copy and paste the HTML file, that contains the code of the SMS form, into the /var/www folder of your webserver.
Step 2: Let the webserver be able to manage the SMS web application
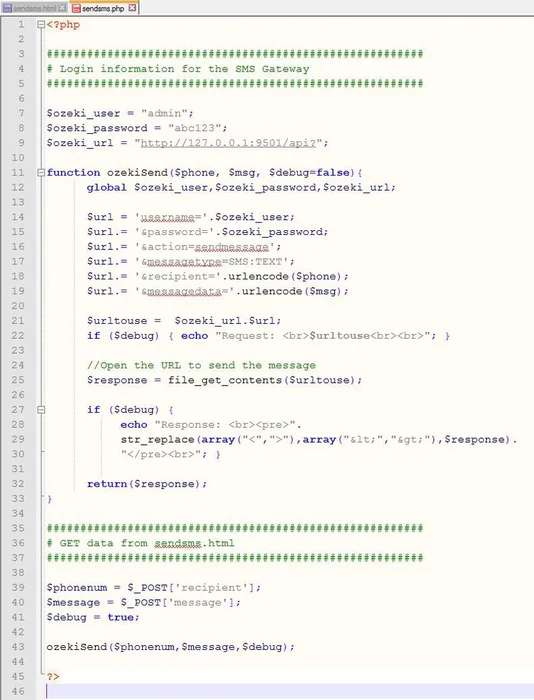
To let your webserver be able to manage your SMS sender web application, copy and paste the following PHP file into the /var/www folder of your webserver.
For better understanding, let’s take a closer look at the code. The program use the following URL format to send an SMS:
http://127.0.0.1:9501/api?action=sendmessage&username=UUUUU&password=PPPPP&recipient=NNNNN&messagetype=MMMMM&messagedata=DDDDD
Let’s analyze what does this URL consist of. As it can be seen in the code snippet attached to this project, first of all, it is needed to establish connection between the application and the SMS gateway. For this purpose, you need to specify the login information for the SMS gateway: username and password related to the user you have created in the SMS gateway, and the IP address of the computer your SMS gateway is installed on. These data can be seen in the first half of the previous URL. (127.0.0.1 refers to the IP address and 9501 is the default port of the SMS gateway. UUUUU refers to the username and PPPPP should be replaced to the password.
It can be seen that the URL contains the action parameter as well, that specified the HTTP API command. Its value is the following: sendmessage.
In addition, the URL consists of the recipient’s telephone number (recipient=NNNNN), the type of the message (messagetype=MMMMM) and the messagedata (messagedata=DDDDD) that should be provided by the website visitor who wants to send an SMS by using your web application. (For text messages the message data will be plain text, for other message types it will be an XML document. The messagedata parameter specifies the text or the data of the SMS message.)
By studying the code snippet, you can see that the program generates the urltouse variable by using the previously described parameters. When the website visitor is ready with the message and clicks on the Send button, the webserver will send this urltouse variable as a HTTP request to the SMS gateway. After this, the SMS gateway will send back a HTTP response that authenticates that the SMS gateway has received the message and it is ready to send it towards the mobile service provider. (Please note that your SMS message will be sent to the recipient’s telephone de facto, if you have configured GSM modem or IP SMS connection properly.)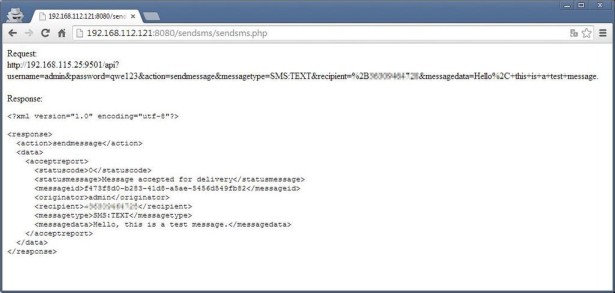
Step 3: Send a test SMS message from your website
Having done all the previously presented configurations, let’s test the SMS application. You only need to open the following URL in a webbrowser:
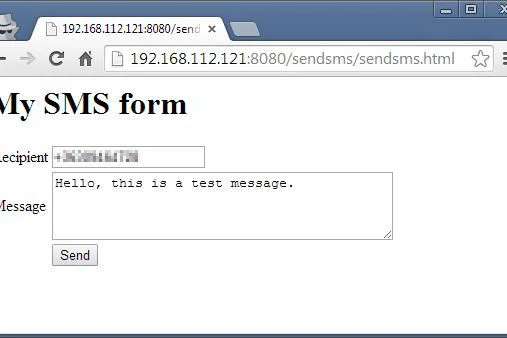
http://192.168.112.121:8080/sendsms/sendsms.html
(The ’192.168.112.121:8080’ should be replaced to the corresponding data related to your Raspberry Pi. The ’sendsms.html’ refers to the HTML file that contains the code of the SMS form.)
Enter a text message into the ’Message’ text input field, then click on the ’Send’ button.
Therafter, a PHP file will be loaded that contains the URL that has been sent to the SMS gateway as a HTTP request, and it also contains the HTTP response, which verifies that the SMS gateway has received the message. This response also shows that the SMS web application works well, and can be used to send SMS messages effectively.
Step 4: Conclusion and References
Conclusion
This tutorial demonstrated how to send SMS from a PHP website through HTTP requests and responses by using Raspberry Pi. It presented a really effective way for SMS messaging that can be useful for anyone who wants to integrate SMS functionality to any website.
References
Source: How to send SMS from a PHP website through HTTP by using Raspberry Pi