
What is a Raspberry Pi ?
Raspberry Pi is a small credit card sized computer that is connected to a output device and input devices such as monitor, keyboard and mouse and can be used to perform operations as performed on a normal PC. It is a low cost gadget developed by the UK Company Raspberry Pi Foundations to promote computer education for school kids. It also runs many programming languages such as C, Java, Python and even basic programming languages such as scratch. It also can be used to browse the internet, play HD videos, creating documents, spreadsheets, playing games, etc…
Raspberry Pi can be used in many electronics projects which are as advanced as setting up a server for multiplayer gaming to simple projects such as spying on a bird nest. We can tweak it and perform our own projects. We can even install other operating systems such as Linux, RISC OS, and also Android.
Now latest Raspberry Pi 2 is available with Windows 10 OS check about it here
Check how to make a wireless remote car
Installing Android OS on Raspberry Pi
Installing Android OS on Raspberry Pi is very easy . It must be installed on a SD-Card usually a 4GB card to enable the installation of other apps and media files. The Android UI is still buggy on Raspberry Pi and crashes a lot and is very slow. Hence it is recommendable to install the OS only on the version of Raspberry Pi with memory of 512 MB or more.
It is more recommendable to install the android version 2.3 because of the low hardware configuration on Raspberry Pi and since its configuration is equal to that of an entry level smartphone, it will run android 2.3 better.
Things needed:
- Raspberry Pi
- 4 GB+ SD Card formatted as FAT32
- CyanogenMod 7.2 (custom Android ROM for Raspberry Pi)
Steps for installing the Android OS:
WINDOWS
- Download the CyanogenMod 7.2 from the given link
- It will be present in the 7z format, unzip it using 7-zip or WINRAR.
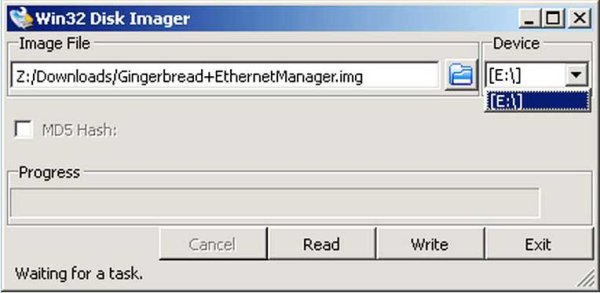
- We need to extract the files in the .img file into the sd card. It can be done using the software Win32 Disk Imager. Select the .img file and the device you want it to be copied into and click on write.

Win32 Disk Imager
MAC OS X
- Download the CyanogenMod 7.2 from the given link.
- Unzip the 7z file using “The Unarchiver” from app store.
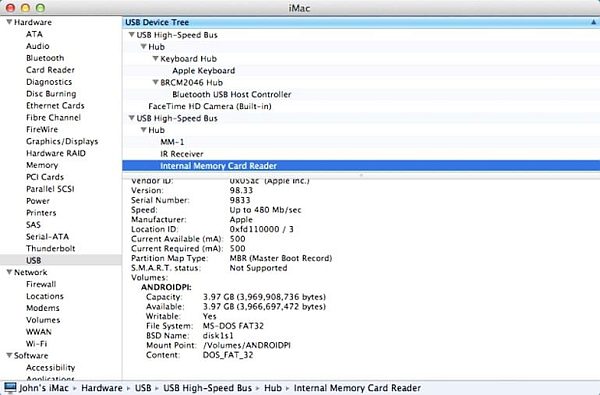
- To find the BSD Name of the Sd card: To find the BSD name of the sd card, click on the apple logo from the menu bar and then click on About this MAC and go to More Info and take a look at the System Report. Next, select ‘USB’ from the sidebar and click on “Internal Memory Card Reader”. The BSD Name will be listed here. For ex: disk1
- To Copy the .img file to the sd card: open the terminal and enter the following the code: sudo dd if=image_path_here.img of=/dev/diskn bs=1m— replace image_path_here.img with the path of the downloaded file and ‘diskn’ with the BSD name of the sd card found above. Dd is a powerful tool and it will format whatever drive is specified so be careful while using this command. It will take some time for the command to finish and it doesn’t provide any feedback. Hence wait until it is done and load the sd card into the RPi
LINUX
Installing in Linux platform is similar to that of MAC OS X and we can use the same dd function.
- Download the CyanogenMod 7.2 from the given link.
- Open the terminal and install p7zip by using the following command: sudo apt-get install p7zip-full.
- Extract the contents of CyanogenMod 7.2 by using the following command: 7za e path_of_your_file.7z.
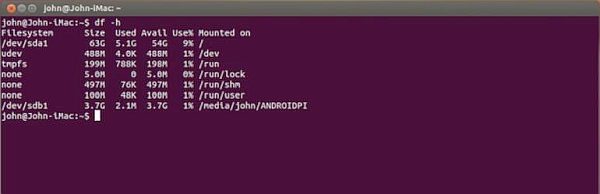
- To find out the label assigned to the sd card, use the following command: df -h. You will be shown a list of all the devices. Find out where the sd card is located. Eg: /dev/sdc1.
You can also unmount the sd card by using the command unmount /dev/sdc.
- Use the dd command to copy the .img file to the sd card using the following command: dd bs=4M if=path_of_image_file.img of=/dev/sdc
For more detail: How to Install Android on Raspberry Pi ?