
Raspberry Pi is an ARM architecture processor based board designed for electronic engineers and hobbyists. The PI is one of most trusted project development platforms out there now. With higher processor speed and 1 GB RAM, the PI can be used for many high profile projects like Image processing and Internet of Things.
For doing any of high profile projects, one need to understand the basic functions of PI. We will be covering all the basic functionalities of Raspberry Pi in these tutorials. In each tutorial we will discuss one of functions of PI. By the end of this Raspberry Pi Tutorial Series, you will be able to do high profile projects by yourself. Go through below tutorials:
- Getting Started with Raspberry Pi
- Raspberry Pi Configuration
- LED Blinky
- Raspberry Pi Button Interfacing
- Raspberry Pi PWM generation
- Controlling DC Motor using Raspberry Pi
- Stepper Motor Control with Raspberry Pi
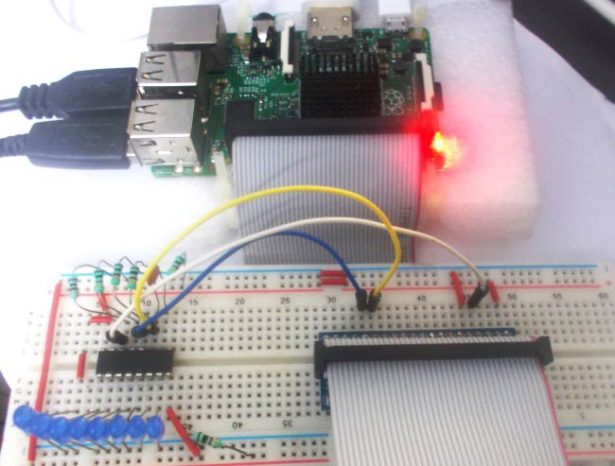
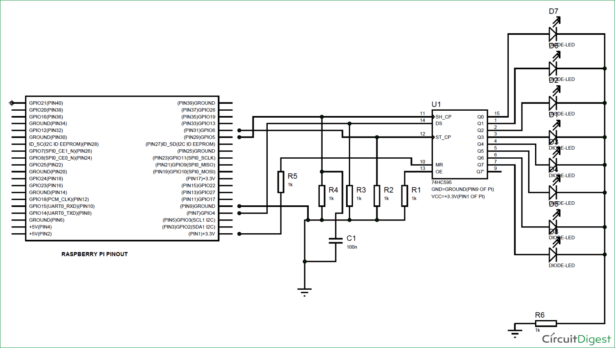
In this Raspberry Pi shift register tutorial, we will Interface Shift Register with Pi. PI has 26 GPIO pins, but when we do projects like 3D printer, the output pins provided by PI are not enough. So we need more output pins, for adding more output pins to PI, we add Shift Register Chip. A Shift Register chip takes data from PI board serially and gives parallel output. The chip is of 8bit, so the chip takes 8bits from PI serially and then provides the 8bit logic output through 8 output pins.
For 8 bit shift register, we are going to use IC 74HC595. It’s a 16 PIN chip. The pin configuration of the chip is explained later below in this tutorial.
In this tutorial, we will use three PI’s GPIO pins to get eight outputs from Shift Register Chip. Remember here the PINS of chip are for output only, so we cannot connect any sensors to chip output and expect the PI to read them. LEDs are connected at the chip output to see the 8 bit data sent from PI.
For doing any of high profile projects, one need to understand the basic functions of PI. We will be covering all the basic functionalities of Raspberry Pi in these tutorials. In each tutorial we will discuss one of functions of PI. By the end of this Raspberry Pi Tutorial Series, you will be able to do high profile projects by yourself. Go through below tutorials:
- Getting Started with Raspberry Pi
- Raspberry Pi Configuration
- LED Blinky
- Raspberry Pi Button Interfacing
- Raspberry Pi PWM generation
- Controlling DC Motor using Raspberry Pi
- Stepper Motor Control with Raspberry Pi
In this Raspberry Pi shift register tutorial, we will Interface Shift Register with Pi. PI has 26 GPIO pins, but when we do projects like 3D printer, the output pins provided by PI are not enough. So we need more output pins, for adding more output pins to PI, we add Shift Register Chip. A Shift Register chip takes data from PI board serially and gives parallel output. The chip is of 8bit, so the chip takes 8bits from PI serially and then provides the 8bit logic output through 8 output pins.
For 8 bit shift register, we are going to use IC 74HC595. It’s a 16 PIN chip. The pin configuration of the chip is explained later below in this tutorial.
In this tutorial, we will use three PI’s GPIO pins to get eight outputs from Shift Register Chip. Remember here the PINS of chip are for output only, so we cannot connect any sensors to chip output and expect the PI to read them. LEDs are connected at the chip output to see the 8 bit data sent from PI.
Circuit Diagram:
For more detail: Interfacing 74HC595 Serial Shift Register with Raspberry Pi