
The General Purpose Input/Output pins (GPIO) give you power to interact with the real world using your Raspberry Pi. This project will get you comfortable with using the GPIO pins, which will form the backbone of the final project.
Traditionally the ‘Hello World’ program for electronics prototyping is simply turning a light on and off. We’re going to go one better than that here though, by simulating candlelight.
To do this we’re going to use the Random and Time modules from Python’s standard library to continually change the brightness of the light while using the RPi-GPIO library to control the LED with Pulse Width Modulation (PWM).
What you’ll need
Small breadboard
Small LED (any colour)
330ohm resistor
2x male-to-female prototyping cables
Step-by-step
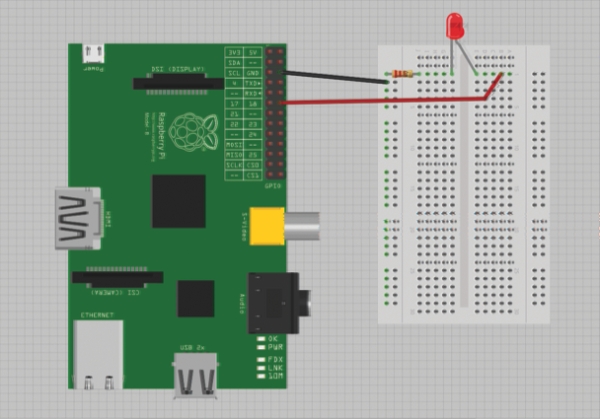
Step 01 Prepare your circuit
Before we turn on our Raspberry Pi we’ll make all the physical cable connections to it. This requires us to place a male-to-female cable on the first ground pin on the GPIO port and another male-to-female cable on the PWM pin (pin 18). Connect it to the breadboard along with the LED and resistor as shown, ensuring the short leg of the LED goes to ground.
Step 02 Power up the Pi
With the circuit complete we can power up the Pi. Open Leafpad and we’ll start creating the script (found to the right) we need to control the LED light. The first thing we do is import the modules we need. The RPi.GPIO library is key to our project – we use it to read and write to pins and control their functionality. We’re also using Random and Time modules in order to help simulate the effect of candlelight.
Step 03 Configure the GPIO module
Next we assign a name to the LED pin and set up the GPIO module for our project. Notice we’re using ‘setmode’ and calling it BCM. This means we’re using the Broadcom naming scheme. We then assign the LED pin to OUTPUT, which means we’ll be outputting to that pin (as opposed to reading from it). If we simply wanted to turn the light on and off, at this point we could use GPIO.output(led,GPIO. HIGH) and GPIO.output(led,GPIO.LOW). Instead we’re using PWM, so we assign a variable PWM to control it.
Step 04 Basic functions
Next we create two very basic functions that we can call in our main program loop to randomly control the physical brightness of the LED and the amount of time that the light pauses on a set brightness. To do this we first use the random.randint method. The numbers 5 and 100 represent the lowest and highest brightness (in per cent) – the function will then pick a number between these percentages during each loop through the program. random.random picks a floating point number between 0 and 1 – we divide this by WIND to help achieve our flicker effect.
Source: LED candle with Raspberry Pi