
The motivation for this project came when I combined my Raspberry Pi voice-controlled electrical outlets with a RetroPie. Due to the number of peripherals and cables involved (a powered USB hub, microphone, two USB controllers, breadboard, wireless remote, plus the normal HDMI and power cables for the Pi), this led to a pretty tangled mess of wires that didn't exactly look great sitting in the TV cabinet. So, I wanted to build a nice case to hold everything that looked something like a regular game console – ideally with external connections for the USB devices, an HDMI port, a power switch, and a single power cord (shared by the Pi and the USB hub).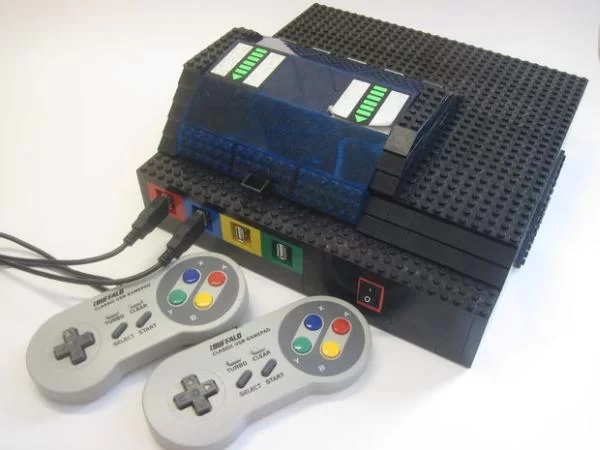
The normal way to do this would be with a custom project box and regular panel mount connectors, like these HDMI and USB ones from Adafruit. To do that, you need to either machine or laser-cut a custom panel to fit all the connectors, and I don't have the means to do so (yet….cough, cough, Full Spectrum Laser contest). I've seen a bunch of cool Raspberry Pi LEGO cases out there – but most of them just enclose the Raspberry Pi itself, without all the extra space for a USB hub and breadboard, or sturdy external panel mount connectors.
Enter Sugru, a self-setting rubber that you can mold by hand, kind of like Play-Doh or modeling clay*. Let it sit for 24 hours and it hardens into a tough, slightly flexible rubber. I'd recently used it for the first time to waterproof a small DC motor for a different project, and realized it would be great for this: build a case out of LEGOs, and use Sugru to firmly seal in the panel mount connections – no machining or lasering required. Rather than using regular panel mount connectors (which have screw terminals that I wouldn't need for this approach), I could use either very short extension cables or female-female couplers to create the panel mounts. The result is a very fun and kid-friendly approach to building a stylish case, without requiring any tools.
So, you could use this idea for ANY project that requires panel mount connections – it doesn't have to be Raspberry Pi-related. I'll just be using my RetroPie “console” as an example since it contains a variety of different connectors (HDMI, USB, barrel jack). I'll also include a power switch (a nice addition since the Pi doesn't have one built in), but that part requires a bit of soldering. It should be pretty easy to adapt the process for any other connections you need for your project (VGA, RCA, pushbuttons, slide switches, etc etc).
*Sugru has an Instructables account where they post their own projects that use Sugru. I am in no way affiliated with the company, nor is this an endorsement of the product. I first found out about Sugru when I won a couple packets as a prize in a different contest, and decided this would be a cool use for it. If you know of a different, cheaper, or better material to use, please mention it in the comments below (for example, I'm curious if plain old modeling clay would work, but my hunch is that it would be too brittle once dried).
Step 1: Materials
Materials – here are the materials required to build the panel mount connectors only. I'll assume you already have your own electronics project that you need to build a case for at this point. If you need different types of connectors (e.g. VGA), you'll have to get the appropriate type of extension cable or female-female coupler.
- Sugru, available in different multi-packs and color combinations. I used one individual pack per connection. Right now it only comes in red, yellow, blue, black, and white, but you can mix those colors to make new ones.
- Assorted LEGO bricks – colored to fit your personal style, of course; and quantity will depend on the overall size of your case and number of connectors. Take a look at the next couple steps to get a rough idea for how many pieces you'll need for a single panel mount. You can buy individual LEGO bricks at the Pick a Brick shop.
- 6″ USB-A male to female extension cables (I have a 7-port USB hub, but one port powers the Pi, so I ordered 6 of these). Edit – after using them, these cables are not very flexible, which makes it difficult to cram them into a small case. I didn't want to spend more money on new cables, but I wouldn't recommend these very highly.
- 6″ HDMI male to female extension cable. Note: I actually already had a very short male-male HDMI cable, so I ordered an HDMI female-female coupler to use along with that cable. Either approach should work fine. Edit – as with the USB cables, short HDMI cables don't seem to be very flexible – keep that in mind if you're designing a very small case.
- 1.3mm barrel jack male-female extension cable. Be careful with your power cable! Unfortunately there are a bazillion different barrel jack sizes. I bought this one hoping it would be compatible with my Plugable 7-port USB hub. I got the diameter right, but the plug is a couple millimeters too long – fortunately it still fits and everything powers on OK. The cable itself is obnoxiously long to fit inside a case (six feet), but you can cut it and solder the ends back together to make it shorter.
- Rocker switch and some extra hookup wire if you'd like to add a power switch. Unlike the other connections, this one requires soldering. You'll also want some electrical tape or heat shrink tubing to cover up exposed wire.
- Edit – I just discovered the SparkFun carries a barrel jack power switch. I don't use this in my instructions, but if you want to avoid soldering altogether, you could use that instead of cutting up a barrel jack cable and soldering it to a separate switch. Again, make sure the plug size is compatible with your project – this one will NOT work with the Plugable USB hub I listed above.
If you want to reproduce my project (voice controlled outlets + RetroPie) exactly: to do the voice-controlled outlets see my Instructable. I followed this guide to set up RetroPie, which requires two USB game controllers (doesn't have to be SNES, that's just what I picked). I'm using this powered USB hub which has worked nicely with the Pi. This isn't a “getting started with Raspberry Pi” guide – but if you need help getting set up, send me a message and I'm happy to help out.
Step 2: Dry run with LEGOs
Sugru has a working time of about 30 minutes. That means that you need to plan your LEGO build out in advance – don't open all the Sugru, then panic as you try to assemble your whole case in half an hour! You should already have an idea of how many and what kind of ports you need for your project. The next thing to decide is how you want them to be arranged. Do you want to build a somewhat permanent case out of LEGOs with multiple ports built into the same walls? There's nothing wrong with that, but I decided to opt for a more modular approach – I built an individual box around each port. While the end result is a little bulkier than it could have been, it means I can swap ports out or move them around if I ever decide to do a different project in the future.

I'd recommend just doing a “dry run” – build the LEGO structures without using any Sugru. Make sure your cables fit snugly, with a little room around the sides to pack in some Sugru and hold them in place. As you can see above, I tried this for my USB, HDMI, and barrel jack connectors. I used 4×4 plates for the base and top of each box, and 1×4 plates/bricks for the side walls (as needed depending on the height).
Step 3: Use the Sugru
Ok, so now you've practiced, and you have a plan for how this is all going to fit together, right? Gather LEGO the pieces you'll need for your first panel mount connector (or multiple connectors, if you're building them into one big structure), along with one pack of Sugru and the appropriate cable or coupler. Here you can see I've got one USB extension cable, two 4×4 plates, four 1×4 bricks, and one matching pack of red Sugru. Now:
- Use scissors to open the pack of Sugru and peel it out of the wrapper.
- Mold the Sugru around the end of the cable/coupler as pictured. Try to spread it out evenly, but the exact thickness on each side will depend on the spacing relative to your LEGO structure (i.e. you might need more on the top and bottom instead of the sides, or vice versa). Also try to get some Sugru along the front and back edges of the connector, to help hold it in place better when it gets pushed/pulled on.
- Re-assemble your LEGO enclosure, and this time tightly pack your Sugru-enclosed cable inside. Make sure to press all the bricks together firmly.
- Take an end-on look at the connector to make sure the Sugru is filling up all the gaps between the cable and the LEGOs. If there are large gaps, your panel mount might be loose in the end. If necessary, try adding more Sugru, or re-designing your LEGO enclosure to have a tighter fit.
- Repeat as needed for each additional connector
For more detail: Lego + Sugru Panel Mount Connectors (with RetroPie case as example)