
With Docker on the Raspberry Pi we are able to connect cloud tools with IoT devices. So how can we interact with the real world from inside a Docker container? Let’s see and get physical…
To keep the tutorial simple we will use the binary from the wiringPi project within a Docker container. This command line tool can be used to read and write the GPIO (General Purpose Input/Output) pins of the Raspberry Pi.
We’ve dockerized the wiringPi binary gpio in a very tiny Docker image of about 2 MByte, so pulling this image even on a Raspberry Pi B is still a fast experience.
docker pull hypriot/rpi-gpio
Turn an LED on and off
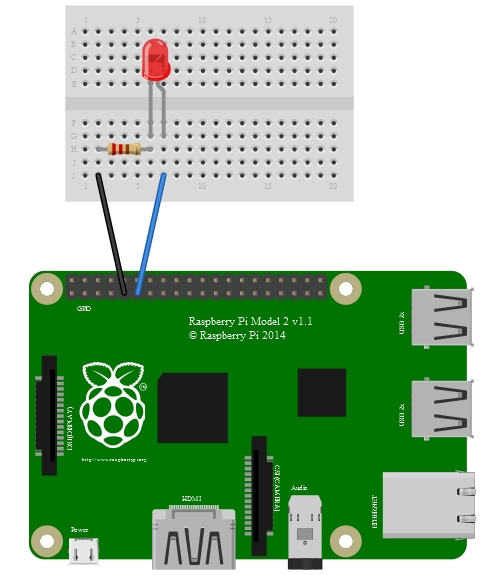
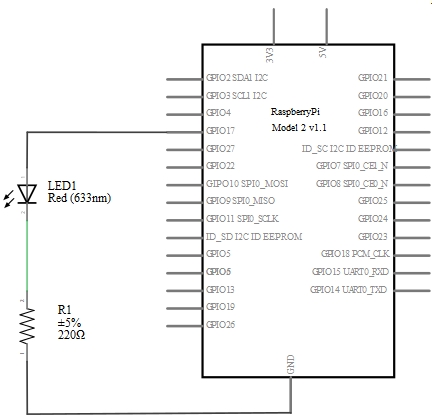
In a first little example we just want to turn an LED on and off. You need only a few components to try it yourself.
See the wiring diagram on how to connect the LED and the 220Ω resistor to your Raspberry Pi for the following examples. We use the 11th (BCM GPIO 17 / wiringPi Pin 0) and 9th (Ground) Pin of the Raspberry Pi B/B+ or Pi 2 B.
Get status of all GPIOs
$ docker run --rm --cap-add SYS_RAWIO --device /dev/mem hypriot/rpi-gpio readall
The output of this command shows a table with all pins and modes as well as the current states.
+-----+-----+---------+------+---+---Pi 2---+---+------+---------+-----+-----+ | BCM | wPi | Name | Mode | V | Physical | V | Mode | Name | wPi | BCM | +-----+-----+---------+------+---+----++----+---+------+---------+-----+-----+ | | | 3.3v | | | 1 || 2 | | | 5v | | | | 2 | 8 | SDA.1 | ALT0 | 1 | 3 || 4 | | | 5V | | | | 3 | 9 | SCL.1 | ALT0 | 1 | 5 || 6 | | | 0v | | | | 4 | 7 | GPIO. 7 | IN | 1 | 7 || 8 | 1 | ALT0 | TxD | 15 | 14 | | | | 0v | | | 9 || 10 | 1 | ALT0 | RxD | 16 | 15 | | 17 | 0 | GPIO. 0 | IN | 0 | 11 || 12 | 0 | ALT5 | GPIO. 1 | 1 | 18 | | 27 | 2 | GPIO. 2 | IN | 0 | 13 || 14 | | | 0v | | | | 22 | 3 | GPIO. 3 | IN | 0 | 15 || 16 | 0 | IN | GPIO. 4 | 4 | 23 | | | | 3.3v | | | 17 || 18 | 0 | IN | GPIO. 5 | 5 | 24 | | 10 | 12 | MOSI | ALT0 | 0 | 19 || 20 | | | 0v | | | | 9 | 13 | MISO | ALT0 | 0 | 21 || 22 | 0 | IN | GPIO. 6 | 6 | 25 | | 11 | 14 | SCLK | ALT0 | 0 | 23 || 24 | 1 | ALT0 | CE0 | 10 | 8 | | | | 0v | | | 25 || 26 | 1 | ALT0 | CE1 | 11 | 7 | | 0 | 30 | SDA.0 | IN | 1 | 27 || 28 | 1 | IN | SCL.0 | 31 | 1 | | 5 | 21 | GPIO.21 | IN | 1 | 29 || 30 | | | 0v | | | | 6 | 22 | GPIO.22 | IN | 1 | 31 || 32 | 0 | IN | GPIO.26 | 26 | 12 | | 13 | 23 | GPIO.23 | IN | 0 | 33 || 34 | | | 0v | | | | 19 | 24 | GPIO.24 | IN | 0 | 35 || 36 | 0 | IN | GPIO.27 | 27 | 16 | | 26 | 25 | GPIO.25 | IN | 0 | 37 || 38 | 0 | IN | GPIO.28 | 28 | 20 | | | | 0v | | | 39 || 40 | 0 | IN | GPIO.29 | 29 | 21 | +-----+-----+---------+------+---+----++----+---+------+---------+-----+-----+ | BCM | wPi | Name | Mode | V | Physical | V | Mode | Name | wPi | BCM | +-----+-----+---------+------+---+---Pi 2---+---+------+---------+-----+-----+
Set mode to output
To turn on LED’s or switch other outputs you have to set the corresponding GPIO pin to output mode with
$ docker run --rm --cap-add SYS_RAWIO --device /dev/mem hypriot/rpi-gpio mode 0 out
For more detail: Let's get physical with Docker on the Raspberry Pi