
Overview
This is an out of the box quick start guide that will give you the essentials of preparing and running the LOGI-Apps demos on your LOGI-Pi and Raspberry Pi. The guide will guide you through the following items to get you up and running in no time.
- Installing the LOGI-Pi onto the Raspberry Pi
- Getting and loading the pre-configured LOGI-Image
- Running the LOGI-Apps from Raspbian Desktop
- Running the LOGI-Apps using an SSH terminal connection to the Raspberry Pi
What you will need for this guide
- Running the LOGI-Apps using Rasbpian Desktop
- LOGI-Pi and Raspberry Pi
- A pre-configured LOGI-Image or a Raspbian Image with the LOGI Tools installed
- Micro USB cable with 500mA supply current source (USB hub or USB power adapter)
- USB Keyboard
- USB Mouse
- Ethernet Cable
- Running the LOGI-Apps using an SSH client on a remotely networked PC
- LOGI-Pi and Rasbperry Pi connected to a local network
- A PC or Laptop connected to the same local network
- A pre-configured LOGI-Image or a Raspbian Image with the LOGI Tools installed
- Micro USB cable with 500mA supply current source (USB hub or USB power adapter)
- Ethernet Cable
Top Level Block Diagram
Unboxing and Connecting your new LOGI-Pi to the Raspberry Pi
Congratulations on getting a brand spaking new LOGI-Pi! Let's get started with installing the LOGI-Pi to your Raspberry Pi.
LOGI-Pi shipped components
The LOGI-Pi will have shipped with some 2x nylon standoffs(1) and 4x screws (2) that will securely mount the LOGI-Pi to the Raspberry Pi. Additioanlly you will note that there is a 1x rubber bumper (3) installed that will ensure that the LOGI-Pi PMOD header pins do not short against the Raspberry Pi ethernet jack metal shell when installed.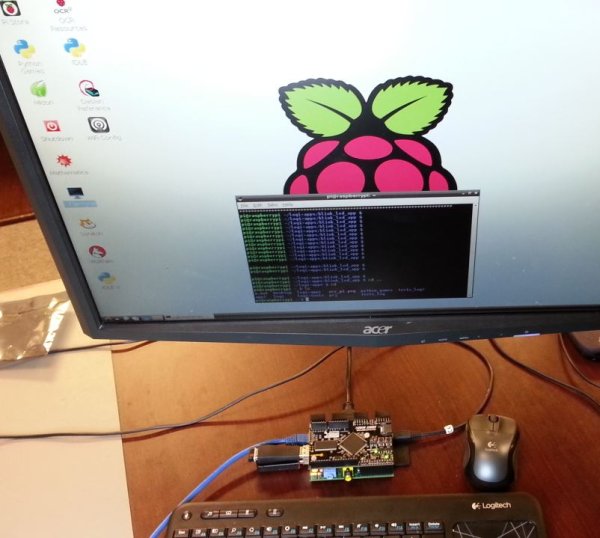
Installing the LOGI-Pi on the Raspberry Pi
1) The first step to installing the LOGI-Pi onto the Raspberry Pi is to install the 2x Nylon standoffs on the Raspberry Pi. You will need to insert the nylon screws through the 2x mounting holes on the bottom of the Raspberry Pi.
2) You can then thread the nylon standoffs onto both of the screws. You can tighten the standoff to a snug tightness. Do you overtighten as the nylon will strip or break if too much force is applied.
3) Install the LOGI-Pi onto the Raspberry Pi. You can now align the 26 pin headers of the LOGI-Pi and the Raspberry Pi and gently plug the LOGI-Pi connector onto the Raspberry Pi Connector. Note that the you must correctly orient the LOGI-Pi so that it “covers” the Raspberry Pi. You can then align the 26 males pins of the Raspberry Pi into the 26 sockets of the LOGI-Pi female connector. Gently press and LOGI-Pi into place.
4) Fix the LOGI-Pi to the Raspberry Pi using the 2 remaining screws. The LOGI-Pi has mounting holes corresponding to the locations of the standoffs installed in part1. You can use a screw driver to gently thread and snug the nylon screws into the standoffs installed on the Raspberry Pi.
Your LOGI-Pi and Raspberry Pi are now securely installed!
Getting your LOGI-Image installed onto your SD card
The easiest way to start using the LOGI-Boards is to use the pre-configured LOGI-Image. The LOGI-Image is based upon Raspbian Wheezy and contains all of the LOGI-tools and the LOGI-Apps to get you started immediately.
Download the Latest Logi-Image
You can access our preconfigured Logi image that contains everything you need to get going with the Logi-boards. The image is based upon 2015-02-16-raspbian-wheezy.
Latest Raspberry Pi LOGI image: Logi-Pi Pre-configured Rasbian Image
The user can find older version LOGI images on the valentfx site: http://valentfx.com/doc/logi-image/logipi/
Loading the Image
The image requires a minimum of 4GB SD card be used. The image can be loaded on an SD card on windows or on a linux system. For windows it is recommended that you use Win32DiskImager and for Linux use USBImageWriter or by using the command line disk utilities.
Creating your own LOGI compatible image
The user can create or use their own image by installing and setting up the LOGI tools on this image. See the LOGI Pi user manual for instructions to do this.
More Raspberry Pi Image Resources
For in depth instructions on Raspberry Pi images, writing your image, customizing images and much more, see the ADA Fruit Raspberry Pi Image guides here.
Running the LOGI-Apps using Raspbian Desktop
Connecting the required periphals to the Raspberry Pi to run Raspbian Desktop
In order to run Raspbian Desktop there are a few peripherals you will need to properly interface with the Raspberry Pi. Using Raspbian Desktop give you a complete standalone PC experience with very nice graphical desktop features and tools.
- Micro USB cable with 500mA supply current source (USB hub or USB power adapter)
- USB Keyboard
- USB Mouse
- HDMI cable
- HDMI to DVI adapter (if using an PC monitor)
- Ethernet Cable (If you need internet Access)
Connecting your peripherals to the LOGI-Pi/Raspberry Pi
HDMI/DVI video cable
You can use either an external HDMI or DVI display to view Raspbian Desktop. If you using a desktop monitor with a DVI input you will need to purchase a HDMI to DVI adapter similar to these. You can also use an HDTV by directly connecting the HDMI cable from the Raspberry Pi to the HDTV and switching to the appropriate HDMI input on the TV.
Keyboard and Mouse
Any USB 2.0 mouse and keyboard should be compatible with the Raspberry Pi. In the above picture I am using a wireless mouse and keyboard.
Ethernet Cable
If you would like to use internet while using Raspbian Desktop you will need to connect an ethernet cable that is connected to internet connected network.
1) Connect your peripherals similarly to that show in the image of above depicting the LOGI-Pi/RPi connected to a PC monitor.
Booting the Raspberry Pi
2) Once you have connected the above listed peripherals you are ready to boot the Raspberry Pi. The Raspberry Pi will begin the boot sequence as soon as you apply power using a micro-USB cable that supplies 500mA of current.
3) The connected monitor will show the status of the boot sequence. Once the Raspberry Pi is fully booted you will be asked to enter the Raspberry Pi login information. Enter the below information on your connected keyboard when asked.
- raspberrypi login: pi
- Password: raspberry
If you have entered the correct login information a command prompt will appear. In order to start Raspbian desktop you will need to enter ” startx “ into the command prompt and press enter on the keyboard.
If all went well, you should now have Raspbian Desktop running on your monitor. You will have regular mouse and keyboard control to navigate and control the Raspberry Pi as you normally would on any PC. You are now ready to start putting the LOGI-Pi to work using the LOGI-Apps!
Running the the Blink LED App from the command line console on Raspbian Desktop
1) There is an icon on Raspbian Desktop titled LxTerminal. Double click the icon and a command line terminal will appear on the desktop that you can begin typing commands. See image “Figure – Running the LOGI-Apps – Raspbian” below for reference.
You can now use the command line as you would under any linux operating system or as you would from an SSH terminal window. Try typing in “ls” to view the contents of the current directory. You will see the contents of the “home” directory including a directory labeled “logi-apps”. In short, the LOGI-Apps are a “plug and play” way of running the LOGI demo projects. We have packaged all that you need into each of the “Apps” so that you can simply run “sudo ./make_demo.sh” from within the App directory and everthing else will be taken care of for you. We use the “make_demo” shell script to compile any needed code, update packages, configure the Raspberry Pi, handle any other house keeping and then Load the FPGA with the bitstream and run any needed executables on the Raspberry to Pi to complete the application. Sometime we just want to watch a move, not understand how the movie is made. So, sit back, relax and enjoy the movie.
For a Full overview of the LOGI-Apps, available LOGI-Apps, links to Documentation and the projects that the LOGI-Apps are based upon see the LOGI-Apps wiki page here.
Let's run our first LOGI-App! The Blink LED LOGI-App or “hello world” is the basis of what all of the other LOGI-Apps are based upon. It is a complete FPGA project that can be run very easily from the Raspberry Pi by simply loading the FPGA project bitfile into the FPGA. This is where the LOGI-Tools come into play. In this case we call the “logi_loader” to load the bitfile from within the “make_demo” shell script. If you are interested in seeing what is in the make_demo.sh, run “nano make_demo.sh”. You will be able to see the how simple this App is, just load the bitstream. Also note that in each App there is a README.TXT that has basic instructions and links to any reference documentation that might be needed to run the App.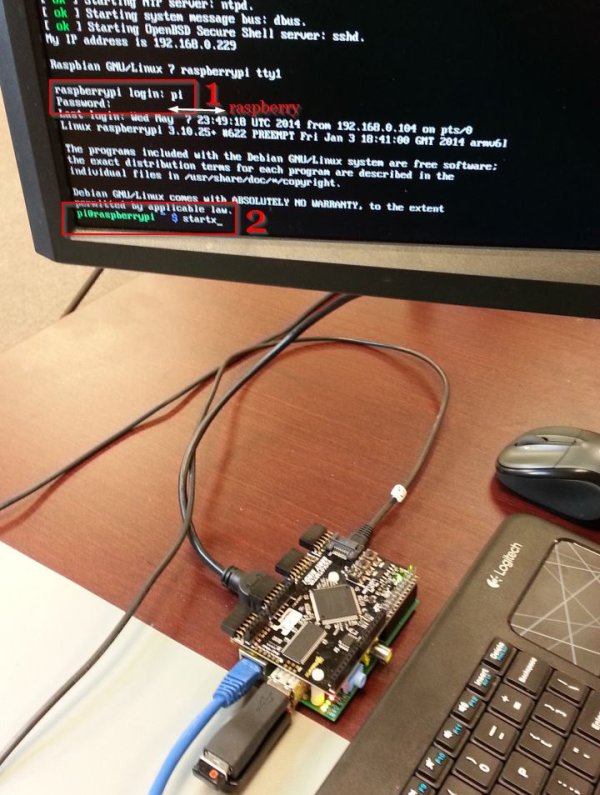
2) Navigate to the logi-apps directory from the pi home directory. See image “Figure – Running the LOGI-Apps – Raspbian” below for reference.
- ” cd ~/logi-apps ” – This will navigate to the logi-apps directory
- “ls” – this will output all of the contents within the logi-apps directory. You will note the different directories for each App.
The LOGI-Apps is a git repository and we will be updating and adding new Apps to the as often as possible. In order to make sure you have the latest LOGI-Apps you should “update” your logi-apps repository periodically to “pull” in any updates from the remote github logi-apps repo, found here.
3) Update the logi-apps repository. See image “Figure – Running the LOGI-Apps – Raspbian” below for reference.
- Enter “git pull” – This will pull in any changes and updates from the remote repository into your local copy of the repository
If for some reason the above “git pull” command give you errors you can also re-clone the repository by using the following commands
- ” cd ~ ” – navigate to the home directory
- ” sudo rm -rf logi-apps ” – DELETE the current copy of the logi-apps
- ” git clone -b logipi https://github.com/fpga-logi/logi-apps ” – this will create a new copy with the latest logi-apps installed.
4) You are now ready to run the Blink LED LOGI-App. Let's navigate into the blink_led_app and run it! See image “Figure – Running the LOGI-Apps – Raspbian” below for reference.
- ” cd ~/logi-apps/blink_led_app ” – This will navigate into the blink_led_app directory, no matter where your current location is
- ” sudo ./make_demo.sh ” – This will run the App!
There should be some text updates being output into the terminal window. From the output you will see that first the logi_loader (logi bitream loader) is called and will output the status of the bitstream loading, where “config success !” indicates that the bitstream has been properly loaded into the FPGA. Then you will see the contents of the README.TXT file output to the terminal with links to detailed information about the App and the project that is was based upon. It will also output a basic description and instructions regarding the App. Note that each App contains a README.TXT file with useful information regarding the App. You can manually open and read the README.TXT file by entering ” nano README.TXT “, which will open the file with a command line editor, “Nano”. You can scroll through and text file, copy, paste, and close the file by entering “CTL-X”.
Congratulations on running your first LOGI-App!
For more detail: LOGI Pi Quick Start Guide