
In this project the Raspberry Pi with the PiCam is used as a wireless camera which can transmit images over long distances, usually hundreds of meters! Images are transmitted by amateur radio (ham radio) using slow scan television (SSTV) on the 2 meter band (144.5MHz).
Thanks to Oliver Mattos and Oskar Weigl the Pi can generate the high-frequency FM signal itself — no additional electronics are needed for low-power transmissions. For a little bit more power, a one or two transistor amplifier would be suitable. Furthermore a low pass filter is recommended to filter out higher harmonics of the signal.
This project also contains a Python script which detects movement. Using this script, the Raspberry Pi can be used as a wireless security cam at distances far outside the range of normal WiFi networks. Be aware that you need a ham-radio license to use this application!
Here’s how I made it work. Follow the steps below; the project code can be found on my blog or on my GitHub page.
Credits to KI4MCW (SSTV), Oliver Mattos and Oskar Weigl (PiFm).
Step #1: Connect the hardware
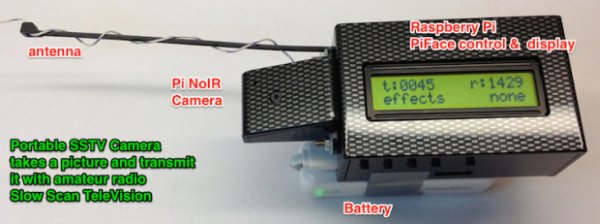
- The only hardware used for this project is a Raspberry Pi, a Pi NoIR camera, a PiFace Control & Display board, and a piece of wire which serves as antenna.
- For portable use, stick a 5V USB battery pack to the Raspberry Pi case with a piece of duct tape.
Step #2: Capturing the image
- The first thing to do is capturing the image we want to transmit. This can easily be done with the raspistill command-line utility:
raspistill -t 1 --width 320 --height 256 -e png -o /tmp/image.png - For SSTV we need a small image of 320×256 pixels. It is saved into the /tmp directory as a PNG image file.
Step #3: Converting the image to a SSTV sound file
- Next we need to convert the image to a sound file which can be transmitted over the air. There are several SSTV implementations available for the Raspberry Pi.
- The first one tested is PiSSTV, a Python implementation. It works but it's very slow — it takes several minutes to convert a single image. (For details see my blog.)
- Next I found a plain C implementation by ham KI4MCW (Robert Marshall). Unfortunately there were some errors in the preamble tones, but those were easy to fix. I also made it a little more flexible so you can set the audio sample rate from the command line.
- Source of my implementation can be found on GitHub. To compile the source code:
pi@rpicamera ~/sstv $ sudo apt-get install libgd2-xpm-dev pi@rpicamera ~/sstv $ sudo apt-get install libmagic-dev pi@rpicamera ~/sstv $ gcc -lgd -lmagic -o pisstv pisstv.cTo run the program:pi@rpicamera ~/pisstv $ ./pisstv /tmp/image.png 22050 Constants check: rate = 22050 BITS = 16 VOLPCT = 20 scale = 6553 us/samp = 45.351474 2p/rate = 0.000285 Checking filetype for file [/tmp/image.png] File is a PNG image. Input file is [/tmp/image.png]. Output file is [/tmp/image.png.wav]. Writing audio data to file. Got a total of [2589556] samples. Done writing to audio file. Created soundfile in 4 seconds. - As you can see, the SSTV sound file is created in just 4 seconds. So far so good. Next step: how to transmit the audio over the air.
For more detail: Long-Range Wireless Broadcasts: Raspberry Pi Slow Scan Television (SSTV) Camera