
Introduction
The Raspberry Pi seems to be popping up all over the place. It’s a small, inexpensive board with a lot of number-crunching capability. It can run a standard Linux distribution, and supports a lot of common Linux applications, including programming languages like C, C++and Python. This makes it very useful for tasks that need more horsepower than a small 8-bit microcontroller provides, or that can take advantage of the feature-rich environment that Linux offers.

After building several projects using the Raspberry Pi, we found some growing pains in building prototypes that incorporated external hardware. The Pi Wedge is a small board that connects to the GPIO connector, and breaks the pins out into rows that work with solderless breadboards.
This guide will show you how to assemble the Pi Wedge, and start using it with your Raspberry Pi.
Required Materials
- The Pi Wedge kit
- A Raspberry Pi single board computer. The Wedge works with both Model A and Model B
- A Solderless Breadboard
- An FTDI Basic
- Your favorite I2C, SPI or GPIO-based peripherals
- A soldering iron and leaded or lead-free solder
Suggested Reading
Suggested Viewing
Background
In the process of developing projects like the Twitter Monitor and Great American Tweet Race around the Raspberry Pi, we found that we were experiencing some growing pains when trying to expand the Pi into a prototype that involved external hardware.
The Raspberry Pi has a 26-pin connector that provides access to several communication interfaces, plus GPIO and power. But the connector doesn’t have detailed labeling, and the native pin arrangement is somewhat scattershot. Pins used for similar functions aren’t always grouped together, and power and ground pins are interspersed with no obvious pattern.
The pins also don’t translate to a solderless breadboard very easily. Our first projects used a bunch of F-M jumper wires that we just plugged into the header. They involved a lot of “ratsnest jiggling” when things stopped working.
Bootstrapping
In addition to the physical issues of using the I/O connector, getting started with a brand new Raspberry Pi always seems to involve a chicken-and-egg situation. We just want to SSH into it, so we can use the command line. But in order to SSH to it, we need to know it’s IP address…and of course, the IP address is most easily learned by running ifconfig on the command line.
Power And Logic Levels
Power
Understanding the Pi’s power supply is critical to using it successfully.
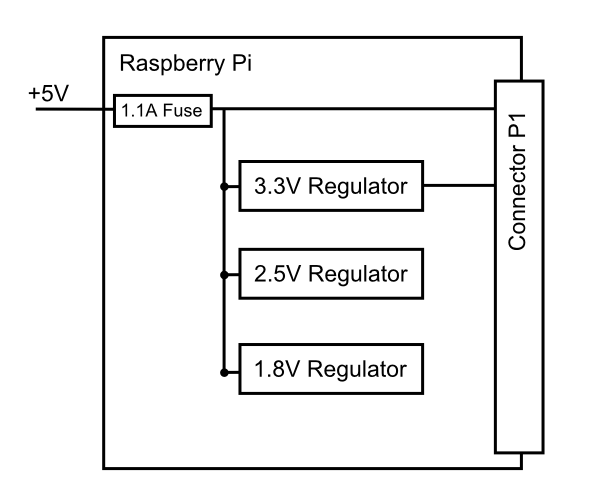
Consulting the Raspberry Pi schematic, we see that 5V comes into the the board via connector S1 – it’s a micro USB connector, but only the power and ground pins are connected. The 5V coming from this connector passes through a fuse, then continues around the board without any further regulation. The 5V connections on the Pi Wedge come straight from this line.
On the Pi, the 5V goes to a set of daisychained regulators that further reduce it to 3.3v, 2.5V and 1.8V. The regulated 3.3V is present on the I/O connector.
For more detail: Pi Wedge Hookup Guide