
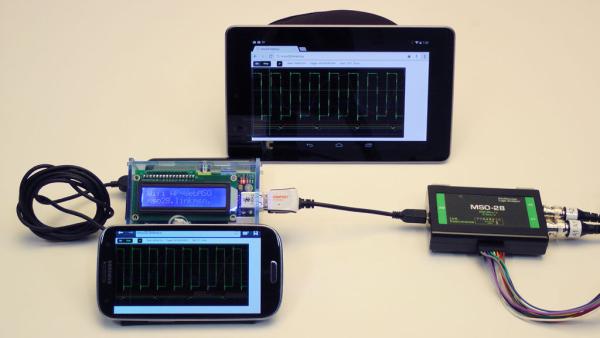
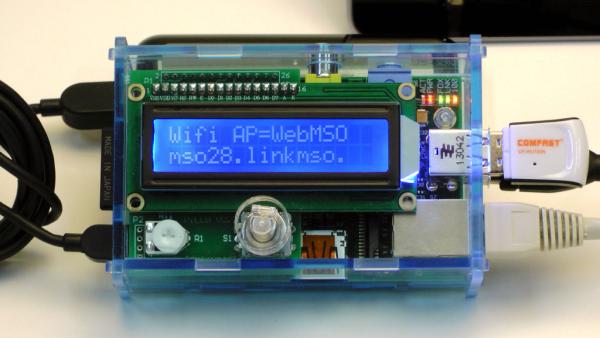
As a bare minimum you'll need the Raspberry Pi and a Ralink RT5370 based Wi-Fi dongle. For this project I used the Tenda W311M from MicroCenter, primarily because it is Access Point capable and inexpensive. An even less expensive dongle that based on the same Ralink RT5370 chip from Comfast can be purchased from Aliexpress for less than $5 inc S/H. A quick search on Aliexpress for RT5370 should yield a few other options. If you don't have a MSO-28 you can still try it out, the WebMSO28 GUI will run regardless if you have the MSO-28. It'll just show “NO DSO”.
If you don't want to roll your own, you can grab a pre-configured Raspian distro from here and skip to Step 6. Otherwise here is how to roll your own on top of your favorite distro.
Step 1: Setting up the Raspberry Pi
2. Boot up the Raspbian and set the it to boot into command line.
Step 2: Package Installation
2. Update the package list.
3. Install the necessary packages.
4. Go to the home directory.
5. wiringPi is not necessary if you don't have PiLCD, but it is nice to have for future I/O control.
cd wiringPi
./build
6. Grab and install the WebMSO-config.git so the Pi will recognize MSO-28 and MSO-19
git clone git://github.com/tkrmnz/WebMSO-config.git
cd WebMSO-config
cp /home/pi/WebMSO-config/74-linkmso.rules /etc/udev/rules.d/.
7. At this point plug the MSO-28 into the Raspberry Pi, you should see it listed under /dev as MSO-28-0.
Step 3: Setting up the web server
Change the nginx default root directory to /var/www
2. Also add the following block for fcgi port forwarding.
include fastcgi_params;
fastcgi_pass 127.0.0.1:9000;
}
3. Copy the proxy.conf to /etc/nginx
The content of the proxy.conf is shown below.
proxy_set_header Host $host;
proxy_set_header X-Real-IP $remote_addr;
proxy_set_header X-Forwarded-For $proxy_add_x_forwarded_for;
client_max_body_size 10m;
client_body_buffer_size 128k;
proxy_connect_timeout 90;
proxy_send_timeout 90;
proxy_read_timeout 90;
4. Check to see if the gzip is enabled in the /etc/nginx/nginx.conf
un-comment gzip on;
gzip_disable “msie6”;
5. Create the webpage folder
6. Grab and install the WebMSO28fcgi javascripts content
git clone git://github.com/tkrmnz/WebMSO28fcgi.git
cd WebMSO28fcgi
cp -rf * /var/www/.
7. Start the nginx web server.
At this point nginx should start serving the web page. ifconfig to get your ipv4 address and access it via a browser from a different computer on the same network.
Step 4: Setting up the FCGI server
2. Create a temporary ram drive for the mso28 fcgi driver to store the captured data.
mount -t tmpfs -o size=20m tmpfs /mnt/tmp
ln -s /mnt/tmp /var/www/fcgi-bin/tmp
3. Grab and install the spawn-fcgi and mso28ctl.fcgi
git clone git://github.com/tkrmnz/mso28fcgi.git
copy spawn-fcgi-1.6.3.tar.bz2 to /home/pi and unzip the spawn-fcgi
cp mso28fcgi/spawn-fcgi-1.6.3.tar.bz2 .
tar -xvjf spawn-fcgi-1.6.3.tar.bz2
Install the spawn-fcgi
./configure
make
make install
cp src/spawn-fcgi /usr/bin/.
Copy the init script from /home/pi/mso28fcgi to /etc/init.d
chmod +x /etc/init.d/spawn-fcgi1
4. Compile and copy the mso28ctl to /www/var/fcgi-bin
touch main.c
sh makemso2.sh
sh msocpy6.sh