
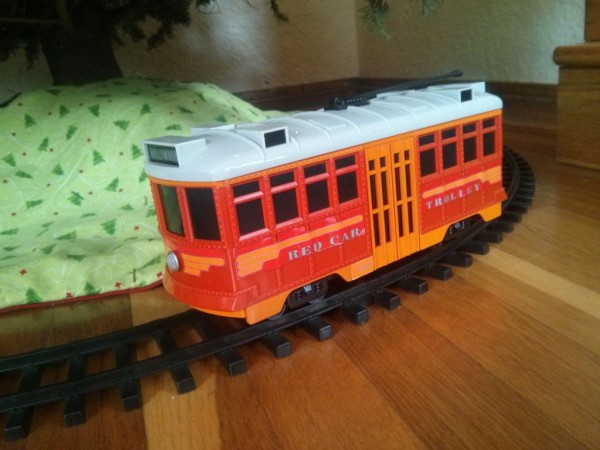
Now the train around your Christmas tree or your favorite remote controlled toy can be controllable from the web or any mobile device. Why would you do that if you already have a remote? You do this just because you can! I used a Red Car Trolley purchased at Disneyland, you can use their trolley, train or even their RF controlled Monorail for this project. The software is set up for the trolley but you can modify it at will. Not only can you remotely control the trolley but the software includes a randomized script that makes the car run routines on its own if your feeling extra lazy or want to simulate some Disney style magic.
Supplies needed (search around, these are random sites I found):
- One Red Car Trolley set from Disney or an online toy store
- I found mine at California Adventure, these are harder to get online
- One Raspberry Pi (I used Model B rev2)
- One SainSmart 8 or 4 channel Relay Module (or other)
- A package of Male to Female and Male to Male solder-less jumper cables
- One Edimax wireless USB dongle (optional)
Step 1: Setup your Rasberry Pi
You will need to install the Apache web server on your Raspberry Pi and get the Edimax wireless adapter working on your Raspberry PI. If you want you can use the built in Ethernet adapter. Those details are out of scope for this project but you can find loads of information on the internet for setting all that up. Click here for a link to setup Apache web server.
Basically you type the following to setup Apache:
sudo apt-get install apache2 -y
You will have to add www-data to the sudoers group.
Type:
sudo visudu
Add the following to the end of the file:
www-data ALL=(ALL) NOPASSWD: ALL
Now Apache is ready to execute Python and Bash scripts from the web server.
Step 2: Solder leader wires to the remote control
Solder leader wires to the toy's remote control buttons. I cut the male to female jumper wires and use the female ends so that when I don't want to use the toy with the Raspberry Pi I can simply leave the wires tucked above the battery and when I do want to use the Raspberry Pi I can plug the male ends of the wires from the relay board into them.I also filed down the remote's case to accommodate the wires both coming out of the circuit board and the ones coming from the relay board so that I can still close the case. Use common colors for each button and keep track of them.
Step 3: Connect the Rasberry PI to the Relay Board and the Remote

Connect your relay board to both the Raspberry Pi and the remote as follows:
- GPIO 18 to any relay attached to the “Sound” Button
- GPIO 27 to any relay attached to the “Hollywood” Button
- GPIO 22 to any relay attached to the “Los Angeles” Button
- GPIO 24 to any relay attached to the “Stop” Button
I wrapped it all together with some Velcro straps.
Step 4: Software
Go to http://github.com/mbanados/Trolley and download the package. The web files belong in /var/www directory. The gpiotoggle.py and the trolley.sh file both go in the /home/pi/ directory. This is the pi account's home directory. Make sure these two files are executable:
sudo chmod a+x /home/pi/gpiotoggle.py
sudo chmod a+x /home/pi/trolley.sh
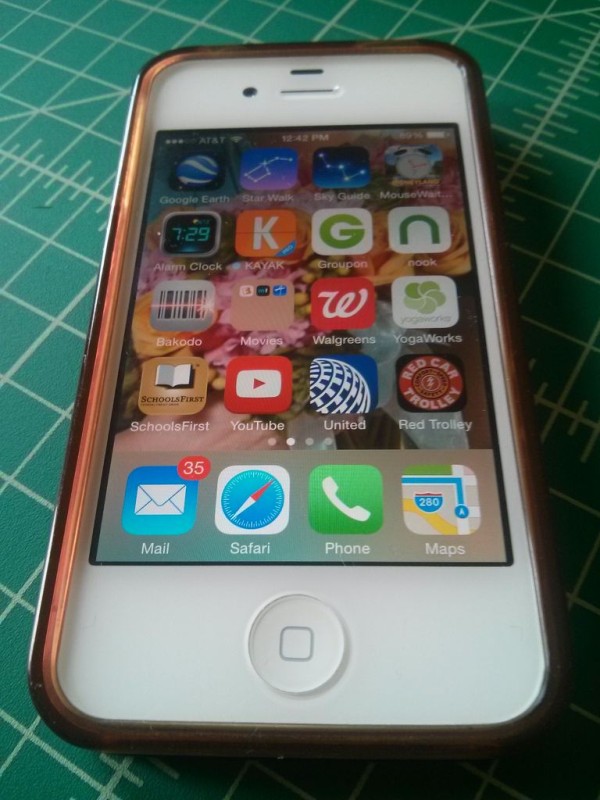
Browse to your Raspberry Pi's IP or hostname from your PC or phone and you should now be able to control your Trolley. Make a shortcut on your mobile device's desktop and you will have nice icons for this web app. The automatic button will run a randomized script making the trolley go in different directions, stop and start at different places and make different sounds for about a minute and a half.