
This aims to show the reader how to build a simple Pan tilt mount using readily available stepper motors and other parts. This device automatically moves the camera to pre set angles and at pre set intervals.
Raspberry Pi is a trademark of the Raspberry Pi foundation.
What you will need:
- 2 x 28BY-J 5V stepper motors with ULN2003A driver board.
- 6 way ribbon cable, approx 45 cm long (Can be split from a bigger cable)
- Dupont cable female to female, usually these are supplied in 40Way strips.
- 10 x M3 x 16 mm bolts
- 2 x 1K resistors.
- 20 x M3 nuts
- 8 x M2.5 x 16 mm bolts
- 26 x M2.5 Nuts
- 2mm heat-shrink tubing, approx 40 cm long
- Plywood approx 30 x 40 cm should be plenty.

- 75 cm camera ribbon cable for the Pi Camera
- Micro roller switch switches 3A size approx (13 x 6 x 6)
- Glue for gluing the wood parts together, I used hot melt glue.
- Large > 15A terminal blocks for connecting to the stepper motors
- Pi – Cobbler (Recommended, but not essential)
- Solder, soldering iron, wire strippers cutters etc.
- Approx 10cm of thin steel wire, approx 0.5 – 1mm. You could probably use a paper clip.
- Raspberry Pi + PSU + camera module + Mini WI-FI dongle + Memory card with latest Raspbian
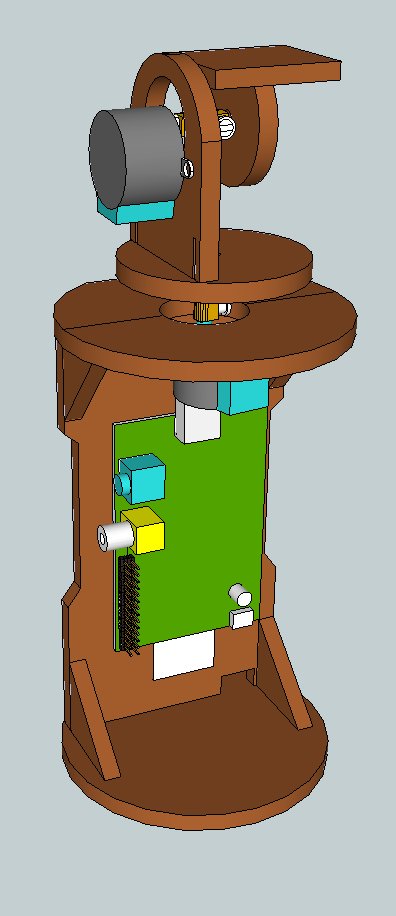
Upright piece :
(ULN2003 driver board Holes not shown as they vary between boards, check your boards and mark accordingly)
The holes for the pi should be approx 2.5mm diameter.
Top piece / horizontal support
The large hole in the centre is around 30mm diameter. The small holes are 3mm diameter.
Base (94 mm circle):
Vertical movement stepper motor holder:
Corner pieces:
Small corner braces, the exact size is not important.
Camera mount side piece:
Drill the hole in the centre with a 6 mm bit.
Camera mount / camera holder.
Drill the holes with a 2.5mm bit.
Cut out all of the parts as per the drawings above. The pieces are cut from 6 mm plywood.
Glue on the corner braces as shown below, and glue on the base.
And then the top piece.
Fit the M3 bolts in place, these attach to the ULN20003A driver boards first. The ULN2003A driver boards are bolted to the back of the upright piece.
Then the M2 bolts for the actual Raspberry Pi. Notice that there are three nuts, these
act as spacers to give the Pi some clearance off the wood.
Add on a brass connector to the stepper motor, you assembly should now look something like this :
Assemble the horizontal moving part as shown below. The edges of the stepper motor mount should just touch the edges of the circle.
Switch assembly:
Both of the switches are wired in exactly the same way.
Both of the roller switches need a 1K ohm resistor wired in series with the switch as shown below. Solder the resistors onto the pin marked “common” or C.
Next, cut the ends off some dupont connectors, and solder them onto the resistor and onto the “NO” (normally open) pin of the switch.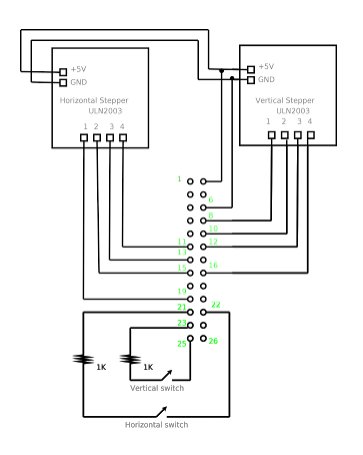 Fixing the switches into place: The switches need to be pressed as the brass connector rotates past it. This is so the the camera will always start in the same position. Hold the switch against the screw of the brass connector and use a drawing pin to mark the holes.
The switches may have too much movement in the lever and catch on the screw, bend a small piece of wire and bolt to the switch to prevent as shown below as shown:
The wires from the vertical stepper motor, so you will need to extend them as above. There are no changes to the stepper wiring, only and extension of the wire. Us the six way ribbon cable to do this, two wires for the switch, and four for the stepper motor. Make sure that all of the connections are covered with heat-shrink tubing.
For more detail: Raspberry Pi DIY Pan Tilt Plans