
Flash an LED – Works Remotely
In this exercise you update your Pi, install the GPIO tools, and write a program to flash an LED ten times.
If you use PuTTY to log in remotely, you could flash LEDs on another continent. I have tried it. It works! With the right hardware, you could control your house or do brain surgery.
Update Your Pi – Install GPIO Tools
Make sure your network is connected to the outside world and then …
sudo apt-get update
sudo apt-get upgrade
sudo apt-get install python-dev
sudo apt-get install python-rpi.gpio
Write the Program – Hello LED – Save as HelloLED.py
Make a folder for your Python files and then run the nano text editor.
cd /home/pi/
mkdir MyPy
cd MyPy
nano HelloLED.py
Here is the code. If you are running a remote PuTTY session, you can copy this code and paste it into nano with a right mouse click. Otherwise get typing!
#!/usr/bin/python3

import RPi.GPIO as GPIO    # needed for GPIO functionality
import time                # needed for sleep

# Use Physical Pin Numbers
GPIO.setmode(GPIO.BOARD)

# Set Physical Pin 12 to be an Output
GPIO.setup(11, GPIO.OUT)

# Loop forever flashing the LED
while True:
    print("FLASH FOR 4 SECONDS")
    for count in range(0, 10):    # Iterates 0, 1, 2, 3, 4, 5, 6, 7, 8, 9 - Never reaches 10!
        # Do ten flashes and then propmt to quit
        GPIO.output(11, GPIO.HIGH)
        time.sleep(0.2)
        GPIO.output(11, GPIO.LOW)
        time.sleep(0.2)

    shouldQuit = input("Press Enter to continue or Q Enter to Quit: ")
    if shouldQuit.strip().lower().startswith("q"):
        break
        # strip() removes white space before and after shouldQuit
        # lower() forces Q to the lower case q
        # startswith("q") allows you to type Quit and the program still ends
        # break causes the program to terminate the loop

GPIO.cleanup()   # Always clean up at the end of programs.

Save and Quit: CTRL+X Y Enter
This must be run as root. Make sure you are still in the MyPy folder and then at the command prompt …
sudo python3 HelloLED.py
To end misbehaving programs press CTRL+C.
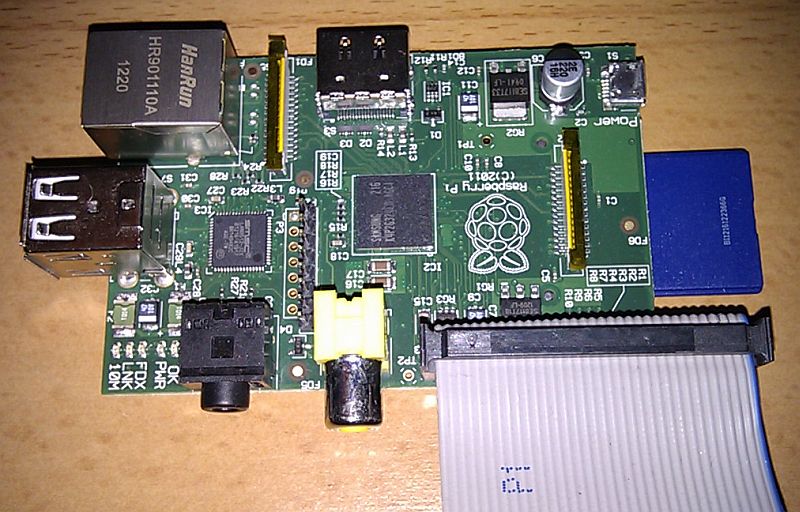
Different Board Versions
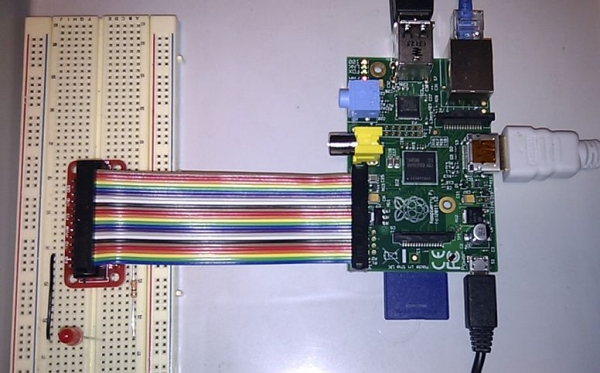
First find out what version Pi board you have. The big yellow arrow points at a revision 2 board.
cat /proc/cpuinfo
This shows the slight differences between the Revision 1 and Revision 2 board pin connections. The code above uses a non-ambiguous pin.
Here is the layout with a ribbon connector to a protoboard.
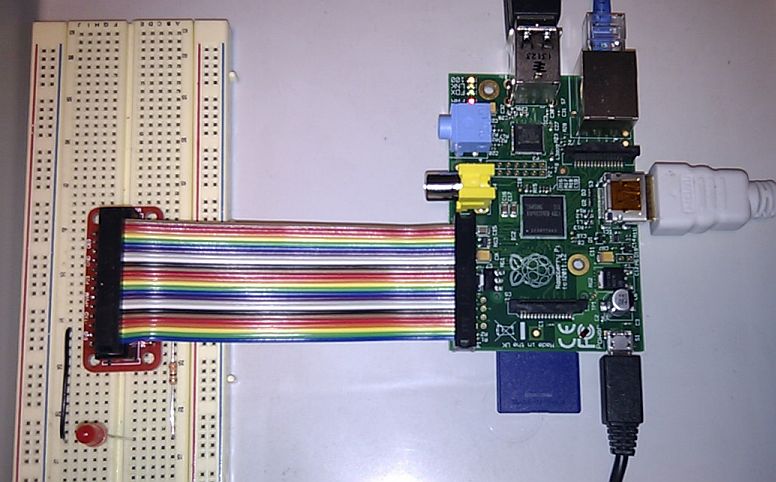
Save your old IDE and Floppy Drive Cables
- There are more pins than you need but the surplus can just overhang the end of the GPIO connector.
- Be careful if you are using a floppy disk cable because one of the pins is missing. If you connect the cable the wrong way round, you will damage a GPIO pin.
SOS
This sends SOS ten times in Morse code and then prompts Q to quit or any other input to repeat.
#!/usr/bin/python3

import os
import RPi.GPIO as GPIO    # needed for GPIO functionality
import time                # needed for sleep

# Use Physical Pin Numbers
GPIO.setmode(GPIO.BOARD)

# Set Physical Pin 12 to be an Output
GPIO.setup(11, GPIO.OUT)

# ============================
# DEFINE SOME USEFUL FUNCTIONS
# ============================
def dit():          # Send a dot
    GPIO.output(11, GPIO.HIGH)
    time.sleep(0.1)
    GPIO.output(11, GPIO.LOW)
    time.sleep(0.1)

def dah():          # Send a dash
    GPIO.output(11, GPIO.HIGH)
    time.sleep(0.3)
    GPIO.output(11, GPIO.LOW)
    time.sleep(0.1)

def letterSpace():  # Allow three time units pause
    GPIO.output(11, GPIO.LOW)
    time.sleep(0.3)

def wordSpace():    # Allow seven time units pause
    GPIO.output(11, GPIO.LOW)
    time.sleep(0.7)

# Clear the Screen
os.system("clear")

# Loop forever flashing the LED
while True:
    print("FLASH SOS TEN TIMES")
    for count in range(0, 10):    # Iterates 0, 1, 2, 3, 4, 5, 6, 7, 8, 9 - Never reaches 10!
        print (count)
        # S = dit dit dit
        dit()
        dit()
        dit()
        letterSpace()
        dah()
        dah()
        dah()
        letterSpace()
        dit()
        dit()
        dit()
        wordSpace()

    shouldQuit = input("Press Enter to continue or Q Enter to Quit: ")
    if shouldQuit.strip().lower().startswith("q"):
        break
        # strip() removes white space before and after shouldQuit
        # lower() forces Q to the lower case q
        # startswith("q") allows you to type Quit and the program still ends
        # break causes the program to terminate the loop

GPIO.cleanup()   # Always clean up at the end of programs.
Source: Raspberry Pi GPIO and LED