
I’ve just started exploring the Raspberry Pi and was intrigued with the Pi infrared camera module. I live in a somewhat remote area and have seen signs of various wild critters exploring around the house at night.
I had an idea of creating a night time game camera using a Raspberry Pi NoIR Camera Board with a PIR motion detector and an external IR LED spotlight to illuminate the area to allow the IR camera to capture video.
I started with something simple, but like all engineers, I kept adding more and more. So here is how it works:
This project uses a Raspberry Pi set up with WiFi in a headless mode. I can have my remote camera within the WiFi range so once connected I can start the program and retrieve the captured video files. There are lots of instructions on-line to do this so I won't try to rehash that here. I also installed the Raspberry Pi camera following the on-line instructions as well. Test the headless (if this is what you want) and the camera to make sure all works.
This project uses the Raspberry Pi NoIR Camera Board (infrared) for night time video recording when something is detected. The Pi NoIR Camera Board can also be used during daytime but since the IR filter is removed, the color is somewhat washed out. I built an external IR LED Spotlight that is enabled when motion is detected to illuminate the area while capturing video. Once the selected video duration completes the IR LED spotlight is turned off. The design also has an LDR circuit to detect whether its day or night. If it is nighttime and motion is detected, the IR LED spot is enabled and during daytime it is disabled. Connecting the external IR LED spotlight cable grounds a sense pin to detect if the lamp is connected to the camera. If the external IR Spotlight is not detected, the lamp output is disabled. After PIR detect, if night, GPIO pin 22 activates the relay which drives the high current IR LED's (If connected).
Capturing video also can take up quite a bit of disk space and could fill up fast. I discovered once I totally filled up the disk space and was unable to remote in and the Pi wouldn't boot. To fix this I added some code to measure disk space and abort the program if disk space is running out.
Enjoy!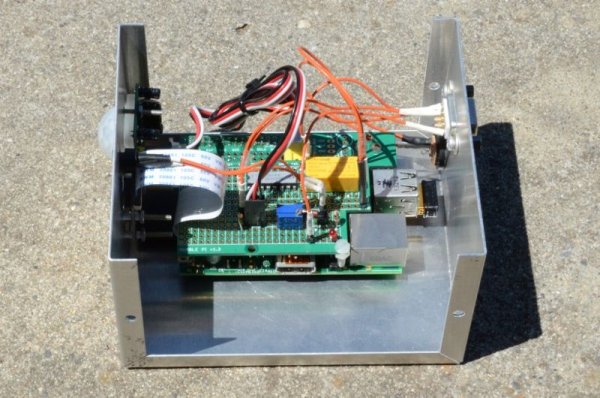
Step 1: Parts List
Raspberry Pi:
Raspberry Pi
WiFi dongle (if desired)
Shield parts:
SN75468D
DS2E-L-5V relay
1M ohm potentiometer
100K ohm resistor
1K ohm resistor
LED
2N3904 transistor
LDR
100K ohm resistor
Misc IO pin connectors, as required
Interconnect wire, as required
Enclosure:
Enclosure to house the Pi and shield
Interface connectors, as required
IR LAMP:
20 high current IR LED’s
47 ohm, 5W resistors (qty 2)
Lamp enclosure (I used a trailer brake enclosure)
Step 2: Create the Shield
I created a shield to mount the relay, relay driver, PIR interface, LDR circuit, IR LED Lamp sensor and other IO.
I used the Humble Pi Shield: http://www.seeedstudio.com/depot/Humble-PI-Protot…
I dug around in my miscellaneous parts and used a 75468, high voltage, high current, Darlington transistor array. All you need is some driver with enough output current drive to set/reset the relay. I also attached a Visio file to show how I placed the parts and added the jumper wires as well as the schematic (Eagle format).
I used some spare socket pins and shrink sleeving to make connectors for IO from the board to the enclosure connectors, PIR and LDR.
Step 3: Build the enclosure
I found a spare enclosure in my parts junk boxes. Something simple, but in the future I might replace it with a waterproof enclosure and experiment with battery/rechargeable power source.
I cut a hole in the enclosure so the PIR sensor would stick out and mounted it to the enclosure. I also used a panel-mount LED grommet to hold the LDR.
I cut another hole for the Pi Camera. I glued a Plexiglas window over the camera to protect the lens.
I installed a DB-9 type connector for the external IR LED Spotlight.
I installed a power connector to power up the whole thing.
Because I used a spare enclosure I had on hand, this enclosure doesn’t allow easy access to the SD Card and the WiFi dongle. But once you get it all working, you won’t really need to get to that unless something really breaks.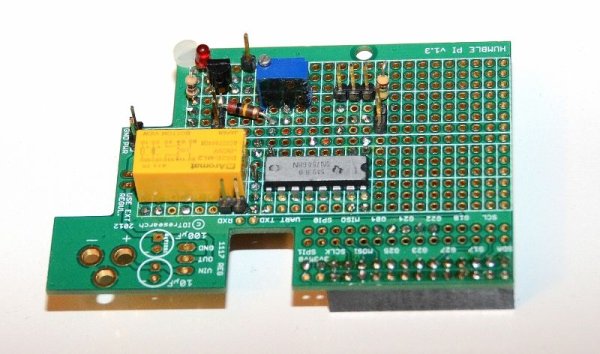
Step 4: Make the IR LED Spotlight
The IR LED Spotlight was fairly simple. I found some cheap high power IR LED's on EBAY spec'd at 700 mA peak. I created 4 strings of 5 LED's wired in serial (see schematic). I wired the two strings in parallel and attached a 47 ohm, 5W resistor to each string. I found an external plug in power supply that provides about 17 VDC. I selected a the resistors to limit the current so I don't burn out the LED's. You'll need to figure out the specs on your LED's, how many you want, what supply to use for the LED drive current and calculate the limiting resistors. There is no way the Pi can drive these by itself. The Camera Shield uses a relay so it doesn't matter what you use. Just make sure you don't drive more current than the relay can handle or the wiring you use.
You will also see a loop of wire between pins 8 and 9. I use this to detect if the lamp is attached. The CAM shield has a pull up resistor attached to the raspberry. When the cable is attached the sense line is pulled low, when not attached the sense line is pulled high.
I also discovered that by using a trailer brake lamp housing the red bezel does a great job in dispersing the IR “beam” to illuminate a larger area. The LED's I got have a fairly narrow beam. Without the bezel, the LED's provide a fairly tight beam.
For more detail: Raspberry Pi Infrared Game Camera