
Introduction
For the past 12 months or so after reading about the exploits of Dave Akerman and his first launching of a Raspberry Pi into near space I've been tinkering with the idea of launching a balloon myself. Although there isn't a huge HAB community in NZ there have been some previous launches, and there is plenty of good information and useful tools available via the UK HAS web site, and #highaltitude IRC channel. The IRC channel in particular has been a great source of information with many friendly people willing to share their experience and knowledge.
It's also been very interesting tracking and watching launches live. Even from the other side of the globe it's sometimes possible to watch live video streams of flight preparations at the launch site and from the chase cars as they track balloons across the country-side. When video isn't available it's still possible to track progress via the live updates on the spacenear.us tracking site and running commentary on #highaltitude.
 Slowly different aspects of the project have been coming together. Most recently I reached my first major milestone, successfully transmitting and decoding telemetry. I've decided to blog about my exprience with this so far as it may be useful or interesting to others wanting to do something similar.
System Overview
Starting from the payload end and working through to the receiving and decoding end my setup looks like this:
I'm planning on using a Raspberry Pi Model A for the payload although for development I'm using a Model B as I have a couple of these already on hand purchased from Element 14. As my day job is J2EE development, Java was my preferred choice of language for the payload control software. The Radiometrix NTX2 seemed to be one of the more popular radio transmitters used in Europe and was readily available also from Element 14 (please note it has subsequently been superceded by the NTX2B). The NTX2 also fitted onto an early circuit board designed to interface both a uBLOX GPS receiver and radio transmitter to the PI's UART, kindly supplied by Dave Akerman. Dave generously supplied this board as he has since changed his approach and currently uses the i2c interface to talk to the GPS receiver and the Pi's UART to talk to the transmitter.
On the receiving end, at the moment I'm using a cheap RTL2832/R820T based USB tuner brought off ebay from a Hong Kong based supplier. A FunCube is another option or a dedicated HAM radio or portable scanner, the UK HAS site has recommendations on brands and models. HAB supplies also sell a range of filtered pre-amps that can provide additional gain and sensitivity. I'm using gqrx, a QT based graphical front end to gnu radio on the iMac for interfacing to the USB tuner – more on this later. Jack provides a way to directly connect the audio output from gqrx to the audio input dl-fldigi, this avoids having to use any cables or indirect sample from the external speakers to the mic. It significantly reduces the amount of noise introduced to the signal. Finally I'm using version 3.1 of dl-fldigi available from the UK HAS web site.
Why RXTX instead of WiringPi?
The typical approach for broadcasting telemetry with a Raspberry Pi and NTX2 is to use the built in UART serial interface to generate the signals. This is because the OS on the Pi makes bit banging a a serial interface very difficult as it's not a realtime OS and timing is critical so it becomes a significant challenge. The UART approach utilises the built in hardware to do do all the hard work. Initially I started working with the WiringPi library and Java front end for doing the serial coms. I eventually changed to use RXTX, the main driver for this decision was that RXTX provided control over the serial port flags such as the number of bits, parity, and stop bits whereas the WiringPi Java front end didn't provide an API for this. As it turned out installing RXTX was reasonable straight forward. There are several useful resources on-line that show you how to do it. One thing that did take a little bit of tracking down was that by default RXTX didn't recognise /dev/ttyAMA0 as a serial device but that is easily fixed by setting the gnu.io.rxtx.SerialPorts property before getting the port identifier:
- String SerialPortID = “/dev/ttyAMA0”;
- System.setProperty(“gnu.io.rxtx.SerialPorts”, SerialPortID);
- CommPortIdentifier portIdentifier = CommPortIdentifier.getPortIdentifier(SerialPortID);
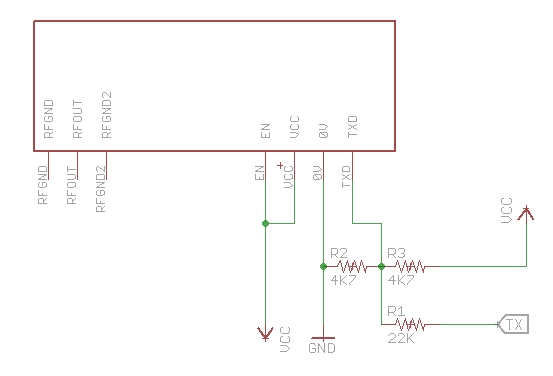
Raspberry Pi to NTX2 Wiring
The following circuit diagram shows how the NTX2 was wired to the Raspberry Pi. This is essentially the same as the schematic on the UK HAS page for linking the NTX2 to an Arduino, the only difference is the value of R1 which has been changed from 47K to 22K as VCC for the Pi is 3.3V instead of 5v for the Arduino. The value of R! influences the carrier shift in Hz when transmitting. A detailed explanation of how to calculate this is provided on the UK HAS site. They also have some good photos of how to assemble the circuit on a breadboard.
For more detail: Raspberry Pi + Java + NTX2 Radio Transmitter