
Use your raspberry pi to control a 1/10 scale RC car via a web page hosted wirelessly on your PI. All you need to do is set up your PI to use your mobile as a hotspot then log onto the appropriate web page (hosted by the Pi) and tilt your phone to control your car like a Wii Remote. I've used an old Tamiya hornet in this example; any car will do but if you are buying one try and get one with enough space under the bodyshell to fit all your electronics. This is a fork of an existing github project that I've modified to make easier to install and to get rid of some components. It's also possible to add a video camera but I didn't do this.

The main project page is hosted here if you need more information:
https://github.com/lawsonkeith/picar
Step 1: Step 1 Measure servo signal levels.
We'll be using PWM to control the servos which will be capable of driving 0-3.3V in 3.3mv steps; it is therefore necessary first to measure what your servo command signal voltage levels are and check they fall within this range. You can do this with a multi-meter connected to the receiver pins. On my car speed and steering both use 3 pin headers which are wired:
- Gnd – Black
- Power – Red
- Throttle / Steer – Orange or White
For my car the throttle voltages were:
- Full Fwd: .19
- VIdle: .28V
- Full Reverse: .36V
The steering voltages were:
- Full Left: .19V
- Fwds: .28V
- Full Right: .355V
Once you are happy about how you are going to power your PI and that the GPIO are up to the job you can start thinking about wiring it up.
Step 2: Step 2 Wire up your car
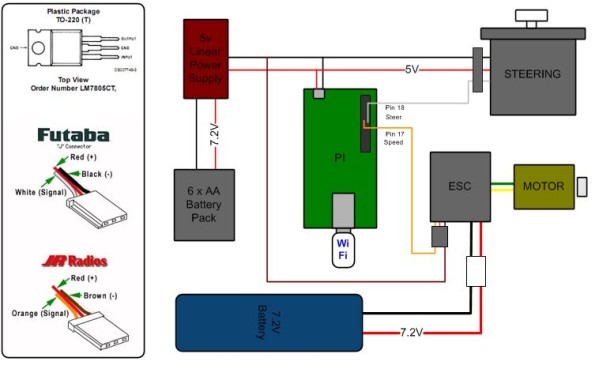
For the servo 3 pin headers I used 2.54mm PCB header and soldered wired direct. I then used superglue to stop the pins moving about. You'll also need heat-shrink or equivalent to cover over the solder joints. To power the PI I chopped a micro USB cable and used the black and red wires from that as my 5V supply. For my linear power supply I used an LM7805 circuit and put a heatsink on it to keep it nice and cool.
I then attached a PP3 battery clip and 6xAA pack with a PP3 connector on it. I've also used a 26w header socket to attach to the raspberry PI GPIO lines; I like this method as it means it's hard to mis-wire when re-connecting plus you can quickly remove you Pi as required.
Note – See the github page for details on running without the extra battery pack and linear regulator.
Step 3: Step 3 Check everything fits in your car
The Pi Is placed in a plastic bag for protection; it's worth putting piece of card underneath it to make sure the PCB doesn't poke through the plastic.
Step 4: Step 4 – Setup the Pi software
The Pi uses node.js to run a web server; a wi-fi dongle on the PI uses your phone as a wireless hotspot to enable wifi communications. Once you enter the web address of the PI a dialog box appears prompting you to begin racing; at that point you can control your car by tiliting oyur phone. An emergency stop is built into the app so if it loses comms to your phone the vehicle stops accelerating and steers forwards. The Pi-Blaster program allows pins 17 and 18 of the PI to act as PWM outputs and control steering and throttle.
The app runs on raspbian using a raspberry PI rev B although you could use the A model. To setup your Pi you need to download some software packages then setup your Pi to run the node.js program on boot.
Step 5: Step 5 Download Required Packages
Get the app
First we need to clone the app from github and place it in it's own directory.
- [cd /home/pi]
- Get this project from GITHUB.
- [sudo git clone https://github.com/lawsonkeith/picar]
- [cd picar]
- Note – do everything in this dir from now on unless instructed otherwise.
Download node.js
Download a new version of node.js
- [sudo wget http://nodejs.org/dist/v0.10.21/node-v0.10.21-linux-arm-pi.tar.gz]
- Then unzip it.
- [sudo tar -xvzf node-v0.10.21-linux-arm-pi.tar.gz]
- [sudo rm node-v0.10.21-linux-arm-pi.tar.gz]
- Create symbolic links to the node executables
- [sudo ln -s /home/pi/picar/node-v0.10.21-linux-arm-pi/bin/node /bin/node]Package manager
- [sudo ln -s /home/pi/picar/node-v0.10.21-linux-arm-pi/bin/npm /bin/npm]
Download additional node packages
Next we use the node package manager (npm) to install some packages that we are going to use in node to give us the functionality required to control our RC car.
- [sudo npm install socket.io node-static sleep optimist pi-blaster.js]
Step 6: Step 6 – Setup PWM
Setup the pi to boot to command line
You will want to not boot to the windows environment because the PWM library can interfere with it. If you do need to use the desktop you can always start it with the command
- [startx].
Download PI Blaster soft PWM daemon
The Pi blaster node library also requires a daemon to be downloaded that runs in the background and runs the PWM. Have a look at [https://github.com/sarfata/pi-blaster.js/] to get some more info about this package.
- [sudo git clone https://github.com/sarfata/pi-blaster]
- [sudo apt-get install autoconf]
- [cd pi-blaster]
- [sudo ./autogen.sh]
- [sudo ./configure]
- [sudo make]
- [sudo make install]
- [cd ..]
Note – you will want to be able to stop the daemon; see note at end.
Setup your PWM defaults
I've included a node script file called pwm_test2. To run this you enter:
- [node pwm_test2]
We are now going to integrate the pi int the RC car and check we can control the servos. You can either connect your Pi to your TV and a keyboard or setup vpn or ssh to do this.
The pi-blaster node setPwm() API requires a pin and demand parameter. For example setPwm(17,.5) would set ppin 17 to 50% PWM demand or 3.2/2 V.
First off make sure you are happy with how the API works and make sure you can set the output voltage on pins 17 and 18 using a meter. Once you are happy with this you can connect up your steering servo and work out the constants you Need to send to get it to steer left; right forwards and backwards. Make sure that when you go full left or Right that the servo isn't over driving as you can damage the servo. Do the same with throttle; the demand magnitudes should be the same so it should be just a case of proving the Wiring and signal directions.
You should now be fairly confident about controlling the servos and powering your pi from the RC platform. Just modify what's in ‘pwm_test2' and keep running it till you are happy with how it all works. Enter your platform specific constants into the ‘readme' file; we'll use them later to do some scaling.
Step 7: Step 7 – Setup Your Phone
Configure PI to use Smartphone WiFi
We now need to set your Pi up to use your phone as wifi.
- On your phone enable the wifi hotspot option.
- On your Pi disable the existing WiFi option and connect to your phone.
- You may need to enter a network key to do this; this will be in your phone somewhere.
- Check it all works by accessing the internet from your Pi.
- Reboot your Pi and check it still all works.
- You are now going to set your Pi IP address to static.
- Enter [ifconfig] write down your IP address for wlan0.
- Edit your network setup file [sudo nano /etc/network/interfaces] file and set to to the current wlan0 IP address and from dhcp to static using the ‘interfaces' file in this project as an example.
- Reboot the Pi and check all still works; your IP address will differ.
Setup your smartphone defaults
With the Wifi Setup you can now test out the phone.
- [node app.js]
Navigate to http://PI_IPADDRESS:8080/socket.html on your phone.A message comes up and asks you to race.On the Pi you should see the values being sent to the setPWM API by the web page running on your Pi.If these work; great you can skip the next step.Setup html file for your setup You may need to setup the scaling specific to your platform…
- In socket.html comment out the min and max gamma if statements.
- Also comment out the scaling M and C terms so the event.beta and event.gamma numbers are sent to the Pi.
- Run up your app [node app.js] and make a note of the raw numbers in the specific orientation you want to use your phone in.
- The numbers are degrees; in my example I tilted +/- 30 degrees to steer and 0 was full fwds and 60 full reverse.
- Put your numbers in the readme file
- Using excel or a calculator work out the constants you need to use to convert your phone tilt values into the setPWM API demands required to control your car.
- Comment out the min max demands if construct and enter your specific min max constants at the top.
- Now edit app.js.
- In the emergency stop function enter the values for steering and throttle that stop your Pi.Now run up the app a few times and convince yourself it's all working.
Step 8: Step 8 – Set App to Auto Run
Configure PI to run node app by default
We now need to configure the app to run as default when we power up the Pi. [sudo cp node-server.sh /etc/init.d/][sudo update-rc.d node-server.sh defaults]Reboot your Pi and check you can log onto the web page. You should now be ready to race.
Issues
PiBlaster can cause issues with the Pi windows environment; mine kept crashing when I moved them when it was running. If you stop running it the problem will go away.
- [sudo /etc/init.d/pi-blaster stop]
Once you're sick of this project you can uninstall it using:
- [cd ~/picar/pi-blaster]
- [sudo make uninstall]