
Previously I built a project where I connected a Neo-6M to an Arduino, but this time around, I wanted to show how to use a GPS with the Raspberry PI. Now there are several USB solutions, and apps that work with them, but I wanted to show how to use a $20 GPS module with a a serial UART, and Python code to decode the NMEA strings. Then you can write your own GPS interface, or combine the data with Google Maps.
Parts Needed:
Raspberry PI (any version)
Raspberry Pi accessories like a >1a 5v power supply, SD Card, keyboard, mouse, and a HDMI monitor are needed for any RPI project.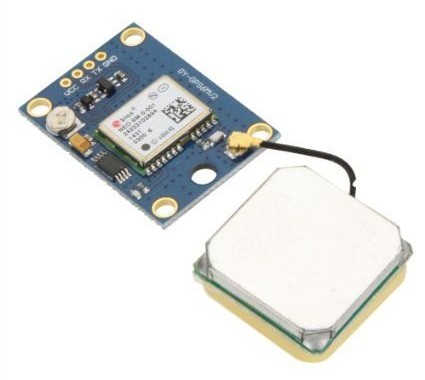
Step 1: Electrical Connection
The first step is to connect the GPS module to the Raspberry PI. There are only 4 wires (F to F), so it's a simple connection.
Neo-6M RPI
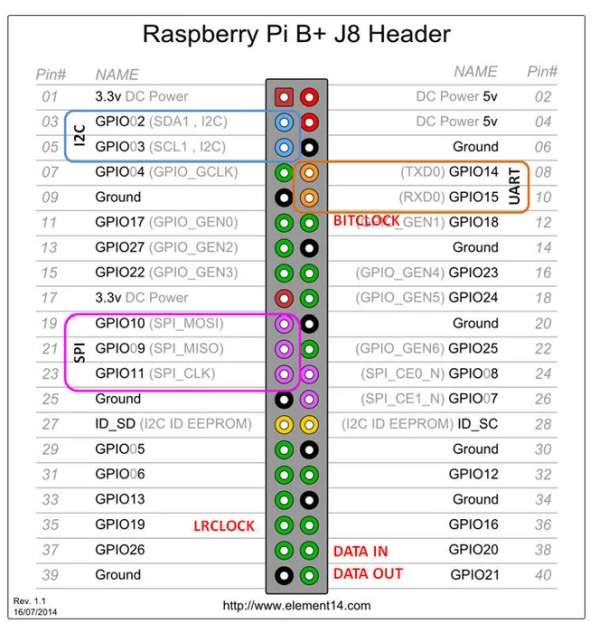
VCC to Pin 1, which is 3.3v
TX to Pin 10, which is RX (GPIO15)
RX to Pin 8, Which is TX (GPIO14)
Gnd to Pin 6, which is Gnd
Step 2: Turn off the Serial Console
By default, the Raspberry Pi uses the UART as a serial console. We need to turn off that functionality so that we can use the UART for our own application.
Open a terminal session on the Raspberry Pi.
The first thing we will do is backup the file cmdline.txt before we edit it.
sudo cp /boot/cmdline.txt /boot/cmdline_backup.txt and press Enter.
The we need to edit cmdlint.txt and remove the serial interface.
Type in sudo nano /boot/cmdline.txt and press Enter.
Delete console=ttyAMA0,115200 and save the file by pressing Ctrl X, Y, and Enter.
Now type in sudo nano /etc/inittab and press enter.
Find ttyAMA0 by pressing Ctrl W and typing ttyAMA0 on the search line.
When it finds that line, press home, insert a # symbol to comment out that line, and Ctrl X, Y, Enter to save.
Type sudo reboot and press Enter to restart the Pi.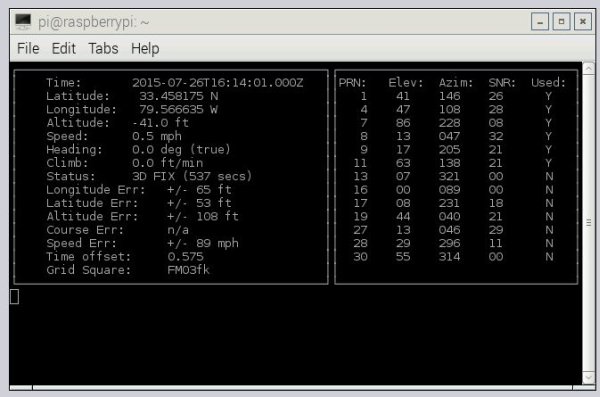
Step 3: Testing the GPS
Before we start writing our own code, let's test the GPS by using some off the shelf programs.
Open a terminal session and type sudo apt-get install gpsd gpsd-clients and press Enter.
After that installs, let's start the serial port:
Type stty -F /dev/ttyAMA0 9600 and press Enter.
Now start GPSD:
Type sudo gpsd /dev/ttyAMA0 -F /var/run/gpsd.sock and press Enter.
Now display by typing cgps -s and press Enter.
Step 4: Writing Your Own Python App
Now that I know the GPS module works, I want to write my own software, so that I can act on the values I'm reading. Coming Soon ……
Step 5: Using a Small LCD Display
For best results, a gps sensor needs to be outdoors. But I really don't want to drag my 42″ HDMI monitor outside. I'll be adding a 2.8″ LCD to this project soon!
Source: Raspberry Pi & the Neo 6M GPS