
Touchscreen displays are always one of the coolest things that you can add to a raspberry pi. Having a neat display always boosts the overall funk of your project. You can build upon a prolific number of applications using portable TFT LCD displays. Maybe create even your own customized smartphone. However, most displays are not used because they are expensive and are really complicated to interface with the raspberry pi. However, in this raspberry pi touchscreen LCD tutorial, I will show you to interface an extremely simple and cheap 3.2 inch LCD display. This TFT LCD display also has a resisitive touchscreen and a stylus.
I am preparing this raspberry pi tutorial for the Wave Share SpotPear 3.2” LCD display with resistive touchscreen. Since, according to me it is the cheapest and the simplest LCD with touch interface that can be added to your raspberry pi projects. You can do a lot of things using such displays. You can build: head mounted displays (like the SmartCap), portable kiosk, or just add it to any of your existing projects where you need a LCD display with touch interface. So, just follow this simple tutorial to learn to work with a raspberry pi touchscreen LCD.
 What are the stuff required to do this project?
Hardware:
- Raspberry pi B/B+.
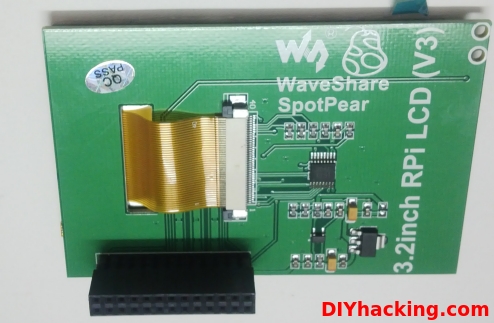
- Wave share SpotPear 3.2” LCD display with touchscreen.
- SD card for loading raspbian OS (8 GB)
Software:
Raspbian image for Wave share SpotPear 3.2” LCD display
How does it work?
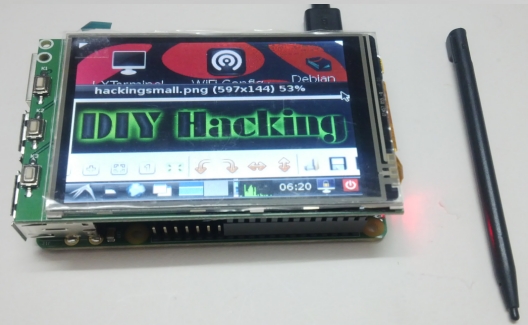
Interfacing the LCD display with raspberry pi is extremely simple. The LCD module comes with raspberry pi’s GPIO pin compatible female headers. Which means that you just have to plug in your display module on to your raspberry pi’s GPIO pins. No other connections or connectors are necessary. Also, this touchscreen TFT LCD display will provide you with a 320*240 resolution. For more details on the Wave share 3.2” LCD display for the raspberry pi, check this: raspberry pi LCD display.
Here, we are using an LCD display with resistive touchscreen. Normally, when you are trying to interface such displays with a raspberry pi, you have to install various drivers, etc. But here, I will be providing an image file for the raspbian OS. This means that you just have to install the OS I am providing on to your SD card. And your raspberry pi will start working with the LCD display and touch interface.
This raspberry pi touchscreen LCD uses the SPI communication protocol. The GPIO pins on the raspberry pi are directly plugged on to the female header of the 3.2” LCD touchscreen display, so you dont have to worry about the connections.
Step 1: Connecting your 3.2” raspberry pi touchscreen LCD display
This will have to be the easiest step, since you just need to take the LCD module and plug it on to your raspberry pi GPIO pins as shown in the above picture.
In case, you need to utilize other pins of your raspberry pi for the project, you can then use raspberry pi GPIO to breadboard connectors (male to female) like this: GPIO connectors.
Or you can just check out the connections for the pins of the raspberry pi touchscreen LCD display module as shown below:
|
PIN NO. |
SYMBOL |
DESCRIPTION |
|---|---|---|
| 1, 17 | 3.3V | Power positive (3.3V power input) |
| 2, 4 | 5V | Power positive (5V power input) |
| 3, 5, 7, 8, 10, 22 | NC | NC |
| 6, 9, 14, 20, 25 | GND | Ground |
| 11 | TP_IRQ | Touch Panel interrupt, low level while the Touch Panel detects touching |
| 12 | KEY1 | Key |
| 13 | RST | Reset |
| 15 | LCD_RS | LCD instruction control, Instruction/Data Register selection |
| 16 | KEY2 | Key |
| 18 | KEY3 | Key |
| 19 | LCD_SI / TP_SI | SPI data input of LCD/Touch Panel |
| 21 | TP_SO | SPI data output of Touch Panel |
| 23 | LCD_SCK / TP_SCK | SPI clock of LCD/Touch Panel |
| 24 | LCD_CS | LCD chip selection, low active |
| 26 | TP_CS | Touch Panel chip selection, low active |
Step 2: Installing the raspbian OS image for the 3.2” raspberry pi touchscreen LCD display
Normally, when trying to interface a touchscreen LCD display with the raspberry pi, you need to install various drivers, make changes in the kernel, etc. But here, you can forget doing all that. Just install the .img file of the raspbian OS on to your SD card. You can find the file and the datasheet for the display here: image file. The image file can be found inside the folder

Next, you have to install this image file to your raspberry pi. So, take an empty SD card and an SD card reader. For Windows users, check out the steps as detailed by the Raspberry Pi foundation.
nsert the SD card into your SD card reader and check which drive letter was assigned. You can easily see the drive letter (for example G:) by looking in the left column of Windows Explorer. You can use the SD card slot (if you have one) or a cheap SD adapter in a USB port.
- Download the Win32DiskImager utility from the Sourceforge Project page (it is also a zip file); you can run this from a USB drive.
- Extract the executable from the zip file and run the Win32DiskImager utility; you may need to run the utility as an administrator. Right-click on the file, and select Run as administrator.
- Select the image file you extracted above.
- Select the drive letter of the SD card in the device box. Be careful to select the correct drive; if you get the wrong one you can destroy your data on the computer's hard disk! If you are using an SD card slot in your computer and can't see the drive in the Win32DiskImager window, try using a cheap SD adapter in a USB port.
- Click Write and wait for the write to complete.
- Exit the imager and eject the SD card.
Now, insert this SD card into your Raspberry Pi and power it up. You should see the display come alive in a few seconds.
For Linux users:
Check Step 2 of our How to Back Up Your Raspberry Pi Project Files tutorial.
After that, test your SD card by inserting it into the Raspberry Pi and powering it up. You should see the Raspberry Pi touchscreen LCD display booting up.
You have successfully interfaced a touchscreen LCD display with a Raspberry Pi! You can now add this cool display to any of your projects and have a sleek touch interface to enter the inputs. Check out the demo video of the Raspberry Pi touchscreen LCD display in action below.