
Recently I purchased my first home. In the kitchen there was a small TV wall mounted however the TV itself was faulty so I was wondering, what should I do with this wall bracket since I didn’t really want a TV in the kitchen area. Then it dawned on me, instead of using a p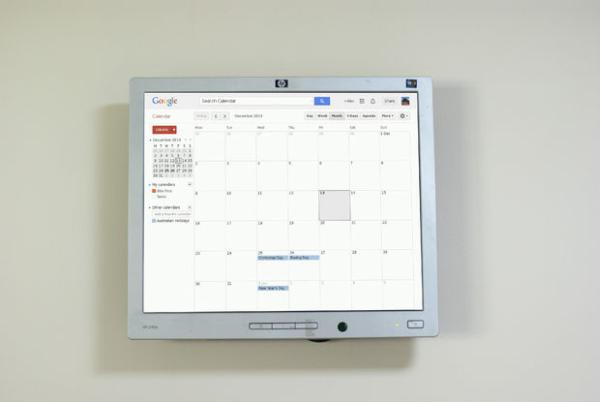 aper calendar with tiny little boxes to write things in I want my Google calendar on the wall.
To tackle this instructable you should have a general understanding of home networking and computing, some linux experience wouldn’t go astray but is not really necessary. If you run into something you don't understand just remember google search is your friend.
Equipment you will need
- Home network (wireless if you can't run a cable to the Pi)
- Raspberry Pi (I've used the model B)
- SD card 2GB or larger
- AC Adaptor (I used a USB wall charger for mobile phones check here http://elinux.org/RPi_VerifiedPeripherals#Power_adapters)
- Micro USB cable
- USB keyboard and mouse
- USB wireless adaptor (MAKE SURE IT IS COMPATIBLE OUT OF THE BOX http://elinux.org/RPi_USB_Wi-Fi_Adapters)
- HDMI cable
- Wall mountable HDMI capable monitor or any monitor with some kind of HDMI converter
- Wall bracket for your monitor
*I will not be showing how to wall mount your monitor as the bracket was already on my wall*
Step 1: Raspberry Pi Setup
First we'll setup the Raspberry Pi, to do this you'll need to have Raspbian installed. You can buy a Pi with Raspbian pre-installed or you can use a 2GB or larger SD card that you already have.
I am using an SD card I already have. Plug the SD card into your computer and download the latest Raspbian http://downloads.raspberrypi.org/raspbian_latest
I'm using windows so I unzipped the file and used win32diskimager (http://sourceforge.net/projects/win32diskimager) to write the Raspbian image to the SD card.
If you are still not sure there is a tutorial here http://elinux.org/RPi_Easy_SD_Card_Setup
Ok now we have Raspbian installed it's time to get our Pi up and running, plug in your SD card, Wi-Fi dongle, USB keyboard, Ethernet cable to your router, HDMI to your monitor and lastly the micro USB cable to the power socket. The first time you boot up you'll end up with the configuration screen.
The changes you need to make are:
- Expand the filesystem so Raspbian utilises the entire SD card
- Change your password
- Enable boot to desktop
- Set your language, region and time zone
Go into advanced options
- Change your hostname so you can recognise your Pi on the network.
- Enable SSH so you can access your PI from a computer on your network.
- Select finish which should restart your Pi.
Step 2: Keyboard and updates
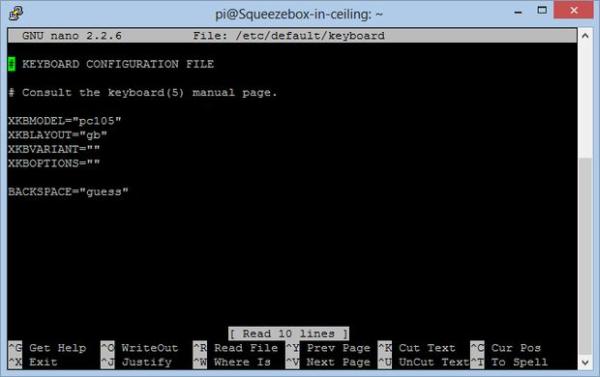
If you are in the US or Australia like me you will want to change the keyboard layout to US.
To do this you’ll need to change a file by opening your terminal and entering the command:
sudo nano /etc/default/keyboard
Use the arrow keys to move the cursor and change the gb to us.
Now save the file by pressing ctrl + X and Y to save changes
Now to update your Pi, type the following commands:
sudo apt-get update
sudo apt-get upgrade
Press y and hit enter to download updates (this will take ages so go have a coffee/beer).
For more detail: Raspberry Pi Wall Mounted Google Calendar