
First of all, I'm French and I apologize for my bad English.
Before to start, I drew a plan for my birdhouse in order to build it.
First, you can see my youtube video here:
After, I decided to add a camera to see the bird life and perhaps the baby birds.
I will describe how to add a raspberry and a camera in my birdhouse.
EDIT 1st October:
Good news, coming soon the temperature and humidity on the web page. Stay connected !
EDIT 5th October:
I have first visit one chickadee => https://youtu.be/stxVw7Cs5os
EDIT 12th October:
Temperature and humidity are available, go to step 8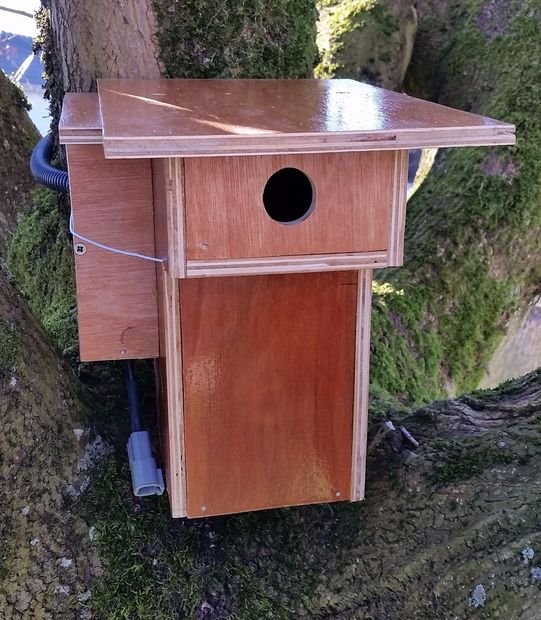
Step 1: The listing
You need:
- 1 x Raspberry pi A+ (28$ / 25€)
- 1 x camera board Pi NoIR (32,5$ / 29€)
- 1 x microSD card class 10 (for me 64GB) (27,5$ / 25€)
- 1 x dongle Wifi 802.11n 150Mbps (9,3$ / 8,3€)
- 1 x DC-DC Buck Converter Step Down Module Power Supply (ebay 1,7$ / 1,5€)
- 1 x Temperature and humidity sensor DHT22 + 1 resistor 4,7 K ohms (ebay ~5$ / 4,4€)
- 4 x led IRs (ebay) + 4 resistors 160 ohms (but value depend of current) (from my stock or ebay ~2$ / 1,8€)
- 4 x led whites (ebay) + 4 resistors 100 ohms (but value depend of current) (from my stock or ebay ~2$ / 1,8€)
- 2 x transistor NPN (2N2222) + 2 resistors 1K ohms (from my stock or ebay ~1$ / 0,8€)
- 1 x prototype pcb board (ebay) (from my stock or ebay ~1$ / 0,8€)
- a soldering iron and solder (from me)
Total : ~ 113$ / 100€
with all these components, you are ready !
Step 2: Install and configure your Raspberry
Now, you should to install and configure your Raspberry.
You can visited my blog to start with a raspberry : here
or to find tuto on google ! (google is your fiend).
I made a special microSD card with Raspbian OS and Wifi already configurated for my home Wifi system.
For the RPI A+, you must to connect it:
- download the Raspbian image on raspberrypi.org
- put the Raspbian image on your microSD card
- insert the microSD card into the RPI
- connect your RPI at your TV by the HDMI cable
- connect your one dongle for USB keyboard + mouse at your RPI
- connect the 5V power supply at your RPI
- The RPI start ! OMG !
- configure with “raspi-config” : extend filesystem, enable camera, change password…
- configure the Wifi
- shutdown your RPI
- disconnect your TV and dongle keyboard
- connect Wifi dongle
- power up your RPI
- log in to your RPI by SSH through your wifi network
Your RPI is ready !
Step 3: Build a mount for the camera, the leds and the sensor
Take the prototype board and cut it in order to place the camera, the leds with resistors and the sensor.
For example of cabling, you look the fritzing picture.
For the white leds : I cut and smoothed the top of led (white) in order to have a wider angle and more diffusing light.
The plastic screws allow me to make an adjustement of the vision of the camera.
Step 4: Build a board for the supply converter and the control of leds
ake the prototype board and cut it at the dimensions of RPI A+.
Make a hole in the board to let to spend the ribbon cable of camera.
Put the supply converter (12V->5V), the transistors NPN and the resistors. (cf fritzing picture on previous step).
Soldered on the RPI, the wires and connect it on the output of converter. On the input, there is 12V supply from my garage.
Why i chose a converter 12V–>5V ? Because, I do not have a power supply 5V.
Step 5: To place the camera, light and sensor board
Take a house bird (my production) and to place the board on the top of the house bird.
Next, to place the RPI in the right direction of the ribbon cable of the camera to avoid to bend the ribbon cable.
And make a ribbon to connect the leds and sensor between the camera board and the control board
Step 6: Closed the electronic boards
Make a protection for the RPI.
Next, make a joint (such as the bathroom) all around the protection with a brush.
Make a hole in order to pass the wire from the power supply.
I used the Deutsch DTM connector (waterproof) between the house bird and my garage.
For more detail: Raspberry with cam in birdhouse