
| Hardware components: | ||||||
|
× | 1 | ||||
|
× | 2 | ||||
|
× | 1 | ||||
|
× | 1 | ||||
|
× | 1 | ||||
|
× | 1 | ||||
|
× | 1 | ||||
|
× | 1 | ||||
 |
|
× | 1 | |||
| Software apps and online services: | ||||||
 |
|
|||||
STORY
You are about to embark on a journey, and we are excited to be part of it! Get ready to make and program your robot using Windows 10 IoT Core!
By the time you are done with this project you will gain the following experience:
- Understand how Windows 10 Universal Windows Applications (UWA) work
- See how the same application can come alive and change behavior by running on the robot via Windows 10 IoT Core on a Raspberry Pi 2 and on your Windows 10 Desktop PC
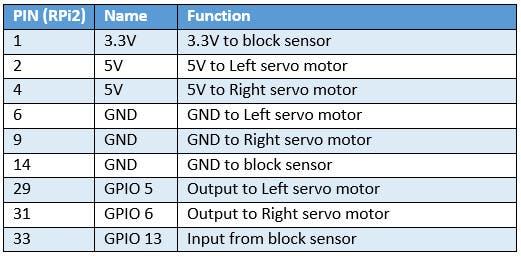
- Control digital GPIO from your Raspberry Pi 2
- Process keyboard, mouse clicks and touch events
We are excited to embark on this journey with you – Thank you from the Microsoft IoT Team!
Usage
Download the project, load it into Visual Studio compile and deploy the application. Follow this link.
The application can be run in 2 ways:
- Windows 10 desktop UWA – here you can use the mouse or touch to drive the robot. You can also plug in the Xbox 360 controller and use that to drive the robot over the network
- Windows 10 IoT Core UWA for the Raspberry pi 2 – here you can drive the robot directly with the Xbox 360 controller, or via network commands from the Windows 10 UWA
Directional movement
The robot can move in 8 directions:
- Forward
- Reverse
- Hard left turn
- Hard right turn
- Soft forward left turn
- Soft forward right turn
- Soft backward left turn
- Soft backward right turn
A hard turn rotates the wheels in opposite directions. A soft turn rotates only one wheel in the specified direction.
Joystick Input
The robot can be controlled via the left analog stick or digital direction pad. They joystick can be plugged into the robot directly via the USB port on the Raspberry Pi 2 or the Windows 10 Desktop PC via USB.
Keyboard Input
From the Windows 10 Desktop PC UWA app, the keyboard controls are:
- Forward – Up arrow / W
- Backward – Down arrow / X
- Left – Left arrow / A
- Right – Right arrow / D
- Back Left – Z
- Back Right – C
- Forward Left – Q
- Forward Right – E
- Stop – Enter / Space
Mouse/Touch
When run on the Windows 10 Desktop PC, there is an input screen with the 8 directional movements of the robot. Click or touch any of these to move the robot.
Bill of Materials
To build the robot, you will need the following:
- Wooden Robot Frame in 7 pieces – Get the cutting plans from the Sumo Robot Jr. GitHub repoand submit them to http://ponoko.com. We cut them 4 to a sheet of P3 5.2 mm Veneer Core Birch
- 2x continuous rotation servos, like these
- A ball caster, like this
- A USB Xbox 360 Controller
- a Digital switch, like this
- 6x 6″ Male-to-Female Wires (2 red, 2 white and 2 black) like these
- 2x 6″ Female-to-Female Wires (1 red and 1 black) like these
- Screws, Nuts, Bolts and standoffs like this
- Raspberry Pi 2, a 2 Amp power supply, SD card, network ethernet cable
- Micro screwdrivers
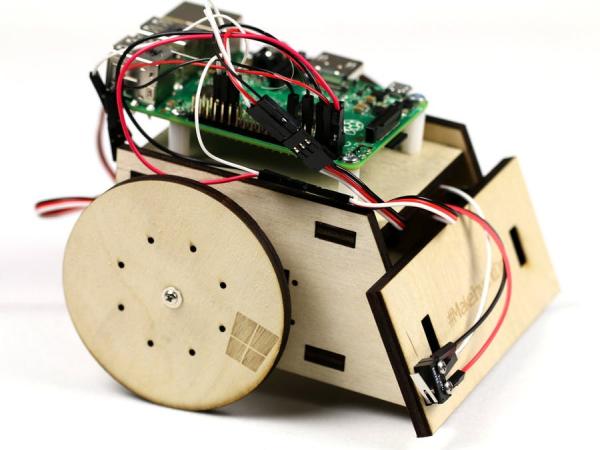
Hardware assembly
Pin Assignments
Assembly Notes
- Tolerances – The robot frame is designed to snap together. We have noticed some slight tolerance differences in the laser cuts of the wood frame. You may want to leave the protective tape on the non-visible side of the parts as a shim when assembling the robot. if you plan to glue the robot frame together or if the pieces fit very tightly, you can choose to remove the protective tape.
- Screw hole alignment – The screw holes were designed for the Raspberry pi 2, but the standoffs may not perfectly align due to tolerance differences in the laser cut frame. This is perfectly ok if the standoffs taper a bit.
- Don't overtighten! – Do not overtighten the screws that go into the standoffs. Overtightening can cause the substrate of the Raspberry pi 2 to crack. It's ok for these to just be a snug fit, or even a bit loose.
Software
The robot kit software is a UWA project with 6 major files:
- MainPage.xaml.cs – The main application code and entry point
- XboxHidController.cs – The initialization and handling logic for the Xbox controller
- MotorControl.cs – The main logic for controlling the continuous rotation servos
- Controller.cs – The logic for converting joystick, key press, mouse, and touch events to robot movements
- NetworkCommands.cs – the logic to setup client and server networking threads and create/process network messages
- package.appxmanifest – the manifest file that defines properties of this UAP application
Read More: Robot Kit