
As part of my ongoing efforts to create a really awesome alarm clock with my Raspberry Pi, I had to set up some MySQL databases. I have very little experience with MySQL, and the idea of setting up tables, users, and all that jazz via the command line was daunting. My dad (a programming pro!) suggested that I install a browser-based MySQL manager, like phpMyAdmin. A GUI sounded like a wonderful idea, but it has taken a bit of work, so I'm documenting it here. For those of you that haven't read my previous posts, I am running an Nginx server on the Pi.
Prerequisites
Make sure you have PHP5 (or above) and MySQL5 (or above installed):
|
1
2
3
4
5
|
$ php -vPHP 5.4.4-14 (cli) (built: Mar 7 2013 08:56:46)$ mysql -Vmysql Ver 14.14 Distrib 5.5.30, for debian-linux-gnu (armv7l) using readline 6.2 |
I also read that installing libmcrypt was a good idea, so I did:
|
1
|
sudo apt-get install php5-mcrypt |
If you don't have these packages installed, follow the instructions I wrote in this previous post to install PHP and MySQL.
Installation
First, you'll need to download phpMyAdmin onto the Pi. The package has to be installed in a certain location too, so we might as well get to the right location first. phpMyAdmin needs to be installed in the root directory of your server. In my case, the root directory is just a folder named “www” in my user's directory. So, we cd into that directory:
|
1
|
cd ~/www |
The next step is to download phpMyAdmin. I went to the phpMyAdmin website and downloaded a .tar of the files directly into my /www directory:
|
1
|
wget http://sourceforge.net/projects/phpmyadmin/files/phpMyAdmin/4.0.1/phpMyAdmin-4.0.1-english.tar.gz/download#!md5!ee358e60f1b526f169deada31d7e98c2 |
Please note that this URL is for the current version of the software, but depending on when you read this, it may no longer be the current version. All you need to do is replace the url with the url of the most recent download – you can find this by right-clicking on the download link and selecting “Copy Link Address.” I went for the “-english.tar.gz” version of the download.
Next, we must extract the files. You may want to rename the package; when I downloaded it, the name of the tar file had extra garbage at the end, so I just deleted everything after the .tar.gz extension.
|
1
|
tar -xvfz phpMyAdmin-4.0.1-english.tar.gz |
Next, rename the extracted folder to phpmyadmin
|
1
|
mv phpMyAdmin-4.0.1-english.tar.gz phpmyadmin |
You should now have a folder called phpmyadmin within your web server's root directory. My file-path looks like this:
|
1
|
/home/my_user/www/phpmyadmin |
Configuration
The next step is to configure phpMyAdmin. First, create a dummy config.inc file:
|
1
2
3
4
5
|
cd /home/my_user/www/phpmyadmin/mkdir configchmod o+rw configcp config.sample.inc.php config/config.inc.phpchmod o+w config/config.inc.php |
Next we open up a browser and start the configuration wizard. My RPi is on my local network with a static IP, so in my browser I navigate to: http://192.168.1.125/phpmyadmin/setup/index.php You should be greeted with a screen that looks something like this:
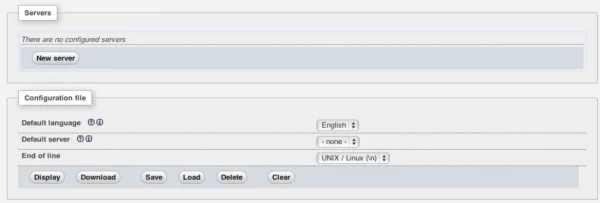
Click the “new server” button. You'll need to enter a few things. First, in the “Basic Settings” tab, I named the server. I also selected “Use SSL.” I left all the other options blank to keep the defaults.
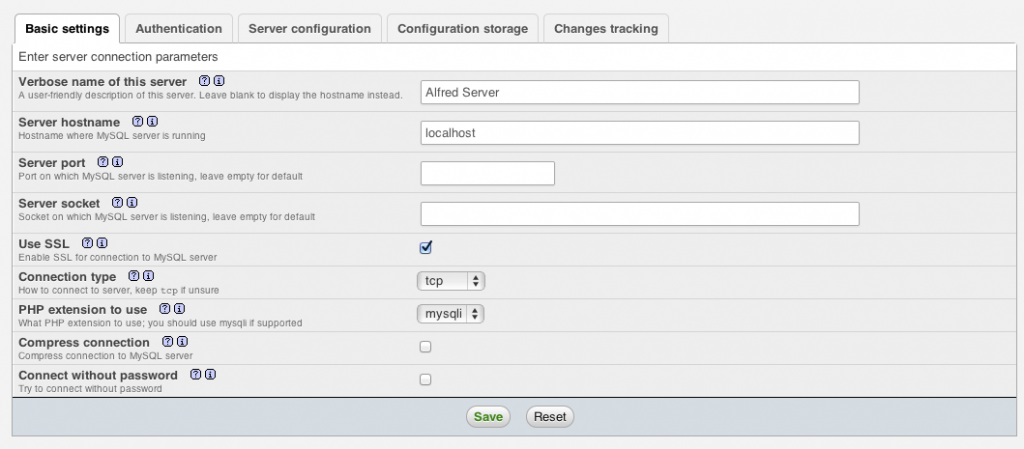
In the “Authentication” tab I entered information for the config author. I used the password that I gave MySQL during the MySQL installation because I'm fairly certain that phpMyAdmin will use these credentials to log in to MySQl. I left “config auth” as the default, “root” and also left “authentication type” as the default “cookie.”