
The Raspberry Pi is an amazing 35 dollars mini-computer. It allows you to do everything you could do with a regular Linux computer (Connecting to the internet, watching videos, launching applications, …) but also to interact with the world surrounding it, just like an Arduino. That's why I qualify it as a mix between a computer and a micro-controller.
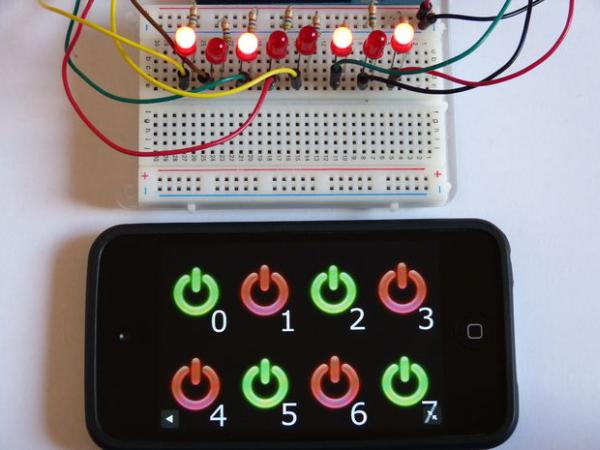
That's also why I chose it for this project. I'm going to show you how to control LEDs with your Raspberry Pi. Firstly directly from the Raspberry Pi itself, then from any device in your house like your Smartphone or your tablet.
Here is a very good example of what you can achieve after reading this Instructable: http://www.instructables.com/id/Web-Controlled-8-Channel-Powerstrip/. Thanks to Rleddington for his amazing project.
Step 1: The electronic part
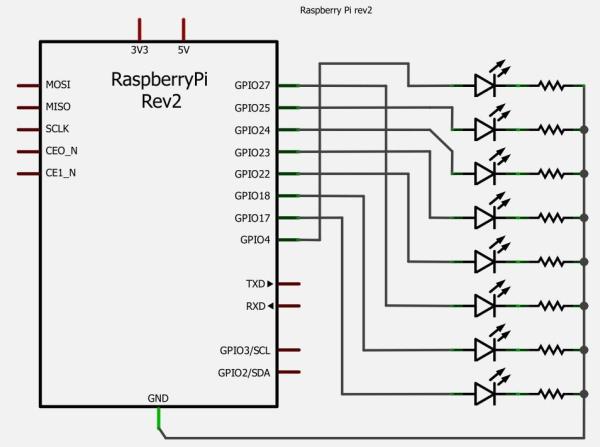
The electronic part is nothing special, it's only 8 LEDs with their protecting resistor. The only hard part is to connect the LEDs to the good pin on the Raspberry Pi. Indeed, I'll be using later a library called Wiring Pi made by Gordon Henderson (You can visit his website at: http://wiringpi.com/) and the pin's numbers used in this library aren't the same than the ones on the Raspberry Pi. See this page for matches: http://wiringpi.com/pins/ (just be careful about your Raspberry Pi revision, the pinout isn't exactly the same). I'll be using Wiring pins 0 to 7.
Concerning the resistors, they should be 270Ω but since I don't have this precise value, I'm using 560Ω resistors (LEDs are just less bright).
Finally, I've made two schematics to make it simpler. The first one (with the complete Raspberry Pi) is showing you the real pins as they are shown on the board. The second one is a simplified version, it's showing you only the useful pins and their matches in the Wiring Pi library (GPIO Wiring number/Actual number on the board).
Step 2: Installing and using the Wiring Pi library
As said before, Wiring Pi is a library. It simplifies a lot using the Raspberry Pi GPIOs (one command instead a long process). It also means that you can use it in any of your C codes. However, we won't build and use a C program but the Gpio utility. It's a software made by Gordon and coming with the library. It allows you to control the GPIOs in a bash script or directly in a command line. Using this utility is however a lot slower than a C program.
We first need to install it. Gordon himself is explaining it very well on his website: http://wiringpi.com/download-and-install/. You just need to download it from GIT then to build it using the ./build command.
You should now be able to use the Gpio utility, type the “gpio mode 0 out” command to test it out. If nothing special appears, everything's fine. Else, if the board is printing “command not found error” or something like that, be sure that you've followed the guide and build the library.
Let's turn on and off the first LED (Wiring pin 0). You first need to set the pin as an output. Use the “gpio mode 0 out” command to do so. “0” is the wiring pin number and “out” simply stands for output. Now, use the “gpio write 0 1” command to turn on your LED. “0” is again the pin number and “1” is the status (1 for ON and 0 for OFF). If everything's fine you should see your LED shining. To turn it off, simply use the “gpio write 0 0” command.
Just a little tip, if you want to use the actual pin number (GPIO-17) instead of the Wiring Pi number (0 is corresponding to GPIO-17), use the -g flag in your command. Ex: “gpio -g write 17 1” instead of “gpio write 0 1“.
There is also the “gpio read” command which allows you to read the pin's status. It may seems useless when the pin has been set as an output but it allows you to be sure of the pin's status when you can't see the LED. Using it is as simple as before, just type “gpio read 0” where “0” is the wiring pin number. The command is returning the pin's status (again 1 for ON and 0 for OFF).
Finally the Wiring Pi library is containing a lot of other commands/functions but I'm not gonna cover them in this instructable since there are not useful here. See this page if you are more curious: http://wiringpi.com/reference/ (library's functions) and https://projects.drogon.net/raspberry-pi/wiringpi/the-gpio-utility/ or the “man gpio” command for the Gpio utility.
Now that you can use this utility, let's play a little bit with it. You can first, if it's not already the case, control remotely your Raspberry Pi with SSH. You can use Putty for Windows or ServerAuditor for your Smartphone. Then have fun with bash scripts such as this one which is turning on LEDs 0 to 7, waiting 2 seconds, then turning them off again:
#!/bin/bash
#set mode to output
for i in 0 1 2 3 4 5 6 7;
do gpio mode $i out;
done;
#turn on LEDs 0 to 7
for i in 0 1 2 3 4 5 6 7;
do gpio write $i 1;
done;
#wait 2 seconds
sleep 2;
#turn LEDs off
for i in 0 1 2 3 4 5 6 7;
do gpio write $i 0;
done;
Step 3: Installing a web server then transferring your website to it
Controlling the LEDs remotely with SSH is pretty cool but the interface (console) isn't very user friendly and typing the commands every time is long and annoying. That's why we need a graphical interface for our project.
Programming an app for each OS (IOS, Android, Windows phone, Mac, Linux, Windows,…) would be too long and would require to know a lot of different languages for nearly nothing. It would also require to do an application running on the Raspberry Pi. Making it this way would be overkill and time wasting.
That's why a website is the best solution, it's compatible with all devices and you “only” need to know four languages: HTML (for the page's skeleton), CSS (page's style), PHP (interactions with the server) and JavaScript (interactions with the user).
We indeed need to install a web server on the Raspberry Pi. In our case, we don't need a MySQL database, only a HTTP server and its PHP extension.
After updating your Raspberry Pi with the “sudo apt-get update” command, type “sudo apt-get install apache2 php5 libapache2-mod-php5” to install Apache HTTP server and PHP5 extension. You can now test if your server is working by typing the IP of your Raspberry Pi in your browser. You should now see a “It works!” page with two other lines. If you don't, then check your board's IP, try re-installing Apache or rebooting your Raspberry Pi. This page is showing that your Apache server is working properly but not its PHP extension. To check it, navigate to your “/var/www/” directory by using the “cd /var/www/” command. If you use the “ls” command, you should have only one file named “index.html“. This file corresponds to the “It works!” page. You can now delete it (“sudo rm index.html”) and create another one called “index.php” (use “sudo nano index.php“). Then type the following text:
phpinfo();
?>
If both pages were correctly displayed, then you now have a fully functional Apache/PHP server but using nano every time is annoying and not very comfortable. We indeed need to transfer files from your computer to your Raspberry Pi. You may want to install a FTP server but it isn't necessary, you can already transfer files using the SFTP protocol. All you need is an SFTP client on your computer. I'm personally using WinSCP for Windows but there are Cyberduck for mac and Filezilla for Linux. If you try transferring files before reading what's next, you'll probably have issues such as “access refused” or “cannot write here”. It's due to the fact that the user pi isn't owning the www directory. Indeed, if you try the “ls -l /var/www” command, you'll see that only root (the super user) is owning the www directory. You can (like I did) use the “sudo chown -R pi /var/www” command to change it or create a group named www-data in which you place the pi user then use the “sudo chown -R www-data /var/www” command. The -R flag is standing for recursive, it means that the user/group isn't owning only the directory itself but also everything inside (index.php as example).
You now have your server ready to work and to receive web pages. Have fun with it if know HTML, CSS and PHP.
For more detail: Simple and intuitive web interface for your Raspberry Pi