
| Hardware components: | ||||||
 |
|
× | 1 | |||
 |
|
× | 1 | |||
|
× | 1 | ||||
 |
|
× | 1 | |||
|
× | 1 | ||||
|
× | 3 | ||||
|
× | 1 | ||||
| Software apps and online services: | ||||||
|
||||||
 |
|
|||||
 |
|
|||||
 |
|
|||||
|
||||||
|
||||||
|
||||||
|
||||||
STORY
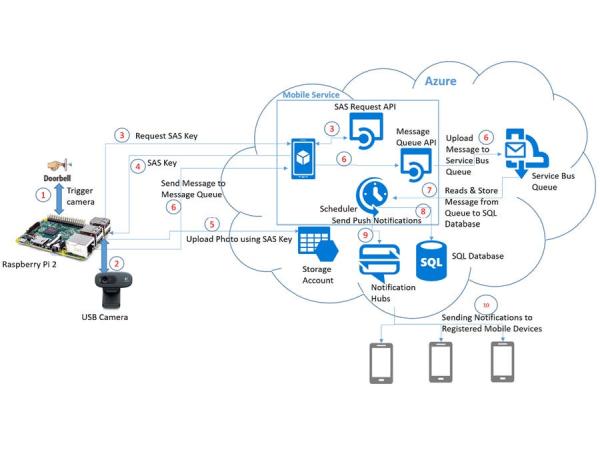
In this project, we used Raspberry Pi 2, Adafruit kit components, Azure components and USB Camera. We have a push button, which when pressed, triggers the USB camera to take photo, then upload the photo in to azure storage container with help of SAS (Shared Access Signature) URL, and finally send notification to the respective mobile apps. Here we developed Windows 10 UWP app to receive notification and for performing actions.
Prerequisites:
Hardware
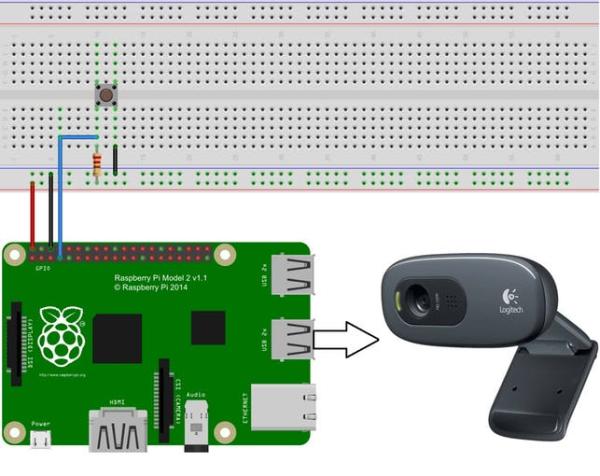
- Raspberry Pi2 Model B
- Breadboard
- Logitech USB Camera (This component is not there in Adafruit kit)
- Adafruit Push button
- 10K Ohm Resistor
- Adafruit Female to Male Jumper Wires
Software
- Windows 10 PC
- Visual Studio 2015 Community Edition or Enterprise Edition Update1
- Azure Subscription
- Dot net Back-end Mobile Service
- Azure Storage Account
- Service Bus Queue
- Scheduler
- Windows 10 IoT Core
Step 1. Set up Your PC
- First you need a Windows 10 PC running the public release of Windows 10 (version 10.0.10586) or better.
- Install Visual Studio Community 2015 or Visual Studio Professional 2015 or Visual Studio Enterprise 2015 with Update 1.
- Install Windows IoT Core Project Templates from here.
- Enable developer mode on your Windows 10 device by following https://msdn.microsoft.com/library/windows/apps/xaml/dn706236.aspx
Step 2. Set up Raspberry Pi2
- 5v Micro USB power supply with at least 1.0A current. If you plan on using several power-hungry USB peripherals, use a higher current power supply instead (>2.0A).
- 8GB Micro SD card – class 10 or better.
- HDMI cable and monitor (Optional)
- Ethernet Cable
- Micro SD card reader – due to an issue with most internal micro SD card readers, we suggest an external USB micro SD card reader.
- Install the Windows 10 IoT Core tools:Download a Windows 10 IoT Core image from http://ms-iot.github.io/content/en-US/Downloads.htm Save the ISO to a local folder.Double click on the ISO (Iot Core RPi.iso). It will automatically mount itself as a virtual drive so you can access the contents.
- Install Windows_10_IoT_Core_RPi2.msi. When installation is complete, flash.ffu will be located at C:\Program Files (x86)\Microsoft IoT\FFU\RaspberryPi2.
- Eject the Virtual CD when installation is complete – this can be done by navigating to the top folder of File Explorer, right clicking on the virtual drive, and selecting “Eject” like shown in below figure.
- Insert a Micro SD Card into your SD card reader.
- Use IoTCoreImageHelper.exe to flash the SD card. Search for “WindowsIoT” from start menu and select the shortcut “WindowsIoTImageHelper”.
- After launch the IoTCoreImageHelper.exe and select your SD Card and the flash.ffu found in the directory.
- Once the process has completed, you are ready to run Windows 10 IoT Core on your Raspberry Pi 2.NOTE: IoTCoreImageHelper.exe is the recommended tool to flash the SD card. However, instructions are available for using http://ms-iot.github.io/content/en-US/win10/samples/DISM.htm directly.
- Safely remove your USB SD card reader by clicking on “Safely Remove Hardware” in your task tray, or by finding the USB device in File Explorer, right clicking, and choosing “Eject”. Failing to do this can cause corruption of the image.
- Hook up your board
- Insert the micro SD card you prepared into your Raspberry Pi 2.
- Connect a network cable from your local network to the Ethernet port on the board. Make sure your development PC is on the same network.NOTE: If you don't have a local wired network, see http://ms-iot.github.io/content/en-US/win10/ConnectToDevice.htm for additional connection options.
- Connect an HDMI (High-Definition Multimedia Interface) monitor to the HDMI port on the board (Optional).
- Connect the power supply to the micro USB port on the board.
Step 3: Create an UWP App for Raspberry Pi
Once we complete setting up the Development PC and Raspberry Pi, Open Visual Studio and create a new project by selecting Universal –> Blank App template
Initialize the Push Button
Here we are assuming that the push button is a Doorbell in our project.
Open the MainPage.xaml.cs file, declare the following properties in the top of the class like below.
  //A GPIO pin for the pushbutton
    GpioPin buttonPin;
    //The GPIO pin number we want to use to control the pushbutton
    int gpioPin = 4;
To Initialize the GPIO pin for the pushbutton, then call InitializeGpio method under OnNavigatedTo method of MainPage.xaml.cs file like below.
base.OnNavigatedTo(e);
try
{
//Initialize the GPIO pin for the pushbutton
InitializeGpio();
}
catch(Exception ex)
{
Debug.WriteLine(ex.Message);
}
Next add the following code in MainPage.xaml.cs file.
//This method is used to initialize a GPIO pin
    private void InitializeGpio()
    {
        //Create a default GPIO controller
        GpioController gpioController = GpioController.GetDefault();
        //Use the controller to open the gpio pin of given number
        buttonPin = gpioController.OpenPin(gpioPin);
        //Debounce the pin to prevent unwanted button pressed events
        buttonPin.DebounceTimeout = new TimeSpan(1000);
        //Set the pin for input
        buttonPin.SetDriveMode(GpioPinDriveMode.Input);
        //Set a function callback in the event of a value change
        buttonPin.ValueChanged += buttonPin_ValueChanged;
    }
buttonPin_ValueChanged event will be called every time there is a change in the GPIO pin value, and add the following code in MainPage.xaml.cs file.
  //This method will be called everytime there is a change in the GPIO pin value
private async void buttonPin_ValueChanged(object sender, GpioPinValueChangedEventA        rgs e)
    {
        //Only to initialize the camera and take photo  when the button is released
        if (e.Edge == GpioPinEdge.RisingEdge)
        {
            //write to the code to intialize the camera and take photo from it.
        }
    }
Initialize the camera and capture photo when we press the push button
When we press the push button the buttonPin_ValueChangedEvent will be fired, in that event we will check whether the Edge property value of the button is at RisingEdge or FallingEdge. Based on the value in the Edge property we will identify whether the bell got rang or not. According to the code here we initialize camera and capture a photo when the value in the Edge property is at RisingEdge. Here we will call the two methods named as initVideo() for initializing the camera and takePhoto_Click() to capture a photo from it.
Next add following lines code in buttonPin_ValueChanged event.
//Only to initialize the camera and take photo  when the button is released
      if (e.Edge == GpioPinEdge.RisingEdge)
      {
           await initVideo();
    await takePhoto_Click();
      }
Declare following properties at the class level of the MainPage.xaml.cs file
  private MediaCapture mediaCapture;
    private StorageFile photoFile;
    private readonly string PHOTO_FILE_NAME = "photo.jpg";
    private bool isPreviewing;
    private bool isRecording;
To set the false value to isPreviewing property under the constructor of this class like below.
isPreviewing = false;
Add the following code in MainPage.xaml.cs file, in that I have to write the code like if the mediaCapture is null, then we have to initialize the camera otherwise it stop the camera preview.
private async Task initVideo()
    {
        try
        {
            if (mediaCapture != null)
            {
                // Cleanup MediaCapture object
                if (isPreviewing)
                {
                    await mediaCapture.StopPreviewAsync();
                    isPreviewing = false;
                }
                mediaCapture.Dispose();
                mediaCapture = null;
            }
            mediaCapture = new MediaCapture();
            await mediaCapture.InitializeAsync();
            // Set callbacks for failure
       mediaCapture.Failed += new MediaCaptureFailedEventHandler(mediaCapture_Failed);
            // Start Preview
            await mediaCapture.StartPreviewAsync();
            isPreviewing = true;
        }
       catch (Exception ex)
        {
            Debug.WriteLine(ex.Message);
        }
    }
Add the following code in MainPage.xaml.cs file, in that I have to write the code like to take photo from camera.
    private async Task takePhoto_Click()
    {
        try
        {
        photoFile = await KnownFolders.PicturesLibrary.CreateFileAsync(
                PHOTO_FILE_NAME, CreationCollisionOption.GenerateUniqueName);
       ImageEncodingProperties imageProperties = ImageEncodingProperties.CreateJpeg();
        await mediaCapture.CapturePhotoToStorageFileAsync(imageProperties, photoFile);
            path = photoFile.Path;
            IRandomAccessStream photoStream = await photoFile.OpenReadAsync();
            TakeAndSendPicture(photoFile);
        }
        catch (Exception ex)
        {
            Cleanup();
            Debug.WriteLine(ex.Message);
        }
    }
Add the following lines of code, to stop the camera preview if it is already in streaming state.
Read More: Smart Doorbell with Azure, Windows10 IoT & UWP App