
Enginursday: First Impressions of the ESP32
An overview of Espressif's sequel to the ESP8266 – a new WiFi/Bluetooth-enabled system-on-chip, with a massive GPIO count.

Last year, the ESP8266 took the embedded IoT world by storm. For less than $10, you could get a programmable, WiFi-enabled microcontroller with just enough GPIO to wiggle some LEDs and monitor some sensors. I spent a good chunk of the year working with the chip – laying out a handful of boards, and mostly wrestling with the lightly-documented SDK (to put it nicely). Fortunately, a huge community sprang up around the chip, and some amazing tools and firmwares were created to support it, like ESP8266 Arduino and NodeMCU.
This year Espressif – the semiconductor company behind the ESP8266 – is releasing a new Internet-capable microcontroller: the ESP32.
The ESP32 doesn’t replace the ESP8266, but it does improve on it in every aspect. Not only does it have WiFi support, but it also features a Bluetooth 4.2 radio, making it even more versatile. The CPU is similar to the ESP8266 – it’s a 32-bit Xtensa® LX6, but the ESP32 has two cores! There’s also 128KB of ROM and 416KB SRAM, but Flash memory (for program and data storage) is still left up to an external chip (up to 64MB).
Block diagram from the ESP32 spec sheet.
There are 36 GPIO pins, which can be assigned to all sorts of peripheral duties, including:
- Analog-to-Digital Converter (ADC) – Up to 16 channels of 12-bit SAR ADC’s. The ADC range can be set, in firmware, to either 0-1V, 0-1.4V, 0-2V, or 0-4V – no more weird 0-1V ADC!
- Digital-to-Analog Converter (DAC) – Two 8-bit DAC’s to produce true analog voltages
- Pulse-Width Modulation (PWM) – Up to 16 channels of PWM-capable pins for dimming LEDs or controlling motors
- Touch Sensor – 10 GPIOs feature capacitive sensing; make a 10-key buttonpad!
- UART – Two UART interfaces, one is used to load code serially. They feature flow control, and support IrDA too!
- I2C, SPI, I2S – There are two I2C and four SPI interfaces to hook up all sorts of sensors and peripherals, plus two I2S interfaces if you want to add sound to your project.
ESP31B Development Board
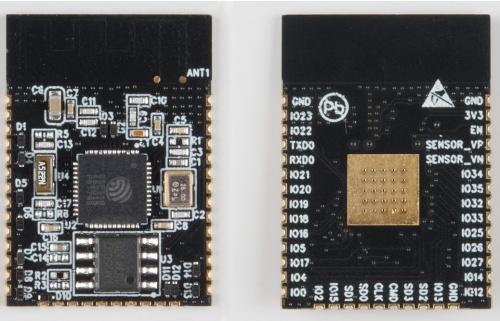
Espressif sent us a preliminary development board – so preliminary, in fact, that it’s not even the right chip. This is the ESP31B on a little module they call the ESP-WROOM-03:
Top and bottom views of the ESP31b-WROOM-03 module.
It turns out the ESP31B isn’t all that different from the ESP32. Some of the GPIO and power pins are in different spots, but they’re close enough for evaluating purposes.
The ESP-WROOM-03 module equips the ESP31B with a 4MB SPI flash, all of the necessary passives, and a trace antenna. Here’s a breakdown of the GPIO and other breakouts on the ESP31B module. It gives you an idea of the chip’s GPIO breadth.
v01 of an ESP31B-WROOM-03 graphical datasheet. (Thanks for the Python script, Michelle!)
All of the GPIO and power pins are broken out to castellated vias on a 1mm pitch. Fortunately, Espressif also supplied us with a testbed…
ESP31B ESP-WROOM-03 module soldered on to the breadboard-compatible testbed.
…so I could solder it down and do a little breadboard prototyping.
Breadboarding with the ESP-WROOM-03 module soldered into a testbed.
Tips For Using the ESP31B Dev Board
If you’re lucky enough to have gotten a preliminary ESP32 dev board, but haven’t gotten around to powering it up yet, here are a few tips I would’ve loved to have handy when I started. There are plenty of links too, if you’re just interested in learning more about the chip.
Espressif is hosting the ESP32 Software Development Kit (SDK) on GitHub. Cloning that repository will set you up with libraries, source files and example code for the ESP32. It includes FreeRTOS, which isn’t required for your application, but sure does help a lot for more complicated projects.
This SDK is still in its extreme infancy – system functions, WiFi, and some of the peripheral interfaces are in there, but Bluetooth support is unfortunately missing for now.
Toolchain and Development Environment
After grabbing the SDK, you’ll need to set your machine up with an xtensa-esp108 toolchain – all of the executables required for compiling ESP32 firmware. Depending on your desired effort-level, you can either build the tools on your own, or try to find them pre-compiled.
If you want to compile the executables on your own, reading through the ESP32 SDK Readme is a good place to start. Personally – stuck on a Windows machine, and with limited cross-compiling experience – I sought out a pre-built toolchain. I’ve had good luck with this development kit. You may find other pre-built toolchains posted on the ESP32 forum.
After installing a GCC compiler for the ESP32, you may want to set up a development environment around the toolchain. Again, Espressif’s ESP32 SDK readme has some good information to help get you started. The Windows development kit I linked to above can be plugged into Eclipse, if you’re into that. For now, I’ve been working with Notepad++ and the command-line – I haven’t done anything complicated enough yet to warrant a full IDE.
And for those looking for a simpler development experience, there is plenty of hope for an Arduino-based ESP32 development environment! A lot of the system, GPIO, and WiFi function calls in the ESP32 SDK are exact matches for the ESP8266 API, so most of the library put into ESP8266 Arduino should translate over to the ESP32. In fact, check out GitHub/me-no-dev/ESP31B for a working, beta Arduino plugin (this forum post has more information on using it).
Example Hookup
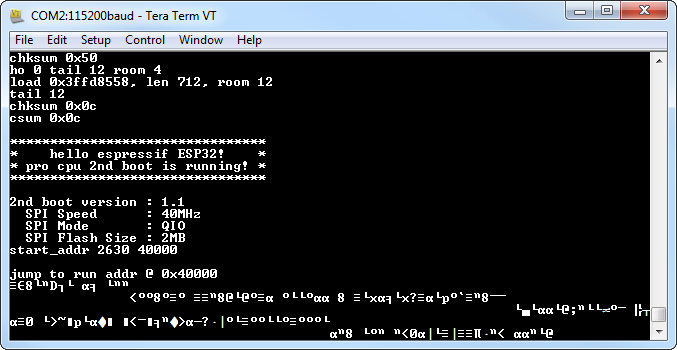
The ESP32’s recommended supply voltage is 3.0-3.6V and, in my experience, it needs a pretty hefty supply. Powering off both USB and a Power Cell (with 100mA and 200mA limits), I ran into sporadic start-up behavior. If you see garbage data in the terminal, and the application just halts after startup, you may be running into the same issue. It wasn’t until I switched to a battery-supplied LM1117 (with up to 1A throughput) that my ESP32 ran reliably.
Like the ESP8266, new code can be flashed to the ESP32 over a simple, serial interface. That means the only extra hardware you need is a USB-to-serial converter, like the 3.3V FTDI Basic. But you’ll also need some GPIO management, and a well-timed reset to program the chip. The ESP32 samples a few GPIO on startup to determine whether it’ll boot into run mode or download-new-code mode.
If you leave TXD0 (UART0’s TX pin), IO2, and IO5 floating, then IO0 determines the chip’s mode. I wired up an SPDT switch to toggle the state as I needed.
Here’s a quick diagram of my simple ESP32 hookup, including a reset button, run/program switch, and a status LED:
Example Phant Application
When I approach a new Internet-capable hardware platform, my go-to “Hello, world” application is to chuck something from the microcontroller up to data.sparkfun.com. So my first ESP32 program reads all eight values from ADC1, and sends them to a Phant stream – testing WiFi, lwIP, and all eight ADC channels of the chip’s ADC1.
I’ve thrown the source code into a ESP32 Miscellany GitHub repository, if you’d like to check it out. Be warned, though, it was my first time using lwIP to send and receive TCP packets – it may not be all that pretty, but it does the job.
There are still plenty of GPIO, hardware peripherals, and other features I need to play with (and a lot of those features are still missing from the SDK), but I’m enjoying the challenge and potential of the ESP32 so far.
For More Details: Sparkfun: First Impressions of the ESP32