
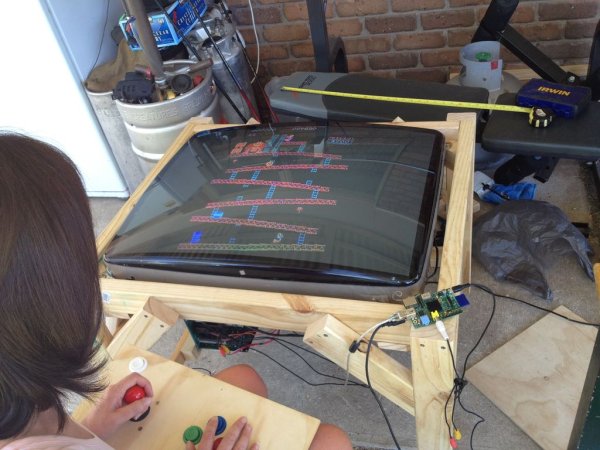
Here I will show you how I went about building my arcade machine that uses a Raspberry Pi running MAME to emulate games. As everyones setup will be different this will be general in nature but will hopefully supply enough information so you can get started yourself ! This is my first instructable but hopefully it will all go well. Enjoy
Step 1: Parts you need
– An old CRT television with an AV input
– A Raspberry Pi (any type should do)
– Strong timber for your CRT frame
– AV leads
– Arcade buttons and switches
– Joystick
– USB interface ( I got mine here, or make one here)
Many of the arcade specific pieces (buttons, joystick, interface etc. are available online, google is your friend here, shop around get the best price you can)
You will also need various tools, saws, drills etc. aswel as bits and pieces like screws and bolts. As everyones CRT will be different you'll need different amounts
Step 2: Getting MAME working
Step 3: USB Interface setup and Buttons
No I'm aware that the GPIO pins could be used as a means of hooking up the arcade buttons. However I opted for an interface that is designed to work around MAME i.e I'm lazy….. You can also make one if you have an old keyboard laying around
So this step will vary depending on the interface you get. Mine was pretty straightforward but you will need to follow the instructions yours comes with in regards to wiring, syncing it to MAME however should be the same for everyone. I found it easies to make a mock up controls pannel for my buttons and joystick fron a bit of 7mm plywood, drilled some 28mm holes (using a spade) and the buttons affixed into place. I then wired them up according to the wiring diagram I got with the interface. Plug in the USB lead and boot up your pi.
OK next….
Launch MAME (any rom will do) and hit the tab key. here you will find the options menu.
Select Input (general)
Select Player 1
Then all you do is scroll through using the arrow keys on your keyboard, hit enter and press the corresponding button, then hit the down key.
eg say you want so set the player 1 “up” button. highlight P1 UP, hit enter, push the joystick up (you should get some sort of response from MAME, it will put into the line highlighted something like j:trig or l;pinkie, so long as you get a response all is well.), then press the down key.
Do this for all your inputs, or just the inputs you need and test it. If you find that some of the pins don't work it might be MAME not recognising them, just change the pin and try again.
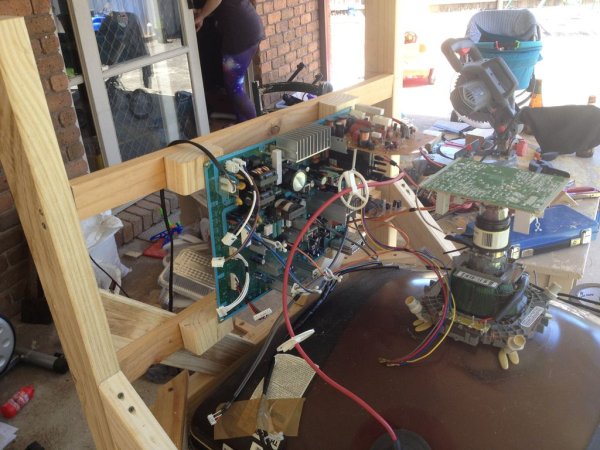
Step 4: Disassembly of CRT
I got my CRT from a hard rubbish recycling place for the grand sum of FREE ! Check your local paper and online trading sites (craigslist, gumtree, trading post etc.) you can usually get them free from people.
WARNING !! The following is for informational purposes only and do not attempt unless you have experience. Needless to say all this work was performed while the TV was UNPLUGGED.
CRT's use high voltage and if you don't disassemble it correctly you can seriously shock yourself (I have done it before and trust me I was lucky not to have been seriously injured oh and yes it hurts !)
Start by laying the TV down on a padded surface (a towel folded over a few times ontop of a wooden table works well). Take out as many screws as you can find, there may some snap lock clips and other things of that nature so I took my time when I did this, when all fittings and screws have been removed the shell can come off.
Safely discharge the CRT (if you don't know what this means then you shouldn't be doing this)
Remove any and all internal screws. Then proceed to remove the electronic components until all you have left is a bare CRT.
It's a good idea to take photos and mark things so that when you go to hook the CRT back up together you don't forget anything.
Step 5: Build a Frame for the CRT
For more detail: Turn an old CRT Television into a Raspberry Pi Powered MAME Cocktail Cabinet