The Raspberrypi board is powerful enough to run large operating systems like Linux, Mac and Windows. The Multi-tasking Operating Systems can run several processes at a time creating and effect of parallel processing with the help of the high speed processor. The Linux Operating Systems provides Multi-User-Multitasking. Linux operating systems especially Ubuntu is preferred for all kind of programming and development. The operating systems like Archlinux ARM, OpenELEC, Pidora, Raspbmc, RISC OS and the Raspbian and also Ubuntu versions are available for the Raspberrypi board.
The Raspberrypi is a board actually designed for helping computer education for remote schools but it is a good platform for programmers especially beginners to explore various coding techniques. The Raspberry pi board runs on the Broadcom controller chip which is a SoC (System on Chip). This SoC has the powerful ARM11 processor which runs on 700 MHz at its core. This powerful processor and the advanced controller peripherals make it a mini-computer.
In this project a Parent process creates so many Child process and controls them using the signals. The Parent process creates the Child processes using the fork () function. When the Parent calls the fork (), it always returns a positive value on success. The positive value which the Parent receives is the process-id of the newly created Child process. The Child process however get a value ‘0’ from the same fork () function call.Thus the Parent can store the process-id of each and every Child process that has been created. Using this process-id the Parent process can send a signal to a particular Child process with the help of the function ‘kill ()’. The kill () is a function defined in the header file <sys/signal.h> which can be used to send a specified signal to a specified process.
The list of all the available signals in the OS and their signal numbers can be obtained using the following command;
kill -l
The following table gives a list of the most common signals that a process might encounter in an Operating System;
| NAME | NUMBER | DESCRIPTION |
| SIGHUP | 1 | Linux sends a process this signal when it becomes disconnected from a terminal. |
| SIGINT | 2 | Linux sends a process this signal when the user tries to end it bypressing CTRL+C. |
| SIGILL | 4 | Linux sends a process this signal when it attempts to execute an illegal instruction. |
| SIGABRT | 6 | Linux sends a process this signal to the process when the process calls the ‘abort ()’ function |
| SIGFPE | 8 | Linux sends a process this signal when it has executed an invalid floating-point math instruction |
| SIGKILL | 9 | Linux sends a process this signal to end it immediately |
| SIGUSR1 | 10 | User programs can send this signal to other process |
| SIGUSR2 | 12 | User programs can send this signal to other process |
| SIGSEGV | 11 | Linux sends a process this signal when the program has attempted an invalid memory access |
| SIGPIPE | 13 | Linux sends a process this signal when the program has attempted to access a broken data stream, such as a socket connection that has been already closed |
| SIGALRM | 14 | A process can receive this signal from the Linux using the function alarm(), after a time period mentioned in its argument. |
| SIGTERM | 15 | Linux sends a process this signal requesting it to terminate |
| SIGCHLD | 17 | Linux sends a process this signal when a child process exits |
| SIGXCPU | 24 | Linux sends a process this signal when it exceeds the limit ofCPU time that it can consume. |
| SIGVTALRM | 26 | A process can receive this signal from the Linux using the function setitimer (), after a time period mentioned in its argument. |

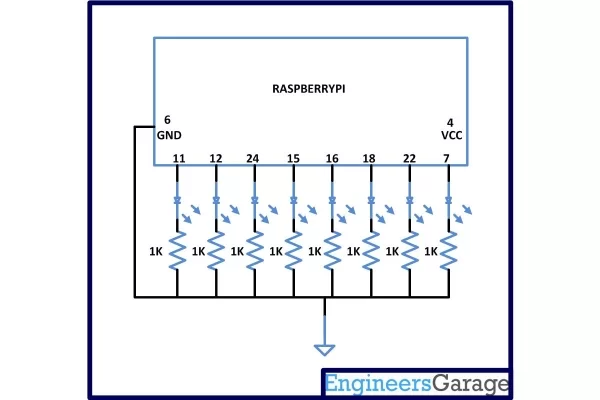
As soon as the Parent receives a ‘SIGUSR1’ signal from the user, it sends a ‘SIGUSR2’ signal to one of its Child process. The Child processes then changes the glowing state of the LED associated with it. This forms a Process System made up of several Child process and a Parent process and the entire system is controlled by the ‘SIGUSR1’ signal received by the Parent process.
The user can send two signals from the command line using the Keyboard shortcuts and they are SIGINT and the SIGQUIT. The SIGINT can be send by pressing the key CTRL+C and the SIGQUIT can be send by pressing the key CTRL+Y or CTRL + \. Any signals other than these require the ‘kill’ command to be used with the command line.

